background image

Installing the Controller In a Rack

Installing the Slide Rails

This section describes how to install the controller in a rack using the rack kits that are sold by Cisco.

To prevent bodily injury when mounting or servicing this unit in a rack, you must take special precautions to
ensure that the system remains stable. The following guidelines are provided to ensure your safety:

This unit should be mounted at the bottom of the rack if it is the only unit in the rack.

When mounting this unit in a partially filled rack, load the rack from the bottom to the top with the heaviest
component at the bottom of the rack.

If the rack is provided with stabilizing devices, install the stabilizers before mounting or servicing the unit in
the rack.

Statement 1006

Warning

Step 1

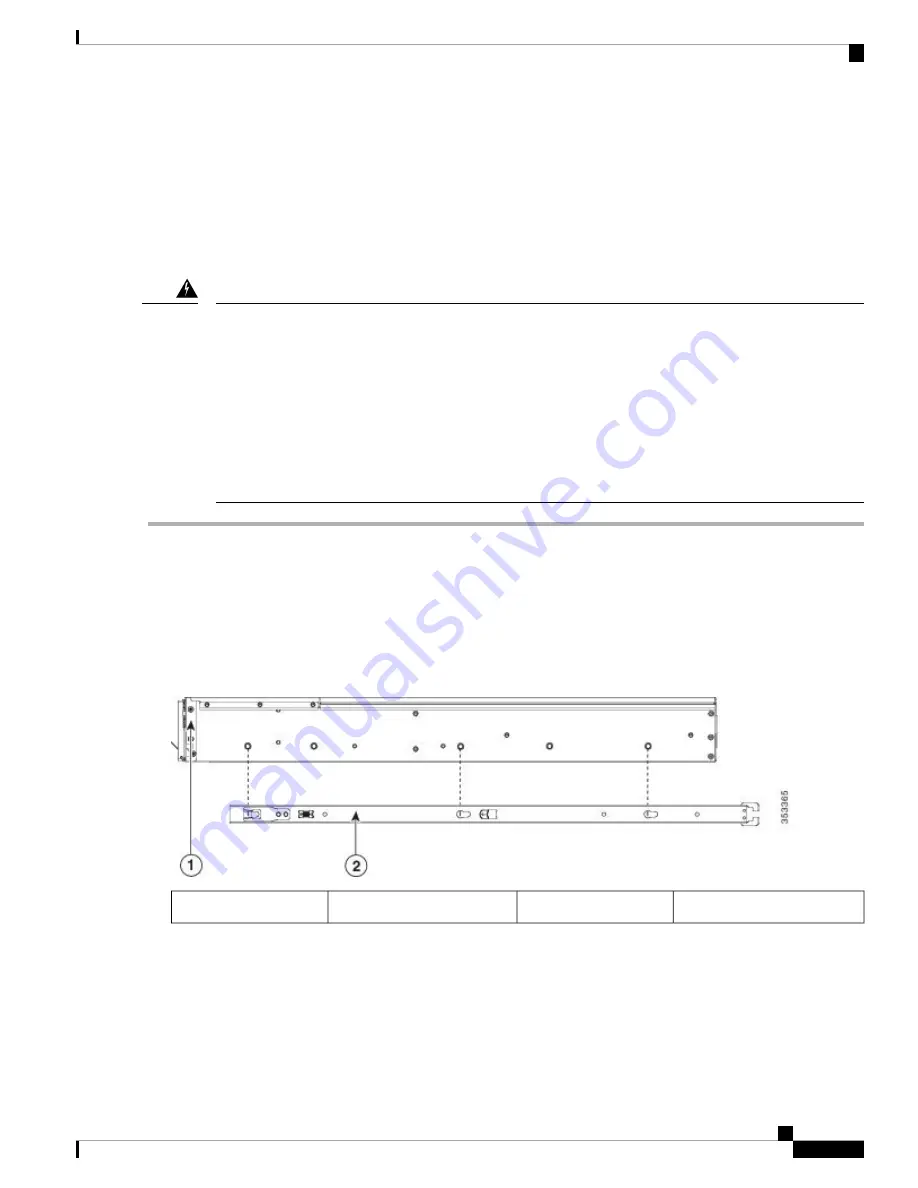
Attach the inner rails to the sides of the controller:

a) Align an inner rail with one side of the controller so that the three keyed slots in the rail align with the three pegs on

the side of the controller.

b) Set the keyed slots over the pegs, and then slide the rail toward the front to lock it in place on the pegs. The front slot

has a metal clip that locks over the front peg.

c) Install the second inner rail to the opposite side of the controller.

Figure 1: Attaching Inner Rail to Side of Controller

Locking clip on inner rail

2

Front of controller

1

Step 2

Open the front securing plate on both slide-rail assemblies. The front end of the slide-rail assembly has a spring-loaded
securing plate that must be open before you can insert the mounting pegs into the rack-post holes.

On the outside of the assembly, push the green arrow button toward the rear to open the securing plate.

Installing the Controller

5

Installing the Controller

Installing the Controller In a Rack

Содержание 8540 - Catalyst Campus Switch Router Modular Expansion Base

Страница 1: ...1071 Warning SAVE THESE INSTRUCTIONS Unpacking and Inspecting the Controller on page 1 Preparing for Controller Installation on page 2 Installing the Controller In a Rack on page 5 Initial Controller Setup on page 9 System BIOS and Cisco IMC Firmware on page 9 Unpacking and Inspecting the Controller When handling internal controller components wear an ESD strap and handle modules by the carrier ed...

Страница 2: ...tem to the power source Statement 1004 Warning This product relies on the building s installation for short circuit overcurrent protection Ensure that the protective device is rated not greater than 20A Statement 1005 Warning The plug socket combination must be accessible at all times because it serves as the main disconnecting device Statement 1019 Warning A readily accessible two poled disconnec...

Страница 3: ...rate it in an area that exceeds the maximum recommended ambient temperature of 40 C 104 F Statement 1047 Warning Invisible Laser Radiation Do not expose users of telescopic optics Class 1 1M Laser Products Statement 1055 Warning Invisible laser radiation may be emitted from the end of the unterminated fiber cable or connector Do not view directly with optical instruments Viewing the laser output w...

Страница 4: ...pes that use ferroresonant technology These UPS types can become unstable with systems such as the Cisco UCS which can have substantial current draw fluctuations from fluctuating data traffic patterns Caution Rack Requirements This section provides the requirements for the standard open racks The rack must be of the following type A standard 19 in 48 3 cm wide four post EIA rack with mounting post...

Страница 5: ...ttach the inner rails to the sides of the controller a Align an inner rail with one side of the controller so that the three keyed slots in the rail align with the three pegs on the side of the controller b Set the keyed slots over the pegs and then slide the rail toward the front to lock it in place on the pegs The front slot has a metal clip that locks over the front peg c Install the second inn...

Страница 6: ...the rack post e Attach the second slide rail assembly to the opposite side of the rack Ensure that the two slide rail assemblies are at the same height with each other and are level front to back f Pull the inner slide rails on each assembly out toward the rack front until they hit the internal stops and lock in place Step 4 Insert the controller into the slide rails This controller can weigh up t...

Страница 7: ...that is attached to the rack post see Figure 4 Attaching the Cable Management Arm to the Rear of the Slide Rails on page 8 Slide the tab over the end of the rail until it clicks and locks Step 2 Slide the CMA tab that is closest to the controller over the end of the inner rail that is attached to the controller see Figure 4 Attaching the Cable Management Arm to the Rear of the Slide Rails on page ...

Страница 8: ...sing the Cable Management Arm Optional Step 1 Rotate the entire CMA assembly 180 degrees The plastic cable guides must remain pointing upward Step 2 Flip the tabs at the end of each CMA arm so that they point toward the rear of the controller Step 3 Pivot the tab that is at the end of the width adjustment slider Depress and hold the metal button on the outside of the tab and pivot the tab 180 degr...

Страница 9: ...C firmware to the same version or the controller does not boot Do not power off the controller until the BIOS and Cisco IMC firmware are matching or the controller does not boot Cisco provides the Cisco Host Upgrade Utility to assist with simultaneously upgrading the BIOS Cisco IMC and other firmware to compatible levels Caution After the firmware is upgraded do not reset the system to factory def...

Страница 10: ...e Main page of the utility Note Step 2 Use the arrow keys to select the BIOS menu page Step 3 Highlight the field to be modified by using the arrow keys Step 4 Press Enter to select the field that you want to change and then modify the value in the field Step 5 Press the right arrow key until the Exit menu screen is displayed Step 6 Follow the instructions on the Exit menu screen to save your chan...

Отзывы: