background image

16

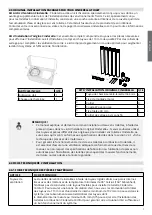
3.6 PANNEAU DE COMMANDE

Le panneau de commande affiche des messages lumineux, sonores et écrits pour la meilleure expérience 

d'utilisateur possible. Différentes combinaisons de signaux lumineux et sonores indiquent à l'utilisateur l'état du 

système. Il est important que tous les utilisateurs se familiarisent avec ces signaux avant toute utilisation. Vous 

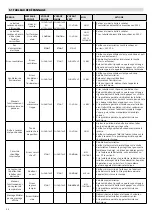
trouverez un résumé de tous les signaux lumineux et sonores dans le tableau de dépannage de la section 5.1.

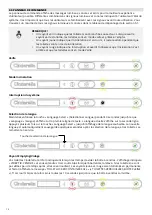
REMARQUE !

•  Un voyant vert indique que les toilettes sont branchées au secteur. Lorsque seul le 

voyant vert est allumé, les toilettes sont en mode veille et prêtes à l'emploi.

•  Un voyant jaune indique que l'incinération est en cours ; il restera allumé pendant que 

les toilettes sont en mode Incinération

•  Un voyant rouge indique une interruption et avertit l'utilisateur que l'incinération s'est 

arrêtée et que les toilettes sont en mode Veille.

Veille

Mode Incinération

Interruption du système

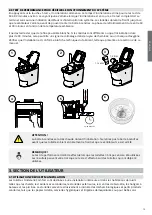
Sélection de la langue

Maintenez enfoncée la touche « Language Select » (Sélectionner Langue) pendant 3 secondes jusqu’à ce que 

« Language » (Langue) s’affiche sur la première ligne de texte. La langue actuelle s’affiche sur la seconde ligne. 

Appuyez plusieurs fois sur la touche « Language Select » jusqu’à l’affichage de la langue souhaitée. La nouvelle 

langue est automatiquement sauvegardée quelques secondes après la sélection de la langue, et les toilettes se 

remettent en service.

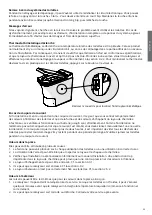
Voyant Emptying/Vidage

Vos toilettes Cinderella Comfort indiqueront lorsqu'il est temps de vider la boîte à cendres. L’affichage indiquera 

« 

VIDEZ TIR. CENDRE

 » et vous entendrez trois courts bips lorsque l’abattant sera relevé. Si les toilettes ne sont 

pas vidées peu de temps après, elles se verrouillent. Les voyants jaune et rouge seront allumés en permanence 

et l’écran affichera le message « TOILET LOCKED CONTAINER FULL » (« TOILETTES VERROUILLÉES, BOÎTE PLEINE 

»). Trois courts bips sont alors émis toutes les 10 secondes jusqu'à ce que la boîte à cendres soit vidée.

Touche de sélection de la langue

Содержание Comfort NA

Страница 1: ...CINDERELLA COMFORT MODEL COMFORT NA Product manual English Fran ais Document number D000782 Revision number 02 Cinderella Comfort NA Product Manual 01 01 2022...

Страница 2: ...SAFETY STRAP 12 2 8 CHECKLIST TO VERIFY THE COMPLETE INSTALLATION 12 2 9 PERFORMANCE TEST TO VERIFY THE SYSTEM FUNCTIONALITY 13 3 USER SECTION 14 3 1 INTENDED USE AND HANDLING 14 3 2 GENERAL SAFETY 1...

Страница 3: ...com 1 4 LIMITATION OF LIABILITY All information and guidance in these operating instructions have been prepared after taking into consideration the applicable standards and regulations as well as the...

Страница 4: ...perate the toilet with the pressure shown on the type plate on the back of the toilet WARNING Danger of crushing Do not place your hand on the hinge or underneath the toilet seat while open as there i...

Страница 5: ...nd receive a list of local dealers where you can obtain service and spare parts MANUFACTURER Appliance Specifications CINDERELLA COMFORT MODEL COMFORT NA SERIAL CINDERELLA ECO GROUP AS Sj vikvegen 67...

Страница 6: ...lbs 34kg INCLUDED ITEMS QTY Cinderella Comfort 1 Bowl liners 100 Product manual 1 2 2 MEASUREMENT SPECIFICATIONS 389 600 618 588 415 155 2 INSTALLATION SECTION 2 1 UNPACKING YOUR CINDERELLA INCINERATI...

Страница 7: ...1 SPECIFICATIONS PARTS AND MATERIALS ITEM SPECIFICATIONS Ventilation pipes The toilet must be installed with straight hard pipes with a smooth inner surface with a minimum temperature tolerance of 90...

Страница 8: ...r to plan and install your Cinderella Comfort appliance The inside of the ventilation pipe must be smooth and not embossed or grooved The elbow must be accessible when installed so that the drainage p...

Страница 9: ...t without a socket should be used on top of the flue pipes to connect to the flue cap DIAMETER VENT PIPE OUTLET DIRECTION REFERENCE BENDS MAXIMUM PIPE LENGTH IMPERIAL METRIC IMPERIAL METRIC 4 21 64 11...

Страница 10: ...ter 40 mm into the inlet terminal on the appliance NOTE When mounting the storm collar on the external wall make sure that the pipe is installed flush with the storm bottom of the storm collar Misplac...

Страница 11: ...local codes The correct voltage frequency and amperage must be supplied to the appliance from a dedicated grounded circuit which is protected by a properly sized circuit breaker The proper voltage fr...

Страница 12: ...in accordance with the appliance rating plate The flue pipe length is installed according to manufacturer specifications The flue termination is no less than 600 mm from the roof surface Safe draining...

Страница 13: ...utes depending on the ambient cooling temperature The end result should only be fine white dust Any end results deviating from this or an incineration time exceeding 90 minutes may indicate a restrict...

Страница 14: ...et CAUTION Young children must be supervised when they use Cinderella incineration toilets 3 3 SAFE OPERATIONS WARNING The ash container in the toilet will become very hot when the toilet is in use Ma...

Страница 15: ...dry and to reduce the external influences of temperature variations and moisture it may be wise to disconnect the toilet from the pipes for longer periods of non use Remember to always reinstall the...

Страница 16: ...omfort will indicate when it is time to empty the ash container The display will read EMPTY THE ASH CONTAINER and you will hear three short beeps when the toilet lid is opened If not emptied within a...

Страница 17: ...the toilet as usual If little waste is produced it may be helpful to pour some water into the bowl to add weight 6 Close the toilet lid 7 Push the Start button to drop the bowl liner and its contents...

Страница 18: ...COVER AND ASH CONTAINER WARNING Only operate the ash container when the toilet is cooled and in standby mode NOTE Please see the maintenance section for instructions regarding cleaning and emptying th...

Страница 19: ...ENGLISH 19 3 9 APPLIANCE ORIENTATION ID PART DESCRIPTION 1 Control panel w display 2 Lid 3 Seat 4 Ash container with insert 5 Front cover 6 Stop pin 7 Temperature safety 1 2 3 4 5 6 7...

Страница 20: ...characteristics when emptying the toilet Deviations in the end result may indicate the need for maintenance or service see section 4 1 4 1 END PRODUCT CHARACTERISTICS The residual waste or ashes will...

Страница 21: ...e sure that the grid power is connected Emptying the appliance without power will not enable the system to reset the use counter 4 2 2 STEAM CLEANING THE CATALYTIC CONVERTER Recommended frequency When...

Страница 22: ...se flammable cleaning agents to clean the bowl Some metal edges may be sharp The toilet needs to be cooled and in standby mode before cleaning the bowl CAUTION Do not use chlorine based cleaning agent...

Страница 23: ...e to be removed by rinsing the catalytic converter with hot water as described in section 5 3 2 4 2 5 CLEANING THE APPLIANCE FLUE TERMINAL Recommended frequency at least every 500 uses 1 The appliance...

Страница 24: ...system with hot water inspect the catalytic converter and perform steam cleaning in accordance with section 4 2 2 If the catalytic converter is still clogged or odour is still noticeable when inciner...

Страница 25: ...ss is ongoing during a power outage you may experience temporary odours from inside the toilet and smoke and odours from the flue pipe outside Since the incineration will not automatically restart whe...

Страница 26: ...Ash container out of position FLASHING FLASHING STEADY ON 3 BEEPS 1 2 3 Adjust the position of the ash container rotate to the left side Check that the stop pin on the container is intact Visually ch...

Страница 27: ...ial 12VDC 119x38mm 100154 7 Motor Nidec 12 24VDC 101177 8 Stop bracket 9x26x12mm 100017 9 Thermocouple assembly L 550mm 100831 10 Magnet 14x7mm 100065 11 Circuit board E5 100063 ID PART DESCRIPTION AR...

Страница 28: ...s one mounted on the top of the toilet frame to check that the hatch is in the desired open position and one mounted on the lower front end of the appliance ensuring that the hatch is in safe enclosed...

Страница 29: ...jection Material Changed date Appr by Tolerance 1 1 Wire diagram Cinderella Comfort NA 06 11 2020 3008 54 CE 0667 MA 0 1 A3 1 1 Draft OS 1 2 3 4 5 6 7 8 9 10 11 12 13 14 15 16 Fan Control panel Displa...

Страница 30: ...under this warranty Cinderella Eco Canada Ltd will either repair replace or refund the purchase price of your Cinderella Incineration Unit at its sole discretion How do I arrange a service To arrange...

Страница 31: ...ENGLISH 31...

Страница 32: ...ST DE PERFORMANCE POUR V RIFIER LE FONCTIONNEMENT DU SYST ME 13 3 SECTION DE L UTILISATEUR 13 3 1 UTILISATION PR VUE ET MANIPULATION 13 3 2 S CURIT G N RALE 14 3 3 FONCTIONNEMENT EN TOUTE S CURIT 14 3...

Страница 33: ...uctions contenues dans ce manuel Le manuel comprend galement des informations sur l entretien professionnel et toute autre information n cessaire la maintenance et aux r parations Une version num riqu...

Страница 34: ...situ e l arri re des toilettes ATTENTION Risque d accident par crasement Ne placez pas votre main sur la charni re ou sous le si ge et l abattant des toilettes pendant que celui ci est relev car il n...

Страница 35: ...s vente ou commander des pi ces de rechange INSCRIPTION My Cinderella Lorsque vous enregistrez vos toilettes dans l espace My Cinderella vous recevrez toutes les informations sur nos produits et syst...

Страница 36: ...t tuyau de ventilation 4 1 16 po 110mm Poids 75 livres 34kg ARTICLES INCLUS QT Cinderella Comfort 1 Sacs 100 Le manuel du produit 1 2 INSTALLATION 2 1 D BALLAGE DE VOS TOILETTES INCIN RATION CINDERELL...

Страница 37: ...de tuyaux flexibles pour installer la toilette Cinderella Comfort Pour assurer une bonne circulation d air nous vous recommandons d utiliser des tuyaux de 110 mm et d un diam tre interne minimum de 1...

Страница 38: ...eur pour organiser l installation de vos toilettes Cinderella Comfort La paroi int rieure du tuyau de ventilation doit tre lisse et non bossel e ou rainur e Le coude doit tre accessible apr s installa...

Страница 39: ...280 mm REMARQUE Le kit d installation original Cinderella comprend 5 tuyaux de 1066 mm utiliser sur la bouche de sortie les tuyaux sont livr s avec un connecteur et un joint pour une installation sim...

Страница 40: ...soit install au ras du bas du collier de solin Un mauvais placement peut restreindre la circulation d air avec pour cons quence une mauvaise incin ration une efficacit r duite et une surchauffe ventu...

Страница 41: ...La tension la fr quence et l intensit correctes doivent tre fournies aux toilettes l aide d un circuit s par mis la terre et prot g par un disjoncteur de la puissance appropri e La tension la fr quen...

Страница 42: ...muler Le tuyau de chemin e est install conform ment la fiche technique du fabricant Le chapeau du tuyau de chemin e est install conform ment la fiche technique du fabricant La sangle de s curit de tra...

Страница 43: ...etirer la bo te cendres La phase de refroidissement dure entre 60 et 90 minutes en fonction de la temp rature ambiante Il ne devrait rester que de la fine poussi re blanche Si les r sidus sont diff re...

Страница 44: ...duits de nettoyage base de chlore Lingettes base d alcool Journaux Serviettes en papier Liquides ou mat riaux inflammables Briquets Cigarettes ou cigares Essence Boissons alcoolis es Alcool ou alcool...

Страница 45: ...ons et emp cheront toute utilisation ult rieure si la bo te n est pas vid e apr s 120 utilisations Nous recommandons de la vider aussi souvent que possible pour assurer une incin ration plus efficace...

Страница 46: ...Veille Mode Incin ration Interruption du syst me S lection de la langue Maintenez enfonc e la touche Language Select S lectionner Langue pendant 3 secondes jusqu ce que Language Langue s affiche sur l...

Страница 47: ...s toilettes comme d habitude S il y a peu de d chets il peut s av rer utile de verser un peu d eau dans la cuvette pour ajouter du poids 6 Baissez l abattant 7 Appuyez sur la touche Start pour faire t...

Страница 48: ...S ATTENTION Manipulez la bo te cendres uniquement lorsque les toilettes sont en mode veille ou ont suffisamment refroidi REMARQUE Veuillez vous reporter la section sur l entretien pour consulter les i...

Страница 49: ...U DES TOILETTES ID DESCRIPTION DES PIECES 1 Panneau de commnde avec affichage 2 Abattant 3 Si ge 4 Bo te cendres avec bo tier interne 5 Panneau avant 6 Goupille de but e 7 Dispositif de s curit temp...

Страница 50: ...us lorsque vous videz les toilettes Tout cart par rapport aux r sidus normaux peut indiquer une n cessit d entretien ou de maintenance cf la section 4 1 4 1 CARACT RISTIQUES DES R SIDUS Les d chets ou...

Страница 51: ...anch es au secteur Si vous videz les toilettes lorsqu elles sont d branch es le syst me ne pourra pas r initialiser le compteur d utilisations 4 2 2 NETTOYAGE LA VAPEUR DU CATALYSEUR Fr quence recomma...

Страница 52: ...u elles sont de nouveau en mode veille 1 2 3 4 2 3 NETTOYAGE DE LA CUVETTE Fr quence recommand e lorsque cela est n cessaire pour assurer la propret et lors du vidage de la bo te cendres Nettoyage de...

Страница 53: ...TUYAU DE CHEMIN E DES TOILETTES Fr quence recommand e au moins toutes les 500 utilisations 1 Les toilettes devront tre d branch es du tuyau de chemin e et de la source d alimentation 2 Nettoyez le rac...

Страница 54: ...s et de rincer le syst me l eau chaude inspectez le catalyseur et effectuez un nettoyage la vapeur conform ment la section 4 2 2 Si le catalyseur est toujours bouch ou si vous sentez toujours une odeu...

Страница 55: ...toilettes et que de la fum e et des odeurs s chappent du tuyau de chemin e l ext rieur Le ventilateur fonctionnera sur batterie jusqu son refroidissement Comme l incin ration ne red marre pas automati...

Страница 56: ...te attendez que les toilettes aient refroidi le ventilateur s arr te red marrez les toilettes relevez l abattant lorsque la trappe s ouvre puis retirez manuellement les objets coinc s Si le probl me p...

Страница 57: ...1127 6 Ventilateur axial 12 V CC 119 x 38 mm 100154 7 Moteur Nidec 12 24V CC 101177 8 But e 9 x 26 x 12 mm 100017 9 Thermocouple L 550mm 100831 10 Aimant 14 x 7 mm 100065 11 Circuit imprim E5 100063 I...

Страница 58: ...e des toilettes pour v rifier que la trappe est dans la position ouverte souhait e et l autre mont sur l extr mit avant inf rieure de l appareil assurant que la trappe est en position ferm e s re Pend...

Страница 59: ...2 3 4 5 6 7 8 9 10 11 12 13 14 15 16 Fan Control panel Display Battery Temp sensor Lower hatch switch Upper hatch switch Ash container Lid Heater element Temp switch Mains cable Hatch motor Controlle...

Страница 60: ...ie Cinderella Eco Canada Ltd r parera remplacera ou remboursera vos toilettes s ches combustion Cinderella son enti re discr tion Service Pour le service de vos toilettes contactez Cinderella Eco Cana...

Страница 61: ......

Страница 62: ......

Страница 63: ......

Страница 64: ...Cinderella Eco Group AS Sj vikvegen 67 NO 6475 Midsund Norway www cinderellaeco com CINDERELLA S GLOBAL PRESENCE North America Greenland Africa China South Korea Nordic Region Europe Oceania...

Отзывы: