Christie FHD553-XU Скачать руководство пользователя страница 21

Ensure that the DP Out connector is not confused with the OPS DP Out connector. The DP Out
connector is used for daisy-chaining display panels. The OPS DP Out connector is used to connect a
second display panel to the installed OPS module (sold separately).

1. To daisy-chain video throughout a video wall using a single video source, connect the DVI,

HDMI or DisplayPort video source to the first display panel in the video wall.

2. Connect the remaining display panels using the DP out of the upstream display panel and the

DP In of the downstream display panel.

Connecting an RS232 or an Ethernet controller to a video
wall in landscape orientation

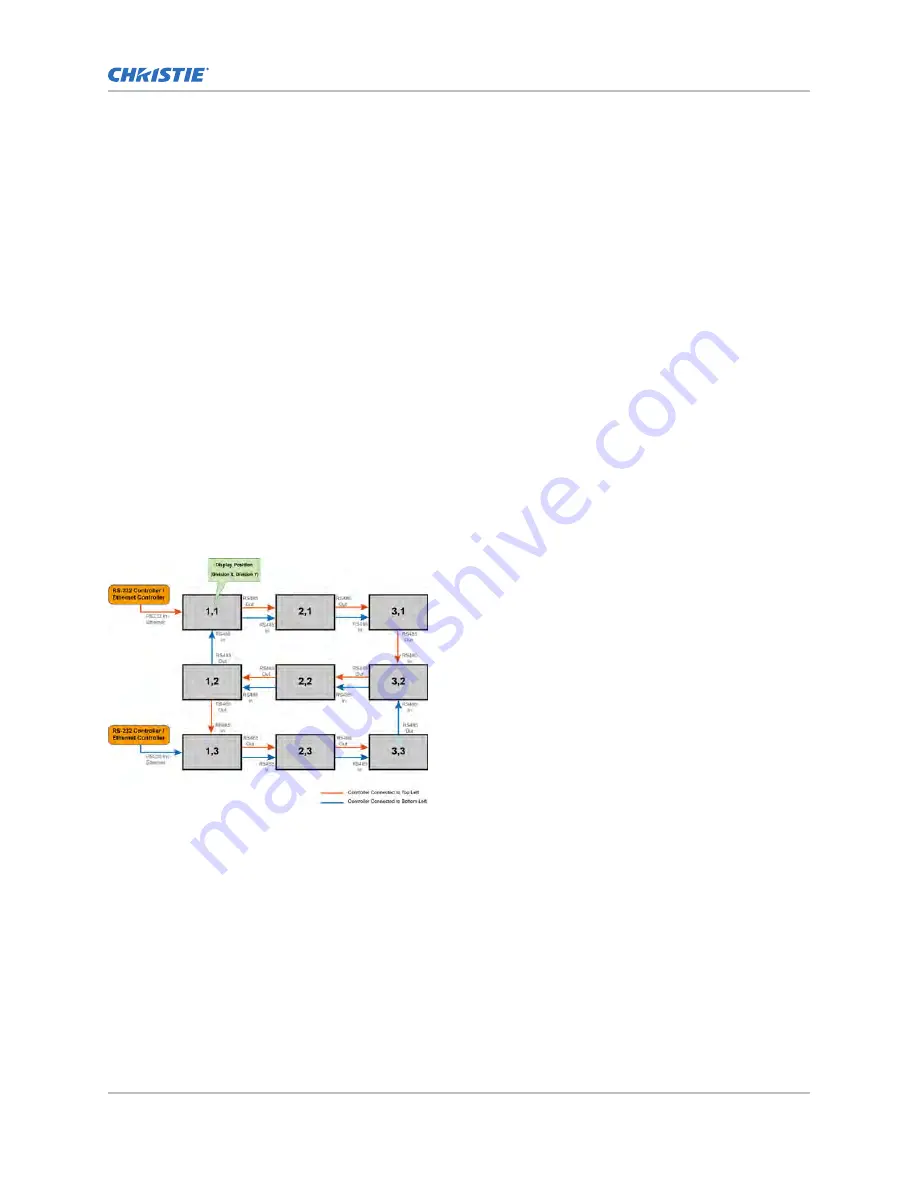
Complete the following steps to connect an RS232 or an Ethernet controller to a video wall in

landscape orientation.
It is not recommended that more than 25 display panels be daisy-chained together using the RS485
input and outputs. If you are working with a video wall that exceeds 25 display panels, consider
breaking the video wall into groups of 25 display panels or less, and then use separate RS232 or
Ethernet connections to control each group.
To control a video wall using the IR remote control, plug the IR extender into the first display panel in
the daisy-chain.

1. Connect the controller to the top-left or bottom-left display panel.
2. Connect the remaining panels as illustrated.

Connecting an RS232 or an Ethernet controller to a video
wall in portrait orientation

Complete the following steps to connect an RS232 or an Ethernet controller to a video wall in portrait

orientation.
It is not recommended that more than 25 display panels be daisy-chained together using the RS485
input and outputs. If you are working with a video wall that exceeds 25 display panels, consider
breaking the array in to groups of 25 display panels or less, and then use separate RS232 or Ethernet
connections to control each group.
When you create a video wall in portrait orientation, both the video source and the content must be
configured for use in a 9:16 format.

Installing a display panel

FHD553-XU User Guide

21

020-001248-02 Rev. 1 (04-2018)

Copyright 

©

 2018 Christie Digital Systems USA, Inc. All rights reserved.

Содержание FHD553-XU

Страница 1: ...User Guide 020 001248 02 FHD553 XU ...

Страница 2: ...esigned for outdoor use problems or damage caused by use of the product outdoors unless such product is protected from precipitation or other adverse weather or environmental conditions and the ambient temperature is within the recommended ambient temperature set forth in the specifications for such product g Image retention on LCD flat panels h Defects caused by normal wear and tear or otherwise ...

Страница 3: ... Connecting signal to the display panel 16 Connecting to an AC power source 17 Connecting a display panel to a control system or a computer 17 Creating an RS232 connection 17 Creating an Ethernet connection 18 Creating an IR extender connection 18 Connecting source components to a display panel 18 Connecting a DisplayPort source 19 Connecting an HDMI or a DVI D source 19 Connecting a VGA source 20...

Страница 4: ...e 27 Changing the image preset 27 Modifying the brightness 27 Changing the contrast 28 Sharpening the image 28 Changing the saturation 29 Adjusting the hue of the image 29 Changing the backlight 30 Changing the gamma settings 30 Calibrating the image 30 Setting the color temperature 30 Selecting the flesh tone 31 Turning off local dimming 31 Updating display settings 32 Configuring the display set...

Страница 5: ...he display does not turn on 40 No picture appears on the display 40 The remote control does not work 41 The image geometry is incorrect 41 The content is jittery or unstable 41 The image is too bright or lacks definition 41 The image appears washed out 42 The image is too dark 42 Images from the HDMI source do not display 42 Computer images do not display correctly 42 Specifications 44 Physical sp...

Страница 6: ...has been placed within the carton 1 Before unpacking prepare a stable level and clean surface near a wall outlet 2 Set the box in an upright position and pull out the white carton locks 3 Lift up the top cover carton 4 Remove the ESD bag before removing the display from the bottom tray carton 5 Remove any additional packaging such as protective stickers from the display panel FHD553 XU User Guide ...

Страница 7: ... UHD content 3840x2160 up to 16 display panels regardless of which digital input connector is used first Video wall resolution up to 3840x2160 UHD Displays native 4K content at 60 Hz on a 2x2 video wall for sources that support Multi Stream Transport MST Multi Stream Transport MST requires a video card that supports this feature and DisplayPort 1 2 Video signal looping Direct LED backlight Video W...

Страница 8: ... damage read and follow these safety precautions General safety precautions Observe these important safety rules to avoid personal injury or damage to the product Warning If not avoided the following could result in death or serious injury A minimum of two people or appropriately rated lift equipment is required to safely lift install or move the product Do not drop the product Do not apply excess...

Страница 9: ...e Only clean the components with Christie approved products AC power precautions Learn the safety precautions related to AC power Caution If not avoided the following could result in minor or moderate injury SHOCK HAZARD Disconnect the product from AC before installing moving servicing cleaning removing components or opening any enclosure Package handling FHD553 XU User Guide 9 020 001248 02 Rev 1...

Страница 10: ...esent off if the main power switch is set to Off 4 Keypad You can use the keypad instead of the remote control unit to operate the on screen display OSD controls The keypad operates as follows On Standby Press once to toggle from Standby mode to On mode Press it again to return to Standby mode SOURCE To select a source press the SOURCE button repeatedly with no menus visible on screen Right key Wh...

Страница 11: ...button to access the on screen display OSD controls or to exit the current menu and return to the previous one Input panel Learn the components of the display input panel 1 Kensington Lock Slot For use with a Kensington lock sold separately for securing the display panel 2 OPS slot An optional OPS slot for connecting an OPS module sold separately to display content Controls and functions FHD553 XU...

Страница 12: ...e 20 9 DP Out OPS A DisplayPort 1 2 and HDCP compliant digital video output for sharing content coming from an OPS module 10 Ethernet An RJ 45 connector for connecting to a computer or a home theater system over a wired Ethernet network 11 RS232 In A female 9 pin D sub connector for interfacing with a PC or a home theater automation or control system 12 RS485 In A female 8 pin RJ 45 connector that...

Страница 13: ...osition DISPLAYPORT Selects the DisplayPort source PIP Turns the PIP feature on or off OPS Selects the OPS source 5 P Source Selects the secondary sub source 6 Swap Swaps the main and PIP source 7 Navigation buttons MENU Opens the monitors on screen menu system If the menu is already open pressing this button selects the previous submenu Arrow Keys Navigate through submenus and settings Controls a...

Страница 14: ...sequence Full Screen Native Letter Box and 4 3 BRIGHT Adjusts the brightness CONTRAST Adjusts the contrast AUTO Automatically adjusts the VGA source SOURCE Selects each source in sequence Controls and functions FHD553 XU User Guide 14 020 001248 02 Rev 1 04 2018 Copyright 2018 Christie Digital Systems USA Inc All rights reserved ...

Страница 15: ...nsider the following Ensure that the battery polarities are correct Do not mix an old battery with a new one or mix different types of batteries together Do not expose batteries to excessive heat such as sunlight or fire If you will not use the remote control for a long time consider removing the batteries to avoid damage from battery leakage 1 On the back of the remote control press down on the t...

Страница 16: ...ll must be capable of supporting three times the weight of the display panel or be reinforced To ensure the mounting brackets clear any protrusions on the rear of the panel Christie recommends using spacers with a minimum height of 6 35 mm 25 in Mounting brackets may block access to the connector ports To ensure the preferred mount allows access to the connectors refer to the display panel line dr...

Страница 17: ...n how to create an RS232 an Ethernet or an IR extender connection Creating an RS232 connection A straight through RS232 cable with a 9 pin male connector is required 1 Connect the RS232 cable to the RS232 port on the display panel 2 Connect the RS232 cable to the control computer Installing a display panel FHD553 XU User Guide 17 020 001248 02 Rev 1 04 2018 Copyright 2018 Christie Digital Systems ...

Страница 18: ...o connect an IR extender cable to a display panel 1 Connect the IR extender cable to the IR extender input on the display panel 2 Place the extender cable receiver in a location that can be detected by the remote Connecting source components to a display panel Learn how to connect video sources to a display panel Installing a display panel FHD553 XU User Guide 18 020 001248 02 Rev 1 04 2018 Copyri...

Страница 19: ... and output can support daisy chaining up to four display panels Connecting an HDMI or a DVI D source Learn how to create a connection using an HDMI or a DVI D source 1 Do one of the following Connect an HDMI or a DVI to HDMI cable to the HDMI port on the display panel Connect a DVI D cable to the DVI D port on the display panel 2 Connect the cable to the control computer Installing a display pane...

Страница 20: ...er the following The DP Out connector on a display panel performs the same function as an external video splitter The DP Out connector functions as a repeater for all digital inputs including DVI In HDMI 1 In HDMI 2 In and DP In The DP Out connector does not support VGA In If your source is VGA you cannot daisy chain display panels together To daisy chain display panels connect a digital source to...

Страница 21: ...o wall into groups of 25 display panels or less and then use separate RS232 or Ethernet connections to control each group To control a video wall using the IR remote control plug the IR extender into the first display panel in the daisy chain 1 Connect the controller to the top left or bottom left display panel 2 Connect the remaining panels as illustrated Connecting an RS232 or an Ethernet contro...

Страница 22: ...the screen Avoiding image retention Image retention can occur when static content appears on the display panel for long periods of time Image retention is not covered under warranty To prolong the life of your display panel follow these recommendations Operate the display panel within its rated ambient environment Christie recommends an operating temperature of 5 to 40 degrees Celsius 41 to 104 de...

Страница 23: ... Turn on the IRFM setting Installing a display panel FHD553 XU User Guide 23 020 001248 02 Rev 1 04 2018 Copyright 2018 Christie Digital Systems USA Inc All rights reserved ...

Страница 24: ...NU on the remote control or keypad 2 Select Basic Settings OSD Location 3 Use the arrows to move the OSD menu to the desired location Setting the size of the on screen display Set the on screen display size 1 Press MENU on the remote control or keypad 2 Select Basic Settings OSD Zoom 3 Use the arrows to display a normal sized or enlarged OSD menu Rotating the on screen display Learn how to rotate ...

Страница 25: ... LED Learn how to change the behavior of the power LED 1 Press MENU on the remote control or keypad 2 Select Basic Settings Power LED 3 Use the arrows to change the behavior of the status indicator LED during standby mode On The LED lights orange to indicate that the display is in standby mode Off The LED is always off regardless of the operational state of the display Changing the date and time L...

Страница 26: ...me Settings on All Set the same power on and power off times for every day of the week Same Settings on Work Days Set the same power on and power off times for Monday through Friday 4 Select Enable for each day the schedule is active Configuring the on screen display FHD553 XU User Guide 26 020 001248 02 Rev 1 04 2018 Copyright 2018 Christie Digital Systems USA Inc All rights reserved ...

Страница 27: ...ss Brightness and contrast controls are interactive A change to one may require a subtle change to the other in order to achieve the optimum setting 1 Display a PLUGE Picture Line Up Generation Equipment test pattern PLUGE patterns vary but generally consist of some combination of black white and gray areas against a black background The example below includes two vertical bars and four shaded box...

Страница 28: ...ast to a point where the white rectangle starts to increase in size Sharpening the image Learn how to sharpen the image on a display panel 1 Select a test pattern similar to the one shown below 2 Press MENU on the remote control or keypad 3 Select Image Settings Sharpness 4 Use the arrows to adjust the sharpness Look for white edges around the transitions from black to gray and differently sized l...

Страница 29: ...f the image The hue or tint is the ratio of red to green in the color portion of the image When hue is decreased the image appears red when it is increased the image appears green Saturation and hue are interactive A change to one may require a subtle change to the other in order to achieve the optimum setting 1 Select a color bar test pattern and apply a blue filter 2 Press MENU on the remote con...

Страница 30: ... type Single Display Use when a single display panel is used by itself not as part of a video wall In this mode the display panel is calibrated to match the selected color temperature very closely Multi Display Use when the display panel is used as part of a video wall In this mode the display panel is finely calibrated to match adjacent displays When display panels are used as part of a video wal...

Страница 31: ... dimming is set to On Local dimming automatically adjusts areas of the LCD backlight to create deeper black levels and higher contrast To avoid an overly dark image when displaying content that includes fine details on a black background turn this feature off 1 Press MENU on the remote control or keypad 2 Select Image Settings Local Dimming 3 Select Off Adjusting the image FHD553 XU User Guide 31 ...

Страница 32: ...screen presentation with some distortion or cropping To change the aspect ratio complete the following 1 Press MENU on the remote control or keypad 2 Select Display Settings Aspect Ratio 3 Use the arrows to select the Full Screen default 4 3 Letterbox or Native aspect ratio Setting the zoom level Learn how to update the zoom level setting 1 Press MENU on the remote control or keypad 2 Select Displ...

Страница 33: ...emote control 2 When the PIP Input Source table appears use the arrow keys to select a source If a source cannot be used for PIP mode a dash appears for that source in the table Setting the picture in picture position Learn how to set the picture in picture position 1 Press MENU on the remote control or keypad 2 Select Display Settings PIP Position 3 Use the arrows to select the position of the Pi...

Страница 34: ...helps to ensure that the image quality is consistent across the screen that the aspect ratio is maintained and that the pixel phase can be optimized 1 Press MENU on the remote control or keypad 2 Select Advanced Settings Clock 3 Adjust the slidebar until the image stabilizes Adjusting the phase VGA sources Christie recommends that you adjust the phase after you adjust the clock The Phase control a...

Страница 35: ...from power saving mode when it receives an active video signal on its VGA analog input VGA Digital RS232 The display panel wakes up from power saving mode when it receives an active signal from its VGA HDMI DisplayPort or DVI inputs or when it receives a valid RS232 command Never Sleep The display panel never enters power saving mode Configuring Ethernet settings Learn how to configure network set...

Страница 36: ...al display spanning the full video wall The Multi Display Control also allows you to control other features such as the removal of the geometric effect of the LCD bezels Before using the Multi Display Control consider the following The largest video wall size supported by the Multi Display Control is 10x10 or 100 display panels If a video wall exceeds this size use an external video wall controlle...

Страница 37: ...led moving objects in a video move behind the gap This allows for better continuity of motion across the video wall and is suitable for moving images When disabled joints between the display panels are shown This is suitable for still images Matrix X Specifies the number of columns in a video wall Matrix Y Specifies the number of rows in a video wall Division X Specifies the horizontal position co...

Страница 38: ...anced Settings DisplayPort MST 3 Use the arrows to enable DisplayPort MST Disabling the OPS Always Powered setting Learn how to turn off the OPS Always Powered setting 1 Press MENU on the remote control or keypad 2 Select Advanced Settings OPS Always Powered No Performing a factory reset Learn how to restore all display settings including image settings to their factory defaults This action is not...

Страница 39: ...ment or to match the color temperature of studio lighting To attain the highest quality image Christie recommends the following image settings for low light environments Image setting Recommended range Backlight 25 or higher Contrast 40 or higher Color Temperature 5000K or higher Updating display settings FHD553 XU User Guide 39 020 001248 02 Rev 1 04 2018 Copyright 2018 Christie Digital Systems U...

Страница 40: ...er switch is off The remote control batteries have run out Resolution Ensure that the display is plugged in and that the power outlet is active Set the main power switch to the on position Replace the batteries No picture appears on the display The display is on and the menus appear but there is no picture on the panel Details Possible causes for this issue include Incorrect source selection Sourc...

Страница 41: ...o Resolution Select a different aspect ratio The content is jittery or unstable The content on the display panel is poor quality or the panel is improperly connected to the source In some cases the horizontal or vertical scan frequency of the input signal may be out of range for the display panel Resolution Verify that the source is properly connected Correct the quality of the content The image i...

Страница 42: ...in the computer are not compatible with the display HDMI cable from source to display is either defective or too long Resolution Select a compatible resolution and vertical frequency Try a known good and or shorter HDMI cable Computer images do not display correctly Images that originate from a computer source do not display correctly on the panel Details Possible causes for this issue include The...

Страница 43: ...ct a compatible resolution and vertical frequency Adjust Clock and Phase settings Troubleshooting FHD553 XU User Guide 43 020 001248 02 Rev 1 04 2018 Copyright 2018 Christie Digital Systems USA Inc All rights reserved ...

Страница 44: ... 178 V 178 Response time 8 ms typical Supported colors 1 07 billion Display resolution 1920 x 1080 16 9 Display frame rate 60 Hz Rotation Landscape Portrait Control RS232C Ethernet built in keypad IR remote control OSD Language English Simplified Chinese French German Italian Portuguese Russian Spanish Korean Japanese Picture options PIP PBP side by side Source auto detect Yes Key lock Yes Horizon...

Страница 45: ...ons for the FHD553 XU panel Description Details Operating temperature 5 C 35 C 90 RH Storage temperature 20 C 60 C 75 RH Heat output 550 BTU hr typical 738 BTU hr maximum non OPS Supported timings Learn the supported timings for FHD553 XU panels Compliant timing Compliant timing for a video wall Timing FH kHz FV Hz Dot clock MHz HDMI VGA DVI DisplayPort VGA 640x480 31 469 59 94 25 175 37 861 72 80...

Страница 46: ... 59 81 83 SXGA 1152x864 67 5 75 108 SXGA 1280x1024 63 981 60 02 108 79 976 75 025 135 91 146 85 024 157 5 1440x900 55 469 59 901 88 75 55 935 59 88 106 5 WSXGA 1680x105 0 64 674 59 883 119 65 29 59 954 146 25 VESA UXGA 1600x1200 75 60 162 VESA 1920x1080 66 587 59 93 138 5 VESA WUXA 1920x1200 74 038 59 95 154 EDTV 480p 31 5 60 27 03 EDTV 576p 31 25 50 27 HDTV 720p 1280x720 37 5 50 74 25 44 995 59 9...

Страница 47: ...716 59 94 74 176 33 75 60 74 25 HDTV 1080p 1920x1080 27 24 74 25 56 25 50 148 5 67 433 59 94 148 352 67 5 60 148 5 4K2K 3840x2160 54 24 297 56 25 25 297 67 5 30 297 Specifications FHD553 XU User Guide 47 020 001248 02 Rev 1 04 2018 Copyright 2018 Christie Digital Systems USA Inc All rights reserved ...

Страница 48: ...quirements and electromagnetic compatibility EMC Safety CAN CSA C22 2 No 60950 1 07 Information Technology Equipment Safety Part 1 General Requirements ANSI UL 60950 1 Information Technology Equipment Safety Part 1 General Requirements Specifications FHD553 XU User Guide 48 020 001248 02 Rev 1 04 2018 Copyright 2018 Christie Digital Systems USA Inc All rights reserved ...

Страница 49: ...licable official amendment s EU Regulation EC No 1907 2006 on the registration evaluation authorization and restriction of chemicals REACH and the applicable official amendment s EU Directive 2012 19 EU on waste and electrical and electronic equipment WEEE and the applicable official amendment s China Ministry of Information Industry along with 7 other Government Agencies Order No 32 01 2016 on th...

Страница 50: ...lic of South Africa ph 27 0 11 510 0094 Korea Seoul ph 82 2 702 1601 Japan Tokyo ph 81 3 3599 7481 India ph 91 080 6708 9999 Germany ph 49 2161 664540 France ph 33 0 1 41 21 44 04 Russian Federation and Eastern Europe ph 36 0 1 47 48 100 China Shanghai ph 86 21 6278 7708 China Beijing ph 86 10 6561 0240 Brazil ph 55 11 2548 4753 Australia ph 61 0 7 3624 4888 Worldwide offices Italy ph 39 0 2 9902 1...

Страница 51: ......

Отзывы: