background image

Adjusting the image

Learn how to adjust image geometry so it displays correctly.

Correcting keystone effect

Learn how to adjust the image to correct keystone effect.
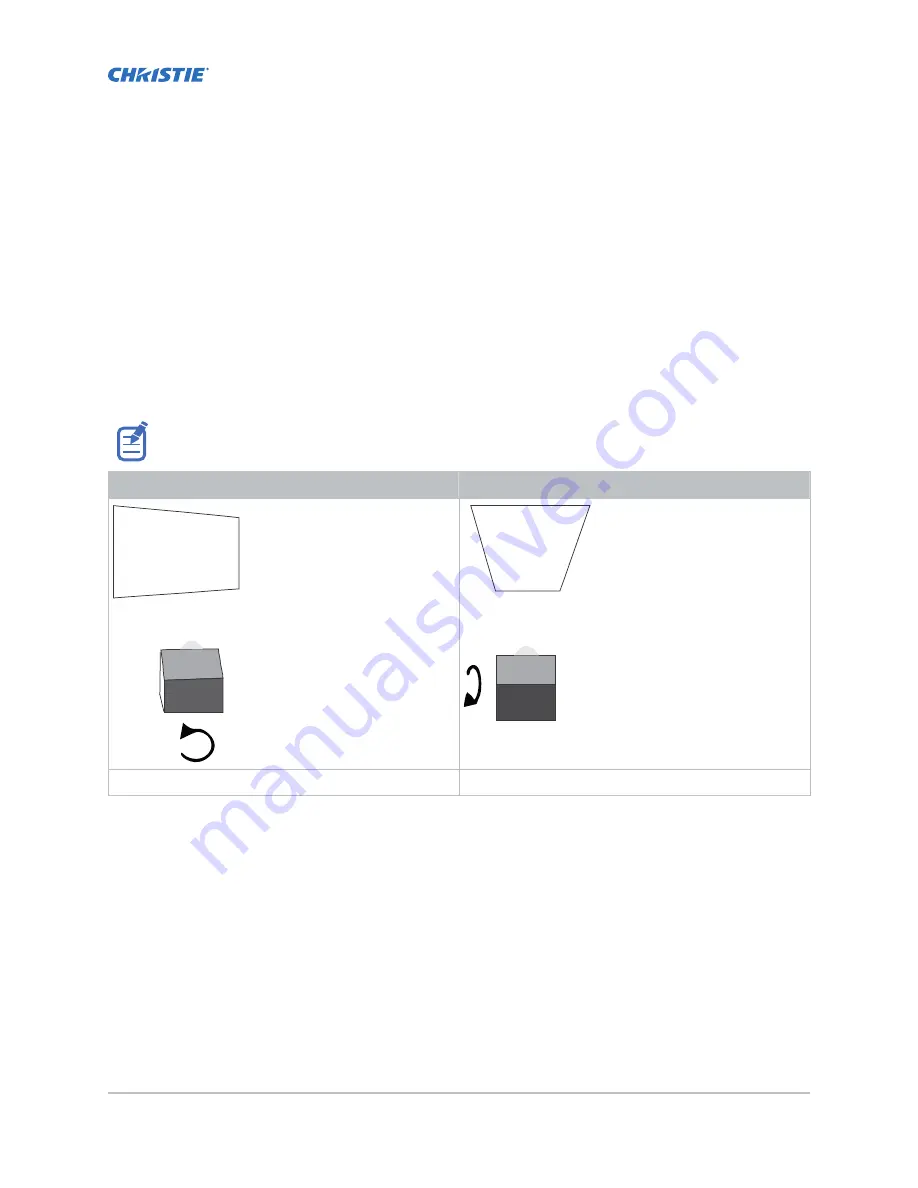
Keystone effect occurs when you project an image onto the screen at an angle. As a result, the image
appears distorted and resembles a trapezoid.

When making the adjustments, set the light source to minimum power.

Horizontal keystone

Vertical keystone

Projector skewed horizontally to the screen

Projector tilted vertically to the screen

1. If the image suffers from slight keystone effect, it can be corrected with electronic cropping.
2. If the keystone effect is severe, you can unevenly adjust the feet to compensate for projector

tilt.
It is recommended that you use lens offset to align the center of the image to the center of the
screen before you correct the keystone effect.

3. If one side of the image is longer than another, adjust the tilt and level of the projector.

Correcting dual projector horizontal keystone

Learn how to correct horizontal keystone.

1. On both projectors, turn the light source on and open the douser (on page 24).


CP2208 User Guide

28

020-101916-03 Rev. 1 (12-20120)

Copyright 

©

 2020 Christie Digital Systems USA, Inc. All rights reserved.

Содержание CP2208

Страница 1: ...User Guide 020 101916 03 CP2208 ...

Страница 2: ...amages in connection with the performance or use of this material Manufacturing facilities in Canada and China are ISO 9001 certified Manufacturing facilities in Canada are also ISO 14001 certified Warranty Products are warranted under Christie s standard limited warranty the details of which are available at https www christiedigital com help center warranties or by contacting your Christie deale...

Страница 3: ...ble 产接产产 产 X O O O O O Ignitor 点火器 X O O O O O Illumination optics system 照明光学系产 X O X O O O Integrated Cinema Processor 集成产理板 X O O O O O Internal Motor Control Board 内部产机控制板 X O O O O O Lamp 灯泡 X O O O O O Line filter 产波器 X O O O O O Low voltage power supply 低产产源 X O O O O O Mechanical enclosure 机械附件 X O O O O O Motorized intelligent lens mount optional 智能产产产产架 产产件 X O O O O O Projection lens 投影...

Страница 4: ...said hazardous substance contained in at least one of the homogeneous materials used for this part is above the limit requirement of GB T 26572 表示产有害物产至少在产部件的某一均产材料中的含有超出 GB T 26572 产定的限量要求 This part uses metallic alloys which may contain Lead 因产部件使用金属合金材料 故可能含有产 ...

Страница 5: ...onnecting the projector to a computer 21 Turning the projector on 22 Logging on to the projector 22 Activating marriage 22 Adding or modifying projector communication settings 22 Adding the lamp information to the lamp history 23 Turning the lamp on 24 Aligning the lamp 24 Adjusting the image to fit the screen 24 Aligning dual projector images 25 Playing content 26 Adjusting the image 28 Correctin...

Страница 6: ...e Digital Light Processing 39 Running a Digital Light Processing self test 39 Downloading an integrated cinema processor certificate 40 Disabling the integrated cinema processor signature test 40 Managing lamp information 41 Creating a new lamp file 41 Modifying an existing lamp file 42 Enabling or disabling LiteLOC on a lamp file 42 Adjusting lamp power 42 Changing the lamp power percentage 42 Vi...

Страница 7: ... Resetting the lens position on projector startup 53 Completing a full lens calibration 53 Resetting the intelligent lens system and the lens position 54 Scheduling events 55 Scheduling the projector to turn on or off 55 Editing a scheduled event 55 Deleting a scheduled event 56 Deleting all scheduled events 56 Turning off the scheduler 56 Viewing and modifying projector settings 57 Setting projec...

Страница 8: ...or files 65 Test patterns 66 Adding or removing preferred test patterns 66 Turning a test pattern on or off 66 Displaying a full screen test pattern 66 Viewing 3D content 67 Display requirements 67 3D sync terminal pin map 67 Setting up hardware 68 Creating a high frame rate 3D file 69 Editing the default 3D lamp file 70 Defining a measured color gamut data file 70 Editing the 3D flat 1998 x 1080 ...

Страница 9: ...jector does not turn on 82 Cannot establish communication with projector 82 Lamp functionality 82 Lamp does not ignite 82 Lamp suddenly turns off 83 LiteLOC not working 83 Display issues 83 Flicker shadows or dimness 83 Blank screen with no display of cinema image 83 Severe motion artifacts 84 Image is vertically stretched or squeezed 84 Inaccurate display colors 84 Display is not rectangular 84 D...

Страница 10: ...tions 87 Power specifications 87 Environmental specifications 88 Display specifications 88 Control signal compatibility 89 Touch panel controller specifications 90 Lamp specifications 90 Accessories 91 Regulatory 92 Safety 92 Electro magnetic compatibility 92 Environmental 92 Content CP2208 User Guide 10 020 101916 03 Rev 1 12 20120 Copyright 2020 Christie Digital Systems USA Inc All rights reserv...

Страница 11: ... death or serious injury TRIP OR FIRE HAZARD Position all cables where they cannot contact hot surfaces be pulled be tripped over or damaged by persons walking on or objects rolling over the cables This product must be installed within a restricted access location not accessible by the general public Only personnel who are trained on the precautions for the restricted access location can be grante...

Страница 12: ... Warning If not avoided the following could result in death or serious injury EXPLOSION HAZARD Lamps and bare bulbs even when packaged may explode if dropped or mishandled EXPLOSION HAZARD Always wear manufacturer approved protective safety clothing gloves jacket face shield whenever the lamp door is open or when handling the lamp Any local or federal specifications take precedence over Christie s...

Страница 13: ...ower cord and AC receptacle C Light source access door Lifting and positioning the projector Safely lift and position the projector in the location where it will be used Warning If not avoided the following could result in death or serious injury Do not install or operate the projector in any position that does not meet the stated product specifications for alignment and orientation Position the p...

Страница 14: ...destal must remain horizontal If you require tilt to align your images you must tilt the projectors and not the rack stand or pedestal 1 On the bottom projector remove the four corner screws securing the top lid 2 Position a single stacking cup 011 104349 XX over one of the empty screw holes so the higher side of the cup faces outward and aligns with the projector skin Installing and setting up CP...

Страница 15: ...each of its feet fit into a stacking cup The lenses of both projectors must face the same direction and the optical axis of both projector lenses must be parallel A and align vertically B 7 Install both projectors a Install the touch panel controller b Install the lens c Install the lamp d Connect devices to the projector e Connect power f Adjust the bottom projector image to fit the screen Instal...

Страница 16: ...t steps a and b to install the three remaining locking brackets Adjusting tilt and leveling the projector To ensure optimum performance install the projector so it is centered and parallel with the screen To compensate for tilt or offset you can adjust the projector feet and the lens mount position 1 To adjust the height of the projector loosen the lock nut on the adjustable feet on the bottom of ...

Страница 17: ...ield whenever the lamp door is open or when handling the lamp Any local or federal specifications take precedence over Christie s protective clothing recommendations Do not open the lamp door while the lamp is on EXPLOSION HAZARD Allow sufficient time for the lamp to cool down before powering down the product disconnecting it from AC and opening the lamp door EXPLOSION HAZARD Lamps and bare bulbs ...

Страница 18: ... nut make sure the anode wire does not touch any projector metal such as the reflector or firewall d Tighten the extension nut screw e Move to step 13 12 For CDXL 19SC or CDXL 21S1 lamps a Hold the anode end of the new lamp in your left hand and angle it up through the hole in the back of the reflector assembly b Insert your right index and middle finger through the back of the reflector and guide...

Страница 19: ...ll the product near an easily accessible AC receptacle For products containing surge suppressors you must adhere to the installation and power requirements Installation and Power Requirements The protected earth wire must be green yellow 12 AWG minimum You must use a 20A branch circuit breaker for Input A 1 If the projector is operating turn it off and disconnect it from AC power 2 Loosen the thre...

Страница 20: ...MTST FMT FPGA State Indicates the state of the FMT FPGA circuit During normal operation the LED is green When the power is turned on the LED turns green immediately ICPST ICP FPGA State Indicates the configured state of the ICP FPGA circuit During normal operation the LED is green When the power is turned on the LED turns green immediately C PORT B Indicates the status of the USB port A green LED ...

Страница 21: ... this button only when the TPC is unavailable G Resets the projector electronics After restarting the projector returns to its previous power mode You must turn on the light source manually H Connects the projector to 3D devices I Connects the projector to Christie or third party automation equipment J Connects the projector to a 10Base T 100Base TX Ethernet connection K Connects the projector to ...

Страница 22: ...age remotely In addition an authorized employee must be physically present to verify that the anti tamper seal on the card firewall is unbroken the projector is unaltered and to tap the marriage button on the card cage faceplate 1 On the touch panel controller TPC log on to the projector on page 22 with marriage permissions 2 Tap Menu Service Setup 3 Complete the Marriage wizard 4 Tap Finish 5 Ver...

Страница 23: ...USB flash drive Apply Applies SNMP settings Serial Access Grants access to serial connections Ethernet Access Grants access to Ethernet connections Adding the lamp information to the lamp history 1 If the lamp is on select Lamp Off to turn it off 2 Select Menu Advanced Setup Lamp Change Wizard 3 Select Next 4 Complete these fields Field Description Type The lamp type Serial Number The lamp serial ...

Страница 24: ...d X axis 2 Complete a fine lamp adjustment a Locate the Y axis adjustment label on the operator side of the projector b Insert a 5 mm hex driver through the louvers at an angle below the Y axis adjustment label until it is firmly seated on the Y axis adjustment screw c Turn the screw slowly clockwise or counterclockwise until you determine the highest value d Remove the hex driver and repeat steps...

Страница 25: ...t Full Screen White test pattern on page 66 12 If the test pattern is focused and centered on the screen you do not need to complete further image adjustment If the image is not focused and centered on the screen complete one of these procedures a If the image appears distorted and resembles a trapezoid correct the keystone effect b If the image is brighter at the center than it is at the sides co...

Страница 26: ...and centered on the screen you do not need to complete further image adjustment If the image is not focused and centered on the screen complete one of these procedures a If the image appears distorted and resembles a trapezoid correct the keystone effect on page 28 b If the image is brighter at the center than it is at the sides correct vignetting on page 30 or align the lamp on page 24 c If a cor...

Страница 27: ...y encrypted content a Install an Integrated Media Block IMB b Connect the projector to a network attached storage NAS or direct attached storage DAS device Installing and setting up CP2208 User Guide 27 020 101916 03 Rev 1 12 20120 Copyright 2020 Christie Digital Systems USA Inc All rights reserved ...

Страница 28: ... image suffers from slight keystone effect it can be corrected with electronic cropping 2 If the keystone effect is severe you can unevenly adjust the feet to compensate for projector tilt It is recommended that you use lens offset to align the center of the image to the center of the screen before you correct the keystone effect 3 If one side of the image is longer than another adjust the tilt an...

Страница 29: ... touch panel select the Lens Adjust icon on the main screen and then select the left or right arrow icons in the Offset area to bring the vertical lines closer together 11 If required on each projector select the Lens Adjust icon and then select the left and right focus icons in the Focus area until both images are the same size and focused Correcting dual projector vertical keystone Learn how to ...

Страница 30: ...ng the lens Caution If not avoided the following could result in minor or moderate injury This procedure must be performed by Christie qualified technicians Ensure that the projector is perpendicular to the screen before adjusting boresight Christie recommends that you complete a top and bottom boresight adjustment before adjusting the horizontal boresight A boresight adjustment should only be mad...

Страница 31: ... and focusing the lens Caution If not avoided the following could result in minor or moderate injury This procedure must be performed by Christie qualified technicians Typically horizontal boresight does not require adjustment It should only be adjusted if a large horizontal angular offset to the screen is required When adjusting boresight you must maintain the boresight distance from the lens to ...

Страница 32: ... the optical system to correct an image with missing or shadowy corners or edges 1 Remove the top cover 2 Display the RGB 12bit Full Screen White test pattern 3 Insert a hex driver in the first set screw and a hex driver in the first cap screw 4 Equally turn the set screw and cap screw in opposite directions until the black corner is removed 5 If the black corner remains insert a hex driver in the...

Страница 33: ...age C Masking moved up D Top masking to hide screen top 2 To create side masking a Install movable flat black panels or curtains along each side of the screen b Close the curtain for flat images or open the curtain and zoom for scope images Side masking theater 2 39 screens Adjusting the image CP2208 User Guide 33 020 101916 03 Rev 1 12 20120 Copyright 2020 Christie Digital Systems USA Inc All rig...

Страница 34: ...alibration wizard when calibrating screen brightness 1 Turn the light source on and allow it to operate for 20 minutes 2 On the touch panel controller tap Menu Administrator Setup Foot Lamberts Calibration 3 Complete the Foot Lamberts Calibration wizard Adjusting the image CP2208 User Guide 34 020 101916 03 Rev 1 12 20120 Copyright 2020 Christie Digital Systems USA Inc All rights reserved ...

Страница 35: ...atus Status LED Displays a green yellow or red LED A green LED indicates that the projector is operating properly If a monitored system falls below a normal reading the LED is yellow or red A yellow LED indicates a warning and a red LED indicates a critical error that you must correct Select the status LED to open the Status window and resolve issues Preferred channels Channel buttons Displays cus...

Страница 36: ...ust correct Select the status LED to open the Status window and resolve issues Bottom bar Menu Select the Menu button to access projector menus Status icons These icons change as these elements update from changes on the projector The current time also displays Select test pattern Select the Select Test Pattern icon to open the Preferred Test Patterns window and select a test pattern to display Lo...

Страница 37: ... assist Christie service technicians diagnose and correct projector issues Image disruption can occur if you run the interrogator during a show When you run the interrogator you cannot modify projector settings Log files are compressed into a 7z or 7 zip file format A tool for opening these archives can be downloaded from http www 7 zip org 1 On the touch panel controller TPC log on to the project...

Страница 38: ...alarm occurs an Alarms window with a red border appears with a description of the alarm condition state and time and date of the alarm The window only displays alarms you have not previously acknowledged 1 To acknowledge an alarm and remove it from the Alarms window select Acknowledge 2 To view all alarms in the left pane select Menu Status All Alarms Turning the projector off Complete the followi...

Страница 39: ...s from the screen try resetting the Digital Light Processing DLP before restarting the projector Do not reset the DLP if content is playing 1 On the touch panel controller TPC log on to the projector on page 22 with administrator or service permissions 2 Select Menu Diagnostics DLP Management 3 Select Reset DLP 4 Select Yes 5 If an alarm appears select Acknowledge Running a Digital Light Processin...

Страница 40: ...t 3 Select Menu Diagnostics DLP Management 4 Select Download ICP Certificate 5 Select Close Disabling the integrated cinema processor signature test Error messages that appear when the integrated cinema processor ICP is turned on and the ICP signature test is run can disrupt projector network monitoring Use this procedure to disable the signature test 1 On the touch panel controller TPC log on to ...

Страница 41: ... power level to maintain lamp brightness as the lamp ages Light Meter Set Target Enables LiteLOC and maintains the current brightness level for as long as possible The Light Meter value is an arbitrary unit of measure not lumens or fL Amps Lamp current in amperes Volts Lamp voltage in volts Watts Lamp power in watts fL or cd m2 Approximate Foot Lamberts reading on the light sensor This assumes a c...

Страница 42: ...llowing To enable LiteLOC select Enable LiteLOC To disable LiteLOC clear the Enable LiteLOC check box 4 Select Save Adjusting lamp power 1 Select Menu Advanced Setup Lamp Power LiteLOC Setup 2 Increase or decrease the Power value 3 Select Set Target 4 Select Enable LiteLOC Changing the lamp power percentage Entering a new Lamp Power percentage temporarily disables LiteLOC settings 1 Select Menu Ad...

Страница 43: ...lds Field Description Type The lamp type Serial Number The lamp serial number Reason for Change The reason the lamp was changed Lamp Expiry Hours The number of hours the lamp can operate before replacement Hours Used The number of hours the lamp has operated before installation 4 Tap Save Verifying current lamp intensity Check the current lamp intensity value 1 Select Menu Advanced Setup Lamp Powe...

Страница 44: ...urce color depth 8 10 12 bit for the channel Source File The resolution and aspect ratio for the channel Screen File The screen type masking cropping and lens settings for the channel Use PCF Associates the channel with a projector configuration file PCF and prevents channel adjustments PCF The PCF file associated with the channel ILS File The intelligent lens system ILS file associated with the c...

Страница 45: ...CT file associated with the channel HDMI EDID Type Identifies the extended display identification data EDID type used by the channel when playing content from a device connected to the HDMI A LEFT or HDMI B RIGHT ports Enable 3D Dual Measured Color Enables 3D Dual Measured Color on the channel Select the color files for the left and right eyes 9 If the channel is being created to display 3D conten...

Страница 46: ...nput Mode ensure that Left L1R1 L2R2 is selected 3D Sync Polarity Keeps 3D stereo sync output the same as input true or reversed inverted True 3D L R sync output from GPO will match L R sync input Inverted 3D L R sync output from GPO will be the opposite of sync input left right right left Dark Time Creates a blank time interval between left and right frames to allow for LCD shutter glasses Z scre...

Страница 47: ...fault settings to the selected channel select Default Current Channel To restore the default settings to all channels select Default All Channels 6 Select OK Changing the channel icon Complete the following procedure to change the channel icon 1 On the touch panel controller TPC log on to the projector on page 22 with advanced administrator or service permissions 2 Tap Menu Channel Setup 3 From th...

Страница 48: ...rag and Drop pane 4 To remove a channel from the Preferred Channels pane select and drag a channel from the Selected Channel Buttons Drag and Drop pane to the recycle bin in the bottom right corner Working with channels CP2208 User Guide 48 020 101916 03 Rev 1 12 20120 Copyright 2020 Christie Digital Systems USA Inc All rights reserved ...

Страница 49: ...The allowable X range is 4096 to 4096 pixels and Y range of 2160 to 2160 pixels Aspect ratio The aspect ratio for the incoming signal The allowable range is 0 to 7 99 6 Select Save Modifying a source file You can change the settings in a source file after it is created 1 On the touch panel controller TPC select Menu Advanced Setup Source File Setup 2 From the Current Source File list select the so...

Страница 50: ...D files to correct on screen colors A colorimeter is required to complete this procedure 1 Turn on the light source and allow it to operate for 20 minutes 2 On the touch panel controller TPC select Menu Advanced Setup MCGD File Setup 3 Select Save As 4 In the Filename field type a name for the MCGD file 5 Select OK 6 To display the red test pattern in the red area of the chromaticity image select ...

Страница 51: ...red area of the chromaticity image select the option button 8 Measure the red chromaticity with the colormeter 9 Enter the red chromaticity values in the x y and Gain fields 10 Select the test pattern that matches the color you are measuring and repeat steps 6 to 8 for the magenta blue white yellow and green chromaticity measurements 11 Select Save Modifying a target color gamut data file You can ...

Страница 52: ... the image on the screen in the Offset area select the forward backward left or right arrow icons 6 Select Save Enabling automatic intelligent lens system adjustments on a channel Enable or disable automatically adjusting the intelligent lens system ILS on a channel 1 On the main screen of the touch panel controller TPC in the Preferred Channels pane select a channel 2 Select Lens Adjust 3 Select ...

Страница 53: ...n projector startup You can reset the lens position to a default location each time the projector starts up We recommend performing this task daily to reduce the risk of large variations in image position and quality 1 On the touch panel controller TPC select Menu Advanced Setup Lens Setup 2 From the Primary Lens list select a lens 3 In the Intelligent Lens System area select Reset on Startup Comp...

Страница 54: ...1 On the touch panel controller TPC select Menu Advanced Setup Lens Setup 2 From the Primary Lens list select a lens 3 In the Intelligent Lens System area select Quick Reset 4 Select Yes Managing projector setting files CP2208 User Guide 54 020 101916 03 Rev 1 12 20120 Copyright 2020 Christie Digital Systems USA Inc All rights reserved ...

Страница 55: ... and time select Power On 8 To enable or disable the scheduled event select Start New scheduled events are enabled by default 9 Select a date and a time for the scheduled event 10 To determine when the event occurs do one of the following To have the scheduled event occur weekly select Weekly and then select the days that you want the event to occur To have the scheduled event occur once at a spec...

Страница 56: ...calendar view select OK Deleting all scheduled events If all of the scheduled events are no longer required you can delete them 1 On the touch panel controller TPC log on to the projector on page 22 with administrator or service permissions 2 Select Menu Administrator Setup Scheduler 3 Select Delete All 4 Select Yes Turning off the scheduler Turn off scheduler if you do not plan to use this featur...

Страница 57: ...or 1 On the touch panel controller TPC log on to the projector on page 22 with administrator or service permissions 2 Select Menu Administrator Setup Time Setup 3 Adjust the following settings as required Adding or modifying projector communication settings To allow a computer or other devices to communicate with the projector add the projector to a network You can also modify the communication se...

Страница 58: ...ice Learn how to add a network device 1 On the touch panel controller TPC log on to the projector on page 22 with administrator or service permissions 2 Select Menu Administrator Setup Network Devices Setup 3 Select the check box If the check box is not selected the device does not appear in the Network Devices menu 4 Select the Launch Dialog icon in the Device Name field and type a name for the n...

Страница 59: ...ask Manager 3 Select OK Viewing local or remote computer settings Use the Microsoft Windows Computer Management console to manage local or remote computer settings 1 On the touch panel controller TPC select Menu Service Setup System Access 2 Select Computer Management 3 Select OK Viewing the files on the projector Microsoft Windows Explorer displays the hierarchical structure of files folders and ...

Страница 60: ...ial number the current software version the digital light processing DLP version and the lens type On the touch panel controller TPC select Menu About Viewing and modifying projector settings CP2208 User Guide 60 020 101916 03 Rev 1 12 20120 Copyright 2020 Christie Digital Systems USA Inc All rights reserved ...

Страница 61: ...tup files as selectable choices for processing a variety of incoming signals Administrator Can perform screen Foot Lambert calibration define Ethernet settings IP network address restore backup files and upgrade the system software Administrators can add users and set user access rights from its own level and below only Service Can access all windows on the TPC except marriage Marriage Can access ...

Страница 62: ...ator Setup User Accounts 3 From the Username list select a user name 4 Select Edit 5 Change the password or the access permissions 6 Select Accept Deleting a user account You can delete a user account when it is no longer needed 1 On the touch panel controller TPC log on to the projector on page 22 with administrator or service permissions 2 Select Menu Administrator Setup User Accounts 3 From the...

Страница 63: ...grade file You can remove an upgrade file if it is not required 1 On the touch panel controller TPC log on to the projector on page 22 with administrator or service permissions 2 Select Menu Administrator Setup Upgrade 3 In the Available Upgrade Files list select an upgrade file 4 Select Remove Installing an upgrade file Complete the following procedure to install an upgrade file 1 On the touch pa...

Страница 64: ...ct Backup Restoring a file You can restore configuration preference channel user and ICP files 1 On the touch panel controller TPC log on to the projector on page 22 with service permissions 2 Select Menu Service Setup File Management 3 To the right of the File to restore field select Browse 4 In the Drive Letter list select the location of the upgrade file 5 In the Folder list browse to the locat...

Страница 65: ... list select a file type 4 Select and drag a file from the TPC Files pane to the Projector Files pane Deleting projector files You can delete files when required 1 On the touch panel controller TPC select Menu Service Setup File Maintenance 2 In the File Type list select a file type 3 Select and drag a file from the Projector Files pane to the trash can icon 4 Select Yes Backing up restoring and u...

Страница 66: ...est pattern on or off Test patterns are available to assist with the configuration of the projector and to diagnose any issues that may occur 1 In the touch panel controller TPC task bar tap the Test Pattern icon 2 Tap All Test Patterns 3 To turn a test pattern on in the Preferred Test Patterns pane tap the test pattern 4 To turn the test pattern off tap Test Pattern Off Displaying a full screen t...

Страница 67: ...Power supply for your synchronization output device The 3D sync port can power output devices 3D sync terminal pin map The 3D Sync terminal is a 15 pin D sub connector female located on the projector communications panel This table lists the control functions available through the 3D connector Pin Signal name Directio n Description 1 12V Out Power to 3D device Maximum 1A total between both 12V pin...

Страница 68: ...MODE Out 3D mode state from projector From projector GPO emitter Compatible with current projector GPIO requirements and restrictions 24VDC max 50mA max 14 CONN_SYNC Out SYNC from projector From projector GPO emitter Compatible with current projector GPIO requirements and restrictions 24DC max 50mA max 15 Not connected Setting up hardware Use an infrared emitter to control gating in active glasses...

Страница 69: ...leave for 3D source data only When specified the ICP will de interleave each line into the left image or right image in memory as specified Line interleave can be used with PsF 3D data left and right data for one field then left and right data for second field L R Display Reference Specifies which frame of eye data to display during a specific display frame This signal is referenced to the display...

Страница 70: ...e For 3D images to display correctly you must edit the default 3D lamp file to match the specifications of your 3D hardware 1 Select Menu Advanced Setup Lamp Power LiteLOC Setup 2 From the Current Lamp File list select Default 3D 3 In the Power field set the brightness percentage for the lamp 4 Select Save Defining a measured color gamut data file For 3D images to display correctly you must define...

Страница 71: ...M list select a frame rate suitable to your 3D system For example for 24Hz 3D select 2 2 4 2 or 6 2 for single double and triple flash c From the L R Display Sequence list select Left L1R1 L2R2 d From the 3D Sync Polarity list select True e In the Dark Time field enter 430 or a value appropriate for your 3D hardware f In the Output Delay field enter 120 or a value appropriate for your 3D hardware ...

Страница 72: ...erify your 3D hardware is functioning correctly 1 Select Menu Channel Setup 2 From the Channel Name list select a 3D channel 3 Select 3D Test Patterns 4 Select a test pattern 5 Put on a pair of 3D glasses 6 Look at the on screen image and then close your left eye and look at the image through your right eye Switch when the image alternates 3D Test Pattern Action RGB 12bit 3D Dynamic Range Alternat...

Страница 73: ... 2 If the image appears correct a Select Menu Channel Setup b From the Channel Name list select a 3D channel c From the 3D Sync Polarity list select Inverted or True 3 If you see image breakup a Select Menu Channel Setup b From the Channel Name list select a 3D channel c In the left pane select 3D Control d Lower the Dark Time field value to match the values of your 3D system Image is too dark The...

Страница 74: ...y field value to match the values of your 3D system Motion artifacts When viewing 3D content I see motion artifacts Resolution 1 Select Menu Channel Setup 2 From the Channel Name list select a 3D channel 3 In the left pane select 3D Control 4 From the L R Display Sequence list select Left L1R1 L2R2 Disturbing flashing in one eye When viewing 3D content I see distracting flashing in one eye Resolut...

Страница 75: ...mblies Always wear clean powder free latex gloves when handling optical components Inspecting ventilation Vents and louvers in the projector covers provide ventilation both for intake and exhaust Never block or cover these openings Do not install the projector near a radiator heat register or within an enclosure To ensure adequate airflow around the projector keep a minimum clearance of 50cm 19 69...

Страница 76: ...d the anode end with your left hand and carefully turn the lamp with your right hand so that it unthreads from the extension nut Make sure the lamp does not contact the reflector or the UV filter b With your left hand guide the cathode end of the lamp out of the reflector on an angle through the lamp access door 10 For CDXL 19SC or CDXL 21S1 lamps loosen the cathode screw on the cathode clamp a Ho...

Страница 77: ...lower air bulb or a canned air duster without additives such as Techspray 1671 10S Ultra Pure Duster Lint free lens tissue such as Lensx 90 tissue or Newport Optics cleaning tissue Lens cleaning solution and a microfiber cloth for the lens only Optical grade cotton swabs with wooden stems A bright portable illumination device such as an LED flashlight Cleaning the lens To avoid the risk of scratch...

Страница 78: ...the filter cover 2 Pull the cover out and down 3 Slide the air filter out and inspect it If the filter appears dirty and you cannot see through it clean it on page 80 If the filter appears clean continue to step 4 4 Replace the air filter with the airflow indicator facing toward the projector 5 Install the air filter cover by inserting the two bottom tabs and then pushing the cover closed 6 Tighte...

Страница 79: ...washable filter If the filter appears clean continue to step 7 7 Replace the air filter with the airflow indicator facing toward the projector 8 Install the cap plate and tighten the two captive screws 9 Install the service panel and then tighten the two screws 10 Install the top lid Maintaining the projector CP2208 User Guide 79 020 101916 03 Rev 1 12 20120 Copyright 2020 Christie Digital Systems...

Страница 80: ...ce and allow it to dry thoroughly 8 To confirm that the filter is dry place it over a dry paper towel and shake it If the paper towel remains dry the filter can be installed in the projector 9 Record the date the filter was cleaned 10 Replace the filter following the instructions for the specific filter Replacing the lens The lens seals the projection head preventing contaminants from entering the...

Страница 81: ...t cap screws for added stability 12 Remove the lens cap from the front of the lens Maintaining the projector CP2208 User Guide 81 020 101916 03 Rev 1 12 20120 Copyright 2020 Christie Digital Systems USA Inc All rights reserved ...

Страница 82: ...lectrician Cannot establish communication with projector The input devices cannot communicate with the projector Resolution Verify all input devices have the same subnet mask and gateway and unique IP addresses Lamp functionality The following topics cover common lamp issues and their solutions Lamp does not ignite The projector is powered on but the lamp does not ignite Resolution Listen for a cl...

Страница 83: ...ins shadows or is dim Resolution Related information Aligning the lamp on page 24 Blank screen with no display of cinema image When the projector is turned on nothing is displayed Resolution Ensure the lens cap is not on either end of the lens Confirm all power connections are still good Ensure the douser is open by verifying the state of the douser on Main panel Ensure any test pattern other than...

Страница 84: ...ee Resolution 1 In the left navigation menu select Channel Setup 2 In the Color Space field verify that correct value is selected Display is not rectangular The shape of the display is not correct Resolution Display is noisy The projected image contains noise Resolution Verify that the cables connecting the input device to the projector meet the minimum requirements and are undamaged Add signal am...

Страница 85: ...ry or unstable Resolution Verify that the input device is connected properly If the input device is not connected properly the projector repeatedly attempts to display an image The horizontal or vertical scan frequency of the input signal may be out of range for the projector The sync signal may be inadequate Correct the source problem Portions of the display are cut off Parts of the image do not ...

Страница 86: ...ted to the projector Button presses on the touch panel controller are not registering correctly Pressing buttons on the touch panel controller behave as if a different button was pressed Details If the location of button presses on the screen are not interpreted correctly the TPC screen may need recalibrating Resolution 1 Select Menu Administrator Setup Preferences 2 Select Calibrate Screen and fo...

Страница 87: ... panel W x H x D Power specifications Learn the power requirements for the projector AC input A Item Description Voltage range 200 240 VAC Line frequency nominal Inrush current Current consumption 16 A maximum at 200 VAC Power consumption 3200 W maximum Current rating of AC input IEC 320 C19 20 A UPS AC input B Item Description Activation Discrete switch above the power inlet cord s UPS inlet conn...

Страница 88: ...000 meters Maximum ambient temperature 35 C Non operating environment Item Description Temperature Humidity non condensing 0 to 95 Display specifications Learn the display specifications of the projector Panel resolution and refresh rate Pixel format H x V square pixels 2048 x 1080 Processing path 23 97 Achievable brightness measured at screen center Achievable contrast ratio 400 1 ANSI CP2208 Spe...

Страница 89: ...or Female RJ 45 Bit Rate 10 Mbps or 100 Mbps half and full duplex RS232 PIBS1 Interface TIA 232 Connector 9 pin subminiature D female Bit Rate 115 200 default bps Flow Control Hardware RTS CTS Data Format 1 start bit 8 data bits 1 stop bit no parity Communication Protocol Christie Serial Protocol 3D terminal Interface Proprietary 3D connector Connector 15 pin subminiature D female Bit Rate 1 200 b...

Страница 90: ...e a 10 minute cool down period Ensure you do not re strike the lamp any sooner than two minutes into this cool down period since hot re strikes reduce lamp life The period required to reach full brightness is 20 minutes maximum Power software adjustable Item Description CDXL 16M 1 6kW 1000 W min 1600 W nom 1760 W max CDXL 21S1 2 1kW 1260 W min 2100 W nom 2300 W max The ballast is power regulated a...

Страница 91: ...9 XX 1 62 2 7 69 DLPCine Zoom 108 496100 XX 2 09 3 9 69 DLPCine Zoom 108 497101 XX Replacement lamps CDXL 14M 003 003066 XX CDXL 16M 003 003900 XX CDXL 19SC 003 005366 XX CDXL 21S1 003 004258 XX Air filters Replacement Light Engine Air Filter 003 004460 XX Replacement Air Filter 003 002311 XX Replacement Light Engine Washable Air Filter 003 004654 XX Replacement Card Cage Washable Air Filter 003 0...

Страница 92: ...ards related to product safety environmental and electromagnetic compatibility EMC requirements Safety Electro magnetic compatibility Emissions Immunity Environmental CP2208 Specifications CP2208 User Guide 92 020 101916 03 Rev 1 12 20120 Copyright 2020 Christie Digital Systems USA Inc All rights reserved ...

Страница 93: ...ingapore ph 65 6877 8737 Africa ph 27 0 11 510 0094 Korea Seoul ph 82 2 702 1601 Japan Tokyo ph 81 3 3599 7481 India ph 91 080 6708 9999 Germany ph 49 0 221 99512 0 Russia ph 36 0 1 47 48 100 China Shanghai ph 86 21 6030 0500 China Beijing ph 86 10 6561 0240 Brazil ph 55 11 2548 4753 Australia ph 61 0 7 3624 4888 Worldwide offices Italy ph 39 0 2 9902 1161 Independent sales consultant offices Mexico...

Страница 94: ......

Отзывы: