background image

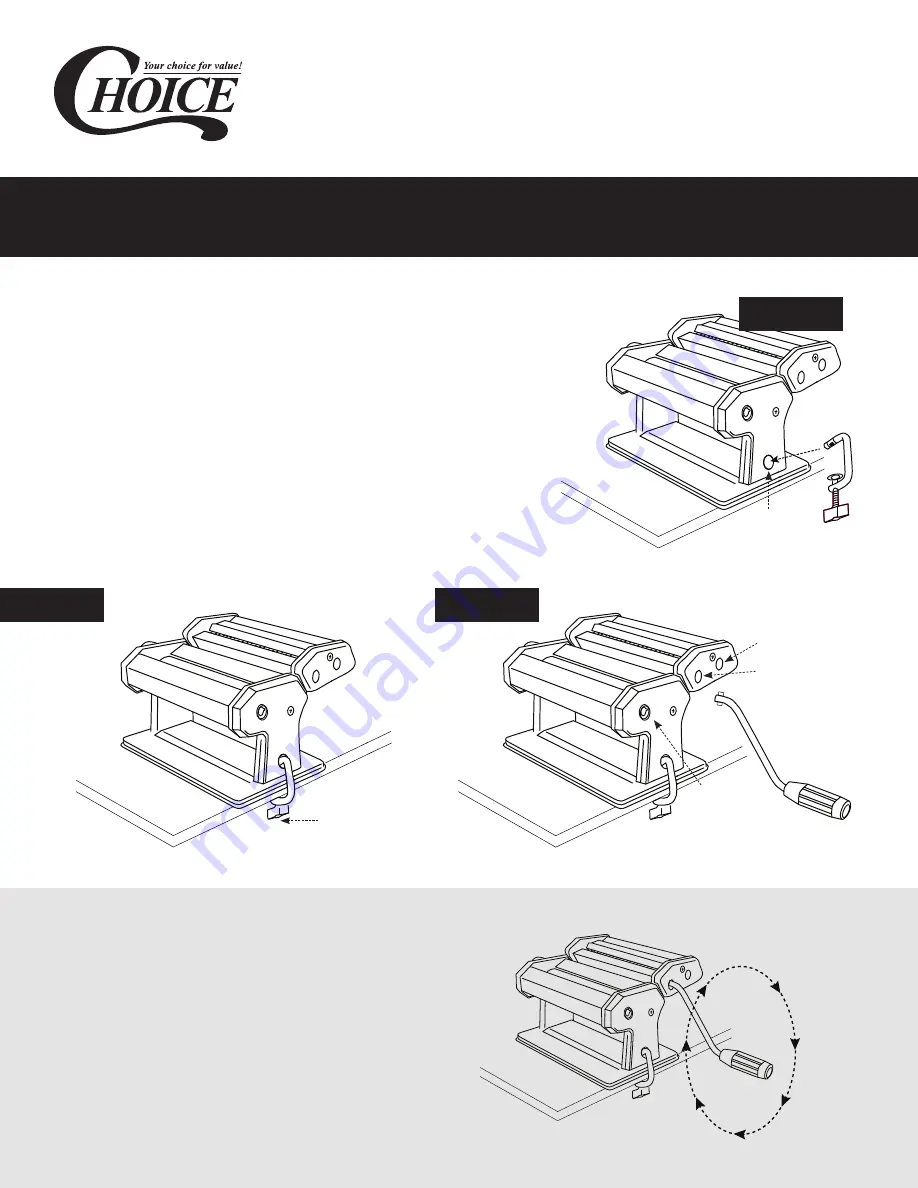
1.  Position the Pasta Machine Base on a table or countertop, 

near the edge of the work surface.

2.  Slide the C-Clamp into the C-Clamp port in the side of 

the Pasta Machine Base. The threaded screw portion of 

the C-Clamp will be underneath the table or countertop. 

FIGURE 1.

3.  Tighten the Thumbscrew on the C-Clamp to secure the 

Pasta Machine to the table or countertop. FIGURE 2.

4.  Align the notches on the Handle with the notches in the 

Drive Slot of choice. Slide the Handle into the Drive Slot of 

the Roller or the Cutter Attachment to be used. FIGURE 3.

NOTE: Be sure to notice when the Handle 

turns, it passes below the edge of the work 

surface and turns freely, it should not hit the 

work surface. If the Handle comes in contact 

with the work surface, loosen the C-Clamp 

and reposition the Pasta Machine to allow 

more space. 

Assembly Instructions

User Manual

#407PASTAKIT

Base

C-Clamp
Port

C-Clamp
Thumb Screw

Spaghetti Cutter 
Drive Slot

Fettuccini Cutter 
Drive Slot

Roller 
Drive Slot

Handle

C-Clamp

Figure 2

Figure 3

Figure 1

Содержание 407PASTAKIT

Страница 1: ...10 2020 Stainless Steel Electric Hybrid Pasta Machine User Manual 407PASTAKIT Hybrid design can operate manually or with the included motor ...

Страница 2: ...y You know when you re finished kneading the dough when the ball of dough has a soft texture It should feel moist but not stick to your fingers Let it Rest When you have your dough ball set it aside to rest for 15 30 minutes While resting wrap it in cellophane wrap or cover it with a damp towel or paper towel to keep it from drying out Resting gives the flour time to fully absorb the water Pasta T...

Страница 3: ...some flour on the Rollers and Cutters Using a dry brush work the flour into the edges of the Pasta Machine and into the Cutter Attachment Brush all the flour away and wipe the machine clean again with a clean dry cloth NEVER INSERT KNIVES BETWEEN THE ROLLERS OR THE CUTTERS Cleaning User Manual 407PASTAKIT Paste Tips cont Water If the recipe that you are using calls for water add it last in portion...

Страница 4: ...ith the notches in the Drive Slot of choice Slide the Handle into the Drive Slot of the Roller or the Cutter Attachment to be used FIGURE 3 NOTE Be sure to notice when the Handle turns it passes below the edge of the work surface and turns freely it should not hit the work surface If the Handle comes in contact with the work surface loosen the C Clamp and reposition the Pasta Machine to allow more...

Страница 5: ...tion insert the motor down into the slot of the fixing bracket Insert the motor drive shaft into the corresponding function hole on the side of the pasta machine 1 2 3 User Manual 407PASTAKIT You are now ready to start making noodles Note After the motor has been working continuously for 10 15 minutes it needs to be shut down for a rest ...

Страница 6: ...s desired thickness Mix flour eggs water and other raw materials together Put the dough into the roller then rotate the handle Install noodle knife then roll dough thru creating noodles Knead the dough Sprinkle dry flour as needed to prevent sticking Finished Noodles 1 4 7 2 5 8 3 6 9 User Manual 407PASTAKIT ...

Страница 7: ...umstances of misuse or abuse will not qualify for replacement Choice has the final decision if misuse or abuse appears evident Warranty does not apply outside of the United States Blades are not covered under warranty Blades are expected to wear down and be replaced by the customer on a consistent basis dependent upon frequency of usage User Manual 407PASTAKIT ...

Отзывы: