


10
11
IMPORTANT! READ CAREFULLY AND KEEP FOR FU-
TURE REFERENCE.
WARNING: KEEP THE PLASTIC BAGS OUT OF REACH
OF CHILDREN TO PREVENT CHOKING HAZARD.
WARNINGS
• WARNING: Never leave the child unattended.
• WARNING: Always use the child restraint and table attach-
ment systems.
• WARNING: Always check the security and the stability of
the product before use.
• WARNING: Maximum weight: 15 kg.
• WARNING: This product is intended for children able to sit
up unaided. Age range: from 6 months onward.
• WARNING: Do not use tablecloths or other objects on the
table that may interfere with the proper operation of the
fastening devices. Keep the table surface clean and dry.
Keep the table structure and surface clean and dry.
• WARNING: Check the locking screws regularly and tighten
as needed.
• WARNING: Do not use the product when any component
is broken, torn or missing.
• WARNING: Do not use accessories or replacement parts oth-
er than those approved by the manufacturer or distributor.
• WARNING: Do not fasten the product in points where your
child could use his feet to push against parts of the table,
chairs or other structures thus making the seat move and
creating situation of instability.
• WARNING: This product is not fit for all types of table. Do
not fasten to: Tables with glass or crystal surfaces or the
like; Tables with uneven or rough surfaces; Tables with one
leg only; Card tables; Camping tables; Table leaf.
• WARNING: Make sure that the table does not tip over
when the product is fastened and in use.
• The table top must have a minimum thickness of 19 mm
and a maximum of 90 mm.
• Do not fasten it to drawers or mobile parts of the table.
• Do not hang objects on the seat that may alter its stability.
• Do not fasten or lock the seat when the child is in it.
• Do not use the seat for more than one child at a time.
• Always supervise children playing near the seat.
CARE AND MAINTENANCE
• This product requires periodical maintenance.
• The cleaning and maintenance operations must only be
carried out by an adult.
• Periodically check the hook on chair to see if it is broken,
damaged or has missing parts: If this is the case, do not
use it.
• Dry the metal parts to prevent the formation of rust.
• Periodically clean the space between the rotating plastic
part and the fixed plastic part of the seat with a tooth-
brush to remove any food residues.
• Please refer to the care label for instructions on cleaning
the fabric.
Hand wash
Do not bleach
Do not tumble dry
Do not iron
Do not dry clean
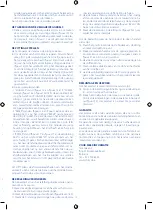
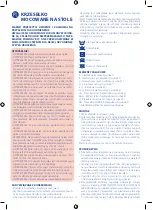
COMPONENTS
A - Chair seat (figure 1)
B - Rotating part of the chair (figure 1)
C - Fixed part of the chair (figure 1)
D - Rotating handle (figure 1)
E - F - Arms (figure 2)
G - Rear fastening pins (figure 2)
GG - Rear joint buttons (figure 2)
GGG - Rear joint screws (figure 2)
H - Front fastening pins (figure 2)
HH - Front joint buttons (figure 2)
I - Non-slip plastic tips
ASSEMBLY
1. Remove the product from the mesh bag.
2. Connect the two arms (E, F) to the seat structure. Insert
one arm at a time into the tube of the structure as shown
in Figure 3, making sure that the two pins in the tube of
the structure have exited completely through the holes
in the arm (E-F). An audible click indicates that they were
inserted correctly (see figure 4). Warning: to make assem-
bly easier, there is a marking on one of the two arms and
on one of the tubes of the structure to indicate that these
two parts must be assembled together. Repeat the oper-
ation for the other arm.
USE
3. To fasten the chair to the table, turn the joint screws
(GGG) clockwise as indicated by the symbols on the
screws themselves, see figure 5.
4. Press the buttons on the joints (GG - HH), figure 6, until
the pins are completely lowered. Incline the seat, lifting
the rear part, and position it on the table surface (figure
7). Push the seat in fully.
5. Push up the four pins (G-H) until they come into contact
with the bottom surface of the table (figure 8).
6. Make the final adjustment by turning the screws (GGG)
COUNTERCLOCKWISE until the seat is properly fastened
(figure 9). At this point, check that the non-slip plastic
tips (I) adhere completely with the table surface. If they
do not adhere perfectly, continue turning the fastening
screws (GGG), always counterclockwise, until the non-
slip plastic tips adhere completely with the table surface.
Check the seal by trying to pull the seat outwards. At this
point, the seat is ready to be used.
USING THE SAFETY HARNESS
7. Remember to always fasten the safety harness, making it
pass through the plastic “D” rings (figure 10). After placing
the child in the seat, fasten the plastic buckle as shown
in figure 11. Make sure it is correctly positioned and cor-
rectly fastened.
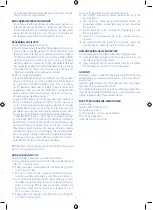
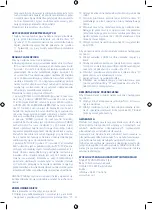
SEAT ADJUSTMENT
The position of the seat can be selected.
EN
HOOK ON
CHAIR
8. To adjust the seat position, lift the handle (D) located on
the backrest of the seat by extracting the pin from the
tube (figure 12), and turning the chair seat in a clock-
wise or counterclockwise direction (figure 13) until the
360° symbol located on the rotating part of the seat (B)
is aligned with the selected symbol located on the fixed
part of the chair seat (C). Once the indicated position is
reached, release the rotation handle so that the locking
pin engages in the hole in the tube: an audible click indi-
cates that the pin engaged correctly.
The chair has six positions:
- 1 “FEEDING BOTTLE” position (figure 14 and figure 14a),
2 “BISCUIT” positions (figure 15 and figures 15a/15b): the
360° indicator is positioned in correspondence of the
“FEEDING BOTTLE/BISCUIT” symbol on the tube of the seat
(C). the child is facing outwards and is able to drink from
the feeding bottle or eat a snack independently, always
keeping the visual contact with his mum, who is able to
move freely in the surrounding area.
- 2 “CUP” positions (figure 16 and figures 16a/16b): the 360°
indicator is positioned in correspondence of the “CUP”
symbol on the tube of the seat (C). The moment of wean-
ing is experienced with the correct contact between the
child and his mum. The child is able to pick up the cup lo-
cated on the table on his own while the mother is able to
be in a correct position near her child while feeding him.
- 1 “CUTLERY” (figure 17 and figure 17a): the 360° indicator
is positioned in correspondence of the “CUTLERY” symbol
on the front part of the fixed structure (C). Once the child
has acquired greater autonomy, he faces towards the ta-
ble and is able to enjoy being at the table together with
his mum and dad.
WARNING! do not adjust the seat to a position of use other
than those indicated in this instruction booklet. The seat
must never be adjusted while the child is sitting in it. In this
case it can be slightly more difficult.
WARNING! While adjusting the seat, make sure that the
child's legs can freely follow the movement of the seat.
HOW TO REMOVE THE FABRIC COVER
The cover of the hook on chair can be removed for washing.
9. Unfasten the safety harness and remove it from the plas-
tic ”D” rings.
10. Unfasten the 4 snap buttons integrated in the fabric
(figure 18a and 18b).
11. Remove the plastic “D” rings, making them pass through
the openings in the seat fabric.
12. Remove the two rear metal hooks of the seat, making
them pass through the seats in the backrest and the
three metal front hooks through the seats along the
front edge of the seat (figure 19a and 19b). At this point,
the fabric can be removed.
13. Unfasten the snap button located on the seat (figure 20)
and remove the HDPE insert.
To recover the chair, proceed as follows.
14. Insert the HDPE insert on the bottom of the chair and
close the snap button.
15. Insert the metal hooks through the specific seats and
make sure that they are correctly blocked as shown in
figure 21a and 21b.
16. Pass the plastic “D” rings through the openings in the
30° C
Содержание 079496
Страница 2: ...A A ...
Страница 3: ...3 6 3 7 5 2 4 Clik Clik 1 A D HH GG GGG E F I I GG GGG H G G H HH B C 9 8 12 11 10 Clik 11 1 A C D B ...
Страница 4: ...4 13 14 16 15a 16a 17a 18a 14a 15 17 15b 16b 14a 15a 16a 15b 16b 17b ...
Страница 5: ...5 20 22 21b 18b 19a 21a 19b ...
Страница 35: ...мя ...


