background image

78,0  °F  |  6,16 % |  456  kg/m

3

 |  -27,3  td |  0,64  aw |  51,9  %r.H. |  14,8  %  abs |  100,4  g/m

2

 |  09  m/s |  4,90  Ugl |  1

Always read this user manual before using the humimeter SLW!

User Manual

humimeter SLW & TMT-425


Moisture meter  

for water content determination of textiles

Moisture meter

Version 3.0

®

Содержание SLW

Страница 1: ... 64 aw 51 9 r H 14 8 abs 100 4 g m2 09 m s 4 90 Ugl 1 Always read this user manual before using the humimeter SLW User Manual humimeter SLW TMT 425 Moisture meter for water content determination of textiles Moisture meter Version 3 0 ...

Страница 2: ...imeter SLW User Manual Page 2 Your humimeter SLW at a glance The main unit with probe No Name 1 Measuring tips 2 Measuring head 3 USB port optional 4 Display 5 Keypad 6 Rubber protection cover 3 4 2 1 6 5 ...

Страница 3: ... 3 The main unit for external sensor No Name 1 Sensor connector 2 USB port optional 3 Display 4 Keypad 5 Rubber protection cover 6 Hand electrode holder 7 Plastic mounting ring 8 Electrodes 6 7 1 8 2 4 5 3 ...

Страница 4: ...nual Page 4 Rear of the main unit No Name 1 Battery compartment The display Nr Bezeichnung 1 Characteristic curve 2 Material moisture in 6 1 Definition of material moisture 3 Display symbols 4 Temperature display 1 1 2 4 3 ...

Страница 5: ...Enter letters View measurements Continue go right Delete measurements Left On off button display light Yes Save measured value The menus The device has three different menus Data Log product selection and main menu Product selection menu No Name 1 Change menu 2 Display illumination device on off 3 For changing the product type 2 1 3 ...

Страница 6: ... 4 Show the last recorded values Main menu The main menu comprises the following menu items Edit Logs Manual Logs Clear Logs Print Logs Last Log All Logs Clear Logs Send Logs Manual Logs Clear Logs Options Bluetooth Date Time Log Time Language Unlock C F BL On Time Auto Off Time Materialcalibration Password Reset Status 2 1 3 4 ...

Страница 7: ... manual 11 1 4 Customer service 11 2 For your safety 12 2 1 Proper use 12 2 2 Improper use 12 2 3 User qualifications 12 2 4 General safety information 13 2 5 Warranty 13 3 After receipt of your device 13 3 1 Unpack the device 13 3 2 Making sure that all of the components have been included 14 3 2 1 SLW with probe s scope of supply 14 3 2 2 SLW for external sensor s scope of supply 14 3 3 Insertin...

Страница 8: ...Saving individual readings 21 5 3 1 Activating the manual saving function in the options menu 21 5 3 2 Using the manual saving option 21 5 4 Saving several readings a measurement series at the same time 22 5 5 Viewing individual readings 24 5 6 Viewing individual readings from a series of measurements 24 5 7 Deleting all measured values data log 25 5 8 Deleting individual measurement series 25 5 9...

Страница 9: ...ion time 36 9 7 2 Configuring automatic switch off 36 9 8 Configuring the material calibration function 37 9 9 Changing the password 37 9 10 Resetting the device to its factory settings 38 10 Cleaning and maintenance 38 10 1 Changing batteries 38 10 2 Care instructions 39 10 3 Cleaning the device 39 11 Faults 40 12 Storage and disposal 41 12 1 Storing the device 41 12 2 Disposing of the device 41 ...

Страница 10: ...tions provided in this user manual have been com piled on the basis of the current standards and regulations the state of the art and the extensive expertise and experience of Schaller Messtechnik GmbH Schaller Messtechnik GmbH does not accept any liability for damage associated with the following which also voids the warranty Non observance of this operating manual Improper use Inadequately quali...

Страница 11: ...s essential to observe this warning Non compliance can lead to damage to property or equipment i Information This symbol indicates important information that enables users to use the de vice more efficiently and cost effectively 1 4 Customer service For technical advice please contact our customer service department at Schaller Messtechnik GmbH Max Schaller Straße 99 A 8181 St Ruprecht an der Raab...

Страница 12: ...sture content of textiles The device must only be used for taking measurements on products defined in the following sections of this manual see 6 Product types 2 2 Improper use The device is not suitable for measuring material with a temperature over 40 C The device is not waterproof and must be protected from water and fine dust IP40 2 3 User qualifications Only those persons are permitted to ope...

Страница 13: ...elivery Every device has a serial number Do not remove the tag with the serial number 2 5 Warranty The warranty does not apply to Damage resulting from non observance of the operating manual Damage resulting from third party interventions Products that have been used improperly or modified without authorisation Products with missing or damaged warranty seals Damage resulting from force majeure nat...

Страница 14: ... operating manual 3 2 1 SLW with probe s scope of supply humimeter SLW 10 pieces of measuring tips without insulation 60 mm 4 pieces of AA Alkaline batteries Rubber protection cover Plastic case User manual Optional accessories 2 replacement tips for measuring electrodes without insulation 255 mm length 2 replacement tips for measuring electrodes insulated 60 mm length 3 2 2 SLW for external senso...

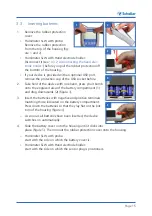
Страница 15: ... your thumb onto the engraved area of the battery compartment 1 and drag downwards 2 figure 3 3 Insert the batteries with negative and positive terminals matching those indicated on the battery compartment Press down the batteries so that they lay flat on the bot tom of the housing figure 4 As soon as all batteries have been inserted the device switches on automatically 4 Slide the battery cover o...

Страница 16: ...is possible to determine humidity at a defined measuring depth as these only measure at the measuring tip Now screw the nuts with measuring tips to the threads located on the measuring head and tighten the nuts by hand figure 8 WARNING Risk of injury Risk of injury due to measuring tips Keep the measuring tips away from your body throughout all activities Keep the measuring tips away from other pe...

Страница 17: ...e product type you selected will now be shown at the top of the display 4 3 Basic operation of the hand electrode holder 4 3 1 Connecting the hand electrode holder Connect the hand electrode holder to the device Pay attention to the elevations at the socket and the guides in the plug and their correct positioning figure 13 Now tighten the plug clockwise with a quarter turn The plug snaps noticeabl...

Страница 18: ...ct polarity of the contacts Screw the dark grey plastic fastening ring back onto the head of the hand electrode holder and hand tighten it WARNING Risk of injury Risk of injury due to the Elektrodenspitzen Keep the Elektroden tips away from your body throughout all activities Keep the Elektroden tips away from other people throughout all activities 4 4 Taking a measurement For information on how t...

Страница 19: ...gnals the end of the measuring range The meas uring range is dependent on the product type see 6 Product types Once the reading has been taken it can be saved on the device see 5 3 Saving individual readings or 5 4 Saving several readings a measurement series at the same time WARNING Risk of injury Risk of injury due to the Mess Elektrodenspitzen Keep the Mess Elektroden tips away from your body t...

Страница 20: ...1 Activating the Hold function in the options menu To do so The device has to be switched on and be in the product selection menu 1 Press twice or hold for 2 seconds 2 Select Options To do so press or and con firm by pressing 3 Select Log Time figure 23 To do so press or and confirm by pressing 4 Select Hold figure 24 To do so press or and confirm by pressing The setting has been saved 5 Press to ...

Страница 21: ...essing 3 Select Log Time figure 26 To do so press or and confirm by pressing 4 Select Manual figure 27 To do so press or and confirm by pressing The setting has been saved 5 Press to leave the Options menu 6 Press to leave the main menu 5 3 2 Using the manual saving option To do so The device has to be in the Data Log menu see Data Log menu page 6 The device is set to Data Log time Manual 1 Press ...

Страница 22: ...Press or to move forward or back 7 Confirm your entry by pressing The data you entered has been saved 5 4 Saving several readings a measurement series at the same time To do so The device has to be in the Data Log menu 1 Take several measurements at different points see 5 The measuring process 2 After each measurement press to save the reading The display will appear as shown in figure 32 The mark...

Страница 23: ... to switch to another input level Press or to move forward or back 7 Confirm your entry by pressing The data you entered has been saved The device automatically determines the average moisture content of the saved measuring values The display will show the following information No Name 1 Name of the measurement series editable 2 Temperature average 3 Date start time of the measurement series 4 Dat...

Страница 24: ...om a series of measurements To do so You must have saved a series of measurements e g 2 logs The display will now appear as shown in figure 37 1 Press 2 Navigate to the required measurement series To do so press or The display will now appear as shown in figure 38 3 Press to switch to another input level The display will now appear as shown in figure 39 4 Press again The display will now appear as...

Страница 25: ...figure 43 4 Confirm by pressing The data log has been deleted 5 Press to leave the Edit Logs menu 6 Press to leave the main menu 5 8 Deleting individual measurement series To do so You must have saved a measured value e g 1 log or a series of measurements e g 3 logs The display will now appear as shown in figure 44 1 Press The display will now appear as shown in figure 45 2 Select the required rea...

Страница 26: ...splay will now appear as shown in figure 49 2 Select the required reading To do so press or 3 Press to switch to another input level The display will now appear as shown in figure 50 4 Press The display will now appear as shown in figure 51 5 Select the required measured value To do so press or 6 Press to switch to another input level The display will now appear as shown in figure 52 7 Press to de...

Страница 27: ... Polyester 50 Rayon 2 6 12 4 14 5 70 PES 30 WO 70 Polyester 30 Wool 2 5 7 9 8 5 55 PES 45 WO 55 Polyester 45 Wool 2 13 14 7 80 PES 20 LI 80 Polyester 20 Flax yarn 0 6 5 2 8 67 PES 33 CO 67 Polyester 33 Cotton 0 5 5 5 5 50 PES 50 CO 50 Polyester 50 Cotton 0 6 6 8 10 5 40 PES 60 CO 40 Polyester 60 Cotton 1 3 10 5 17 5 50 PES 50 PAC 50 Polyester 50 Polyacrylics 0 1 1 5 1 8 70 PAC 30 WO 70 Polyacrylic...

Страница 28: ...s to 100 In relation to the dry weight the 0 4 kg water result in a material moisture of 66 7 6 2 Definition of moisture content The moisture content readings are calculated in relation to the material s overall mass Mn Mass of the sample with average moisture content Mt Mass of the sample with zero moisture content WG Moisture content in accordance with EN ISO 18134 2 Example 1 kg material with 4...

Страница 29: ...screen will now display the LogMemorizer s interface figure 54 Before using LogMemorizer please refer to the the separate LogMemorizer operating manual for the correct configuration of the USB COM Port For more information on LogMemorizer please refer to the separate LogMemorizer operating manual supplied with the device 7 2 Exporting measured values to a computer To do so The LogMemorizer program...

Страница 30: ...press or and confirm by pressing 7 Select Manual Logs figure 57 To do so press or and confirm by pressing 8 The display will then show the message Send figure 58 All measuring values saved on the humimeter SLW will now be sent to your computer Initiating the data export at your computer Connect the humimeter SLW to your computer using the supplied USB cable 1 Insert the USB Mini B connector into t...

Страница 31: ...ual logs for importing all manually saved readings or Import most recent manual log for importing the most recent manually saved logs No Name 1 Import all manual logs 2 Import most recent manual log The measuring values saved on the humimeter SLW will now be sent to your computer 61 1 2 ...

Страница 32: ...ds 2 Select Status To do so press or and confirm by pressing The display will then show the status indicator humimeter The display will show the following information No Name 1 Serial number 2 Software version 3 Battery status 4 Memory status 3 Confirm by pressing 4 Press to leave the main menu 1 2 3 4 ...

Страница 33: ...rmat for the date is DD MM YY Day Month Year The format for the time is hh mm ss Hour Minutes Seconds 4 Add numbers Press and hold to quickly scroll to the required number and either press it for 3 seconds or press to confirm the selected number figure 63 5 Moving forward To move forward between DD MM YY and hh mm ss press 6 Moving back Press to switch to another input level To move backward betwe...

Страница 34: ...Options menu 6 Press to leave the main menu 9 4 Activating options To do so Some of the options must be deactivated 1 Press twice or hold for 2 seconds 2 Select Options To do so press or and confirm by pressing 3 Select Unlock To do so press or and confirm by pressing The display will now appear as shown in figure 64 On delivery the four digit password is the device s serial number 4 Add numbers P...

Страница 35: ...restarted the C F BL On Time Auto Off Time Material cali bration Password Reset options will be deactivated again 9 6 Selecting C F To do so All of the options must be activated see 9 4 Activating options 1 Press twice or hold for 2 seconds 2 Select Options To do so press or and confirm by pressing 3 Select C F To do so press or and confirm by pressing 4 Navigate to the required temperature scale ...

Страница 36: ...tes To do so press or and confirm by pressing The settings have been saved 5 Press to leave the Options menu 6 Press to leave the main menu 9 7 2 Configuring automatic switch off To do so All of the options must be activated see 9 4 Activating options 1 Press twice or hold for 2 seconds 2 Select Options To do so press or and confirm by pressing 3 Select Auto Off Time To do so press or and confirm ...

Страница 37: ...confirm by pressing 3 Select Password To do so press or and confirm by pressing The display will show the current password 4 Overwrite the current password To do so press and hold to quickly scroll to the required number and either press it for 3 seconds or press to confirm the selected number Moving back Press to switch to another input level To move back press 5 Confirm the new four digit passwo...

Страница 38: ...igure 67 Resetting the device will not affect the saved measuring values 10 Cleaning and maintenance Regular cleaning and maintenance will ensure that your device remains undamaged for as long as possible 10 1 Changing batteries The device constantly monitors the charge level of the batteries The current battery status is shown on the status screen If the battery s charge is very low the battery s...

Страница 39: ...t the device from strong mechanical shocks and loads 10 3 Cleaning the device Plastic housing Clean the plastic housing with a dry cloth Measuring tips The measuring tips can be cleaned with a cloth and cleaning alcohol ATTENTION Do not clean with fluids Water or cleaning fluid getting inside the device can destroy the device Only clean with dry materials ...

Страница 40: ... the temperature adjust to the material being measured permitted dif ference of max 3 C Wrong product type Check whether you have selected the right product type product before taking a reading see 6 Product types Moldy or rain wet material The accuracy of the measurement decreases significantly Water film on the measuring electrode tips After a measurement of wet material a film of water may appe...

Страница 41: ... 60 C 12 2 Disposing of the device Devices marked with this symbol are subject to Directive 2012 19 EU of the European Parliament and of the Council of 4 July 2012 on waste electrical and electronic equipment WEEE If the device is being operated outside the European Union the national regulations on the disposal of such devices that apply in the country of use must be observed Electronic devices m...

Страница 42: ... with the applicable requirements of the following documents EN 61326 1 2013 Electrical equipment for measurement control and laboratory use EMC requirements EN 50581 2012 Technical documentation for the assessment of electrical and elec tronic products with respect to the restriction of hazardous substances I hereby declare that the equipment named above has been designed to comply with the relev...

Страница 43: ...ure compensation Automatic Data memory Up to 10 000 measuring values Power supply 4 pcs of 1 5 Volt AA Alkaline batteries Current consumption 60 mA incl display illumination Menu languages German English French Italian Spanish Por tuguese Czech Polish Russian International Display 128 x 64 illuminated matrix display Device dimensions 334 x 75 x 62 mm Device weight 450 g Plastic case dimensions 450...

Страница 44: ...Climate Environment Food Bioenergy Materials Buildings Paper Board ...

Отзывы: