background image


Declaration of Conformity for CE Marking


Charnwood Declare that Woodworking Lathe, Model 1624V 
  
Conforms with the following Directives:  

Machinery Directive 2006/42/EC 


And further conforms to the machinery example for which the EC type examination Certificate No. AM 
50387408 has been issued by TUV Rheinland LGA Products GmbH, Tillystrasse 2, 90431, Nurnberg, 
Germany. 

I hereby declare that equipment named above has been tested and found to comply with the relevant 
sections of the above referenced specifications. The machinery complies with all essential requirements of 
the directive. 
  

Signed: 


Dated: 11/09/2017 


Location: Leicestershire 

Richard Cook 


Director                    

 
 Please dispose of packaging for the product in a responsible manner. It is suitable for 
recycling. Help to protect the environment, take the packaging to the local amenity tip and 
place into the appropriate recycling bin.  


Only for EU countries  
Do not dispose of electric tools together with household waste material!  
 
In observance of European Directive 2002/96/EC on waste electrical and electronic 
equipment (EEE) and its implementation in accordance with national law, electric tools that 
have reached the end of their life must be collected separately and returned to an 
environmentally compatible recycling facility.  


Your local refuse amenity will have a separate collection area for EEE goods 


Charnwood 1624V Wiring Diagram 


Содержание 1624V

Страница 1: ...ELECTRONIC VARIABLE SPEED LATHE MODEL 1624V Charnwood Cedar Court Walker Road Hilltop Industrial Estate Bardon Hill Leicestershire LE67 1TU Tel 01530 516 926 Fax 01530 516 929 email sales charnwood net website www charnwood net ...

Страница 2: ...arter keys 9 Do not force the machine It will do the job better and be safer at the rate for which it is designed 10 Use the right tools Do not force the machine or attachments to do a job for which they are not designed Contact the manufacturer or distributor if there is any question about the machine s suitability for a particular job 11 Wear proper apparel Avoid loose clothing gloves ties rings...

Страница 3: ...ize balance length and condition of the timber being turned The greater the diameter of the work the slower the rotation speed needs to be If the piece you are turning is out of balance then you must start turning at a low speed until it is balanced 6 The tool must rest firmly on the tool rest before it is brought into contact with the rotating wood and must never be lifted off the tool rest as lo...

Страница 4: ...ard Reverse Low High 100 1350rpm approx 200 3000rpm approx Spindle thread size M33 x 3 5mm Spindle tapers 2MT Indexing Positions 36 every 10 degrees Dimensions WxDxH 1550mm x 410mm x 1220mm Weight net gross approx 135kg 165kg Rating Light Trade Warranty 1 Year Main Components Headstock Indexing Holes Tool Rest Crossbar Tailstock Revolving Centre Belt Pulley Cover Digital Display Faceplate Lathe Be...

Страница 5: ...aps and prise off the lid of the crate Care must be taken as it is secured with sharp pins Using a 13mm spanner remove the two bolts securing the legs to the side of the crate Prise off the front of the crate and lift out the lathe legs The lathe and legs are extremely heavy and assistance will be required ...

Страница 6: ...mm spanners Unpack the parts from the accessories box and check that everything is present as shown If anything is missing contact your retailer immediately With the accessory box and legs removed the remaining sides of the crate should now be prised apart to leave only the lathe attached to its pallet ...

Страница 7: ...le from accessory box banjo and tailstock then remove each item by sliding off the end of the bed Remove the four nuts and washers from the bolts attaching the bed to the pallet and lift clear laying it on its top face ready to accept the legs Using the 8mm hex key attach the two legs with the eight M10 x 35mm cap head bolts spring washers supplied The leg with the two holes for mounting the Tool ...

Страница 8: ...bed The headstock is fitted at the tool rack end of the bed Replace the two end stops Adjusting the Spindle Speed The lathe has electronic speed control There are two ranges of speeds which are obtained by changing the position of the drive belt To adjust the drive belt position 1 Open the belt pulley access door by unscrewing the securing screw with the 3mm hex key this screw can be replaced by t...

Страница 9: ...peed range you require The High Speed range left hand pulleys will provide maximum speed whereas the Low Speed range right hand pulleys will provide maximum torque Always remove the belt from the larger pulley first Re tension the belt by releasing the locking handle and lowering the tensioning lever The weight of the motor will provide the correct amount of tension Tighten the locking handle in t...

Страница 10: ...nges are Left Hand Pulleys 100rpm to 1350rpm Right Hand Pulleys 200rpm to 3000rpm The actual spindle speed will be displayed on the LED Indicator Recommended Turning Speeds Workpiece Diameter mm Roughing Cuts RPM General Cutting RPM Finishing Cuts RPM Under 50 1500 3200 3200 50 100 750 1600 2500 100 150 500 1000 1700 150 200 500 800 1250 200 250 500 650 1000 250 300 500 530 850 ...

Страница 11: ... taper drive centre Some chucks are not equipped with any form of locking and should never be used in reverse The faceplate supplied with the lathe has two thread locking grub screws Using the Lathe Fine adjustment of the tail centre is made by unlocking the winding handle locking lever by half a turn only Turn the winding handle to enable the tail centre to be advanced or retracted It has a trave...

Страница 12: ...positioned where required clamp it firmly in place by pressing the lever down firmly Faceplate Turning with Head Rotated 1 Release the Headstock locking cam with the handle provided and slide it towards the centre of the lathe bed 2 Pull out the spring loaded head locking pin and turn the headstock through ninety degrees so that the spindle is facing forwards Lock the headstock with the cam handle...

Страница 13: ...tion of these will enable you to mark your workpiece for evenly spaced features Pin Position A is unthreaded and will accept the unthreaded end of the Indexing Pin This position can be also used to lock the spindle when removing chucks faceplates etc Pin positions B C are threaded and are used in combination with the threaded end of the Indexing Pin NUMBER OF SEGMENTS ANGULAR SPACING DEGREES PIN P...

Страница 14: ...pindle Using a cross head screwdriver remove the cover plate surrounding the spindle to allow access for the belt Release the tension on the drive belt as when changing the speed range and remove the old belt by feeding it over the end of the motor shaft then over end of the spindle and through the aperture in the headstock casting Fit the new belt by reversing this procedure Apply tension and tig...

Страница 15: ...spring washers Before finally tightening the bolts ensure that the top surfaces of the beds are exactly level aligned and that the tailstock can slide smoothly over the joint Fit the Stop Pin to the extended bed To Increase the Bowl Turning Capacity Remove the Stop Pin from the tailstock end of the lathe bed Remove the Tailstock and Tool Rest by sliding them along the lathe bed Bolt the Extension ...

Страница 16: ...ed controller failed Replace speed controller Machine starts only when green button held Switch has failed Replace Switch Spindle stalls but motor still running Loose drive belt Increase belt tension Motor is running but spindle not turning Broken drive belt Replace drive belt Motor is overheating Too much load on motor Reduce load make shallower cuts Airflow around motor restricted Keep motor cle...

Страница 17: ...d Dated 11 09 2017 Location Leicestershire Richard Cook Director Please dispose of packaging for the product in a responsible manner It is suitable for recycling Help to protect the environment take the packaging to the local amenity tip and place into the appropriate recycling bin Only for EU countries Do not dispose of electric tools together with household waste material In observance of Europe...

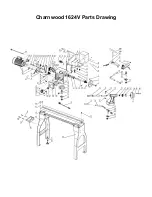
Страница 18: ...Charnwood 1624V Parts Drawing ...

Страница 19: ...mm 45 Handle Tube 46 E Clip 4mm 47 Knurled Thumb Screw 48 Belt Door 49 On Off Switch KJD17 50 Phillips Hd Screw S Tap M4 x 12 51 Variable Speed Dial 52 Potentiometer 53 Rotary Switch ZH A 54 Panel Cover 55 Switch Box 56 Headstock Casting 57 Angular Setting Assembly 58 Turning Base 59 Headstock Clamp Bolt 60 Bushing 61 Headstock Clamp 62 Nyloc Hex Nut M18 63 Power Cord 64 Handwheel Handle 65 Set Sc...

Страница 20: ...tension Lock Lever A03 Set Screw M6 x 10mm A04 Bed Attachment A05 Cap Head Bolt M10 x 30mm A06 Spring Washer M10 A07 Flat Washer M10 Updated March 2018 Charnwood Cedar Court Walker Road Hilltop Industrial Estate Bardon Hill Leicestershire LE67 1TU Tel 01530 516 926 Fax 01530 516 929 email sales charnwood net website www charnwood net ...

Отзывы: