background image

7

6

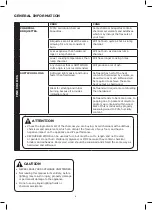
RECOMMENDED LIGHTING METHODS

LIGHTING OPTIONS

RECOMMENDED LIGHTING

OPTIONS

NOT RECOMMENDED

What should I use 

to light my Lump 

Charcoal, Hardwood 

Logs, Softwood or 

Charcoal Briquettes?

Use ALL NATURAL fire starters.

NEVER USE any fuel accelerants, liquid 

lighting fluid to start a fire, or inside of 

the fire chamber.

Use a chimney charcoal starter 

and follow the instructions that 

accompany this tool.

NEVER USE WOOD that has been 

chemically treated such as treated 

pine.

Use a propane torch or butane 

lighter.

NEVER USE any packaging materials, 

including, but not limited to: 

polystyrene, plastics or WOOD that has 

a high resin content.

Use paraffin starter blocks or 

cubes that DO NOT contain any 

chemicals.

NEVER USE hearth logs meant for a 

fireplace.

Use twigs, paper and corrugate 

to get your fire going.

GENERAL INFORMATION

WARNING

Overfilling your fire chamber with wood 

can cause overheating and make managing 

temperatures difficult.

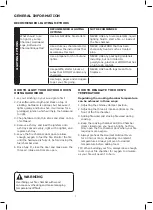
HOW TO LIGHT YOUR OUTDOOR OVEN 

USING HARDWOOD

1. Lay out kindling on your wood grate first.
2. Cut softwood to length and stack on top of 

kindling. Softwood is optional, but because it 

lights quickly and burns hot, it will allow for a 

prolonged ignition which will help the hardwood 

to light.

3. Chop hardwood into thin slices and stack on top 

of softwood.

4. Remove ash tray and load the igniters onto 

ash tray spaced evenly, light with a lighter, and 

replace ash tray.

5. Leave the fire chamber door open to allow 

enough oxygen to fuel the fire. Monitor the fire 

until the hardwood is fully lit, before closing the 

fuel chamber door.

6. Once fully lit, close the door and make sure the 

three air intake controls are open.

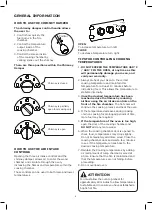
HOW TO REGULATE THE OVEN’S 

TEMPERATURE

Regulating the cooking chamber temperature 

can be achieved in three ways:
1. Adjusting the chimney damper position.
2. Adjusting the three air intake controls on the 

front of the fire chamber.

3. Adding firewood and stoking firewood during 

cooking.

4. Keep the cooking chamber and Fire Chamber 

doors closed once you have a bright, hot fire. 

Only open the fire chamber door when your fire 

requires more oxygen.

5. Always preheat the Gourmet Outdoor Oven 

for 40 min or more, depending on ambient 

temperatures. Always get oven to desired 

temperature before adding food.

TIP: When building your fire, always leave enough 

room in your fire chamber for oxygen to circulate, 

as your fire will need it to burn.

Содержание CM160-018

Страница 1: ... READING THE INSTRUCTION BOOKLET DO NOT PLACE ARTICLES ON OR AGAINST THIS APPLIANCE DO NOT STORE CHEMICALS OR FLAMMABLE MATERIALS OR SPRAY AEROSOLS NEAR THIS APPLIANCE DO NOT OPERATE THE APPLIANCE INDOORS DO NOT OPERATE IN AN ENCLOSED AREA ACCESSIBLE PARTS MAY BE VERY HOT KEEP YOUNG CHILDREN AWAY Minimum clearance from combustible materials 3 metres Retain these instructions for future use ...

Страница 2: ...easoned before first use The external surfaces of this appliance will become very hot when in operation DO NOT touch the appliances surfaces without protection ALWAYS wear oven gloves when using this appliance to avoid burns Protect your children and pets DO NOT allow children and pets in the vicinity of this appliance when in operation DO NOT use indoors This appliance is very heavy Care must be ...

Страница 3: ...he two moving handles that are nested in the left cart legs The moving handles enable you to easily lift and tilt the oven to engage the wheels and move the oven to its new position Before moving the handles must be locked in position using the locking bolt See image below CAUTION Never relocate a hot oven Avoid tipping Using the moving handles only lift the oven a few inches off the ground to rel...

Страница 4: ...ing Handle Bottom Shelf Tool Hooks Air Intake Controls Chimney Damper Thermometer Cooking Chamber Door Latch Door Latch Smoker Vent Control Fire Chamber Top Shelf Tool Hooks Cart Assembly Smoker Box and Cover Cooking Grill Support Cooking Grill Ash Tray Baking Stone Wood Grate Fire Brick ...

Страница 5: ...ns HOTTER and SLOWER than softwood Can be cut to exactly fit the oven s wood grate ATTENTION It is important that the wood being used has been seasoned by allowing it to dry to about 20 humidity content GENERAL INFORMATION BEFORE FIRST USE 1 Read this manual in its entirety 2 Clean the oven 3 Get to know key features 4 Season the oven 5 Get cooking CLEANING BEFORE USE Before attempting to light yo...

Страница 6: ...ning because it provides immediate heat Softwood will require more refuelling than hardwood Softwood tends to be more prone to popping due to pockets of moisture and or sap contained within wood Risk of this is reduced by properly seasoning wood to 20 humidity content ATTENTION Check the ingredients list of the charcoal you are buying Avoid charcoals with additives chemicals and accelerants which ...

Страница 7: ...od is optional but because it lights quickly and burns hot it will allow for a prolonged ignition which will help the hardwood to light 3 Chop hardwood into thin slices and stack on top of softwood 4 Remove ash tray and load the igniters onto ash tray spaced evenly light with a lighter and replace ash tray 5 Leave the fire chamber door open to allow enough oxygen to fuel the fire Monitor the fire ...

Страница 8: ...hen cooking for prolonged periods of time more fuel may be required 5 If the temperature of the oven is too high open the door of the cooking chamber and DO NOT add any more wood 6 When the cooking chamber door is opened to check food temperatures may drop slightly Do not immediately add more wood Close the cooking chamber door and wait a few minutes to see if the temperature rises back to the des...

Страница 9: ...r Close the cooking chamber door 6 Light the kindling using the lighting method of choice If using something other than paper or wood kindling Follow the instructions that accompany the product 7 Once you have established a bright hot fire close the fire chamber door 8 Heat the oven maintaining a temperature of about 350 F 177 C for at least 2 hours There are three positions within the Chimney Dam...

Страница 10: ...ow to achieve subtle smoky flavours For reference smoking temperatures range from approximately 140 C 284 F to 225 C 437 F and smoking requires an extended cooking time This type of cooking is ideal for poultry ham brisket ribs and more 1 Place a small amount of flavoured wood smoking chips into the detachable smoker box and soak as recommended Follow the instructions that accompany your smoking c...

Страница 11: ...r high temperatures or while smoking THERMOMETER AND VIEWING WINDOW The large cooking window and thermometer allow you to observe your food while it cooks without opening the door Keeping the cooking chamber door closed will allow you to maintain temperatures and flavour The thermometer is calibrated to Celsius and Fahrenheit and lets you closely monitor the temperature inside the oven chambers Ba...

Страница 12: ... over and brush away any debris leftover on the baking stone Wipe the stone down with a damp cloth If stubborn stains from oils and fats are still visible on the baking stone don t worry most will be burned off during preheat when the oven is in use again To avoid permanent damage never allow the oils and grease to build up Cleaning the Cooking Grills To remove build up from the cooking grills and...

Страница 13: ...end of every cooking cycle When the embers are fully extinguished and the oven has cooled completely remove the ash tray and support grid and empty contents into a heavy foil container or other fireproof container ALWAYS wait for the oven to completely cool before attempting to remove the ASH TRAY Once cooled ashes can be disposed of into compost Cleaning the Glass Clean the glass window using a h...

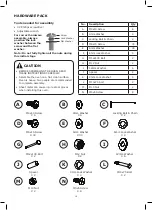
Страница 14: ...olt Chain 2 D M6x15 Screw 30 E 6mm Washer 30 F 6mm lock Washer 4 G M12x130 Bolt 2 H M12 Nut 2 I 12mm Washer 6 J Spacer 2 K 4mm Lock Washer 4 L M10x75 bolt 2 M M10 Nut 2 N M5x6 Screw 8 Lock Washer Flat Washer Screw A B C M4x10 Screw X 6 4mm Washer X 4 Locking Bolt Chain X 2 D E F M6x15 Screw X 30 6mm Washer X 30 6mm Lock Washer X 4 G H I M12x130 Bolt X 2 M12 Nut X 2 12mm Washer X 6 J K L Spacer X 2...

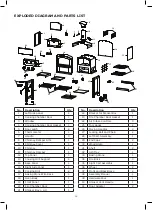
Страница 15: ... 19 Front Panel 1 20 Fire Chamber Door 1 21 Smoker Box Lid 1 No Description Qty 22 Bracket for Smoker Box 1 23 Fire Chamber Door Gasket 1 24 Air Intake Controls 3 25 Tool Hooks 2 26 Moving Handles 2 27 Locking Bolt and Chain 2 28 Left Cart Assembly 1 29 End Caps 2 30 Wood Grate 1 31 Shelf 2 32 Ash Tray 1 33 Baking Stone 1 34 Fire Brick 3 35 Right Cart Assembly 1 36 Wheel 2 37 Front and Back Brace ...

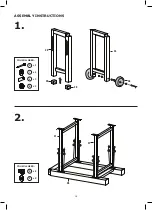
Страница 16: ...16 35 31 28 31 28 29 36 29 YOU WILL NEED G x 2 I x 6 J x 2 H x 2 YOU WILL NEED D x 8 E x 8 ASSEMBLY INSTRUCTIONS 1 2 ...

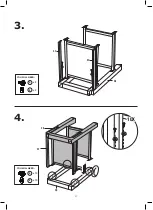
Страница 17: ...17 37 28 37 YOU WILL NEED D x 2 E x 2 YOU WILL NEED D x 10 E x 10 28 37 35 10X 3 4 ...

Страница 18: ...18 YOU WILL NEED A x 4 K x 4 B x 4 25 28 35 25 YOU WILL NEED L x 2 M x 2 C x 2 28 L M C 26 5 6 ...

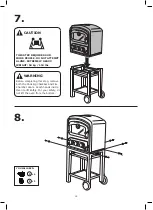
Страница 19: ... 6 E x 6 THIS STEP REQUIRES 2 OR MORE PEOPLE DO NOT ATTEMPT ALONE EXTREMELY HEAVY WEIGHT 54 kg 119 lbs WARNING Before completing this step remove both the Cooking Chamber and Fire Chamber doors Reach hands inside Oven to lift safely For your safety do not lift the oven from the bottom ...

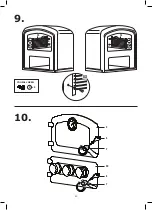
Страница 20: ...20 13 13 8X YOU WILL NEED N x 8 2 5 7 20 5 7 13 13 8X YOU WILL NEED N x 8 2 5 7 20 5 7 9 10 ...

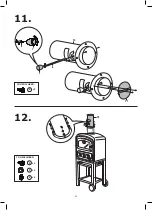
Страница 21: ...21 10 11 7 7 8 8 YOU WILL NEED A x 2 10 YOU WILL NEED D x 4 F x 4 E x 4 10 11 7 7 8 8 YOU WILL NEED A x 2 10 YOU WILL NEED D x 4 F x 4 E x 4 11 12 ...

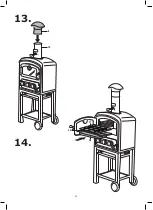
Страница 22: ...22 9 10 33 34 17 13 14 ...

Страница 23: ...23 16 13 16 30 32 15 16 ...

Страница 24: ...24 21 22 30 16 13 21 32 17 17 18 ...

Страница 25: ...25 ...

Страница 26: ...26 ...

Страница 27: ...27 Charmate is a registered trademark of Sitro Group Australia Pty Ltd www gasmate com au Aber Hamilton N Z www charmate co nz ...

Страница 28: ......
Отзывы: