


© Copyright Charge Amps AB
Doc. Nr: 130741-EN
Rev 01
Charge Amps
Frösundaleden 2B
SE-169 75 Solna
Sweden
www.chargeamps.com
Org. No. 556897-7192
Registered office: Solna
13
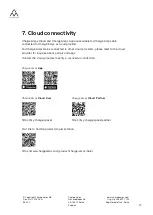
1.
5-pin terminal block for incoming power supply
2.
Ethernet port (
if connected by wired network
)
3.
6-pin terminal block for charging cable
4.
3-pin terminal block for socket-outlet (
some models only)
5.
WiFi antenna cable (
some models only)
18.
Refit the front cover to the back cover.
Carefully check that:
•
All O-rings around the fastening screws are in place.
•
No cables are pinched.
•
All cables are properly seated.
•
The front cover is mounted with Charge Amps logo facing the upright
direction.
19.
Tighten the four H4 Allen head screws with a torque of 1.5–2.0 Nm.
20.
Switch the power on at the main switch.
•
A start-up sequence with self-test begins.
•
Once Charge Amps Halo is illuminated with a steady white light, it is ready
for use.
21.
Continue the installation by configuring Charge Amps Halo.