-3-
ASSEMBLY INSTRUCTIONS
Read all safety warnings and instructions carefully before assembling and operating your grill.
IMPORTANT HINT: DO NOT TIGHTEN ANY NUTS AND BOLTS UNTIL GRILL IS FULLY ASSEMBLED.
LONG LEG
LONG LEGS
SHORT LEG
SHORT LEGS
(with wheel)
Damper
(Estimated Assembly Time: 45minutes)
Asembly requires 2 people. Get another person
to Help. For easiest assembly use a HAMMER,
PLIERS and a 7/16" NUT DRIVER. NOTE: Do
Not tighten any bolts unless instructed to do so.
Tightening too soon may prohibit parts from
Fitting together. All Hex Nuts should be on the
Inside of the grill unless stated otherwise. Unpack
all contents in a well-cleared and padded area.
Insert one LONG LEG into one SHORT LEG.
See Fig. A. Repeat this step for the other LONG
and SHORT LEG.
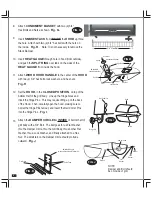
Attach LEG BRACES to the outside of one of the
LONG and SHORT LEG assemblies you just made.
See Fig. B. Use two 1 3/4" hex bolts and nuts for
each LEG BRACE but only finger tight.
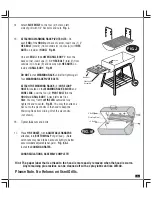
Insert all four corners of the BOTTOM WIRE
SHELF into the four holes located near the bottom
inside of the four LEGS. See Fig. C. Next, rotate the
LEGS upward until vertical. Important: Make sure
the two Long Legs are on the same end.
Attach the other end of the LEG BRACES to the
corresponding legs using 1 3/4" Hex Bolts and Nuts
but only finger tight. See Fig. D.
Gently hammer one WHEEL CAP to one end of
the AXLE. Slide one WHEEL onto the AXLE.
Insert AXLE through the holes at the bottom of both
SHORT LEGS. Slide second WHEEL onto AXLE
then gently hammer the second WHEEL CAP onto
AXLE. Next insert a cotter pin through the hole in each
end of the axle and spread the tip of the cotter pin.
See Fig. D.
Stand the CART/LEG ASSEMBLY upright. Attach
the bottom half of the BODY to the CART/LEG
ASSEMBLY with four 1 3/4" Hex Bolts (make sure
damper is on same side as wheels, unless you are
adding the Side Fire Box). There are two holes in
the front and two in the back of the grill
BODY. See Fig. E.
1.
2.
3.
4.
5.
6.
7.


