background image

A frosty regulator indicates gas overfill. Immediately
close LP cylinder valve and call local LP gas dealer
for assistance.

Do not release liquid propane (LP) gas into the
atmosphere. This is a hazardous practice.

To remove gas from LP

, contact an LP dealer

or call a local fire department for assistance. Check
the telephone directory under “Gas Companies” for
nearest certified LP dealers.

Many retailers that sell grills offer you the option of
replacing your empty LP

through an

exchange service. Use only those reputable
exchange companies that inspect, precision fill, test
and certify their cylinders.

Always keep new and exchanged LP cylinders in
upright position during use, transit or storage.

Leak test must be repeated each time LP cylinder is
exchanged or refilled.

Do not smoke during leak test.

Do not use an open flame to check for gas leaks.

Appliance must be leak checked outdoors in a well
ventilated area, away from ignition sources such as
gas fired or electrical appliances. During leak test,
keep appliance away from open flames or sparks.

Use a clean paint brush and 50/50 soap and water
solution. Use mild soap and water.

Do not use

Household cleaning agents. Damage to gas train
components can result.

cylinder

cylinder

LP Cylinder Exchange

LP Cylinder Leak Test

Exchange your cylinder

only for an OPD safety feature-equipped
as described in the “LP Cylinder” section of this
manual.

Leak test new and exchanged LP cylinders
BEFORE connecting to appliance.

For your safety

cylinder

s

WARNING

If “growing” bubbles appear do not use or
move the LP cylinder. Contact an LP gas
supplier or your fire department!

Connecting Regulator To The LP Cylinder

1.
2.
3.

4.

LP cylinder must be properly secured onto appliance.
Turn control knob to OFF position.
Turn LP cylinder OFF by turning hand-wheel

clockwise to a full stop.

Remove protective cap from LP cylinder valve. Always

use cap and strap supplied with valve.

Safety Relief
Valve

OPD Hand Wheel

Type 1 outlet with
thread on outside

Strap and Cap

O f

f C

lockwise

Do not use a POL transport plug (A)
(plastic part with external threads)! It
will defeat the safety feature of the
valve.

5.

Hold regulator, insert nipple (B) into LP cylinder valve.
Hand tighten coupling nut, holding regulator in a
straight line (C) with LP cylinder valve so as not to
cross thread the connection.

Nipple has to be centered
into the LP cylinder valve.

A

B

Brush soapy solution onto the shaded areas.

5

Содержание 5101194

Страница 1: ...ny other appliance 2 An LP cylinder not connected for use shall not be stored in the vicinity of this or any other appliance To installer or assembler Leave this manual with consumer for future reference FOR OUTDOOR USE ONLY If you have any questions or need assistance during assembly please call 1 800 232 3398 To insure your satisfaction and for follow up service register your product online at w...

Страница 2: ...andwillrequiretouchup These limited warranties are made exclusively to the original customerpresentingproofofpurchase Thesewarrantiesare limited to non commercial residential use only Any returned goods must be shipped prepaid These warranties do not cover normal wear and tear or damages resulting from abuse or misuse This warranty excludes incidental or consequential cost due to damages or losses...

Страница 3: ...oval Transport and Storage 4 LP 4 LP Liquefied Petroleum Gas 4 LP Filling 4 LP Exchange 5 LP Leak Test 5 Connecting Regulator to the LP 5 6 Leak Testing Valve Hose and Regulator 6 Safety Tips 6 Ignitor Lighting 7 Match Lighting 7 Burner Flame Check 7 Burner Check 7 Turning Appliance Off 7 Ignitor Check 7 Valve Check 7 Hose Check 7 Natural Hazard Spiders 8 Care and Cleaning of Stainless Steel 9 Tro...

Страница 4: ...d exchanged LP cylinders in upright position during use transit or storage Storage of appliance indoors is permissible only if the cylinder is disconnected and removed from the appliance LP Cylinder LP Liquefied Petroleum Gas LP Cylinder Filling Purchase LP cylinders only with these required measurements 12 30 5cm diameter x 18 45 7 cm tall with 20 lb 9 kg Capacity maximum Be constructed and marke...

Страница 5: ... Use mild soap and water Do not use Household cleaning agents Damage to gas train components can result cylinder cylinder LP Cylinder Exchange LP Cylinder Leak Test Exchange your cylinder only for an OPD safety feature equipped as described in the LP Cylinder section of this manual Leak test new and exchanged LP cylinders BEFORE connecting to appliance For your safety cylinder s WARNING If growing...

Страница 6: ...alve Hose and Regulator 1 Turn control knob to OFF 2 3 Correct before proceeding 4 Be sure regulator is tightly connected to LP cylinder Completely open LP cylinder valve by turning hand wheel counter clockwise If you hear a turn gas off immediately There is a major leak at the connection Brush soapy solution on areas where bubbles are shown rushing sound 5 If growing If leaks cannot be stopped do...

Страница 7: ... push in knob and release knob should spring back If knob does not spring back replace valve assembly before using appliance Turn knob to position then turn back to position Valve should turn smoothly Before each use check to see if hose is cut or worn Replace damaged hose before using appliance Use only hose valve regulator specified by manufacturer HI LOW 7 For Safe Use of Your Outdoor Stove Top...

Страница 8: ...ly a strong solution of detergent and water or use a grill cleaner with scrub brush on insides of lid and bottom Rinse and allow to completely air dry Wash with warm soapy water and wipe dry Do not use citrisol abrasive cleaners degreasers or a concentrated grill cleaner on plastic parts Damage to and failure of parts can result Because of glass like composition most residue can be wiped away with...

Страница 9: ...t If you choose to use scouring powder or solvents consult with the solvent manufacturer or supplier before use Before cleaning first test any cleaning product in an inconspicuous location and consider the possibility of scratching and the potential for corrosion caused by not completely removing cleaners Never use brushes or steel wool as they will scratch and leave particles embedded on stainles...

Страница 10: ...ntion Cure Wipe dry with cloth Replace electrode Reconnect or replace ignitor wire Replace Replace ignitor Check to see if LP cylinder is empty If LP cylinder is not empty refer to Sudden drop in gas flow Turn the coupling nut about one half to three quarters additional turn until solid stop Tighten by hand only do not use tools Clear burner tube Re engage burner and valve Check assembly instructi...

Страница 11: ...ovided Estimated assembly time 30 45 minutes Key Qty Description Part No A 1 Cover Assembly 29100873 B 1 Cast Iron Grate 29100874 C 1 Burner Assembly Kit 55700664 D 1 Hose Valve Regulator Kit 55700665 E 1 Ignitor Kit 55700666 F 1 Towel Bar Kit 55700667 G 1 Stainless Steel Top Kit 55700668 H 1 Heat Shield Kit 55700669 I 1 Wrap Body Kit 55700670 J 1 Control Panel Kit 55700671 K 1 Base Kit 55700672 L...

Страница 12: ...Parts Diagram A B C C D E F F G H I J K L L M M F N O 12 ...

Страница 13: ... Tool hook 1 4 20x3 4 Machine Screw Step 2 Feed burner tube through center hole of heat shield Align the three threaded studs on bottom of burner with small holes in heat shield Make sure electrode passes through electrode hole Secure burner beneath heat shield using three Attach ignitor wire to electrode 10 24 hex keps nuts 10 24 Hex Keps Nut Qty 3 Burner assembly 55700664 Ignitor Wire 55700664 E...

Страница 14: ...r 55700666 8x1 2 Self Tap Screw Control panel 55700671 Step 4 Insert valve hose through front opening and attach to control panel using two Screws may already be installed in valve and must be removed to attach valve to control panel 8 32x3 8 machine screws NOTE 8 32x3 8 Machine Screw Qty 2 8 32x3 8 Machine Screw Hose Valve Regulator assembly 55700665 14 ...

Страница 15: ...Tap Screw Qty 1 10 24x3 8 Machine Screw Qty 2 10 24 Hex Keps Nut Qty 2 Figure A Valve Burner Tube Beneath control panel 10 24 Hex Keps Nut inside body 10 24x3 8 Machine Screw 10x1 2 Self Tap Screw from inside body 10 24x3 8 Machine Screw from inside body 10 24 Hex Keps Nut Step 6 Feed ignitor wire from electrode through opening beneath control panel and attach to ignitor Press rotary ignitor knob ...

Страница 16: ...king casters Attach body assembly to base using nine and nine 10 24x1 2 machine screws 10 24 hex keps nuts 10 24x1 2 Machine Screw Qty 9 10 24 Hex Keps Nut Qty 9 10 24x1 2 Machine Screw 10 24 Hex Keps Nut Base 55700672 Locking caster 55700673 Locking caster 55700673 Place cast iron grate onto top Align grate legs with slots in top Cast iron grate 29100874 16 ...

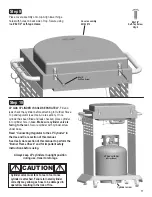
Страница 17: ...PARATELY Make sure cylinder valve is facing to the rear Read in the Use and Care section of this manual See Use Care section of this manual to perform the Burner Flame Check and for important safety instructions before using Fill and leak check the cylinder before attaching to Outdoor Stove Top and regulator see Use Care section Once cylinder has been filled and leak checked place cylinder into cy...

Страница 18: ...18 ...

Страница 19: ...Please register your product online at If you register online you do not need to send in this registration card WWW GRILLREGISTRATION COM 19 ...

Страница 20: ...Char Broil LLC Columbus GA 31902 Assembly Instructions 2005 ...

Отзывы: