background image

9

ENGLISH


100331

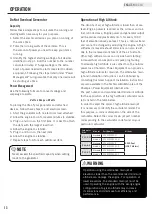
1.  Place the generator on a flat, level surface.

2.  Remove oil fill cap/dipstick to add oil.
3.  Add up to 0.6 qt. (0.6 L) of oil (included) and replace 

oil fill cap/dipstick. DO NOT OVERFILL.

4.  Check engine oil level daily and add as needed.

The recommended oil type is 10W-30 automotive oil. 

NOTE

The engine is equipped with a low oil shut-off and 
will stop when the oil level in the crankcase falls 
below the threshold level.

CAUTION

Add Engine Oil

DO NOT attempt to crank or start the engine before 
it has been properly filled with the recommended 
type and amount of oil. Damage to the generator as 
a result of failure to follow these instructions will 
void your warranty.

CAUTION

ASSEMBLY

Check oil often during the break-in period. Refer to the 
Maintenance section for recommended service intervals.

NOTE

The generator rotor has a sealed, pre-lubricated ball 
bearing that requires no additional lubrication for 
the life of the bearing.

NOTE

Add Engine Oil Cont’d.

Synthetic oil may be used after the 5 hour initial 
break-in period. Using synthetic oil does not 
increase the recommended oil change interval. 
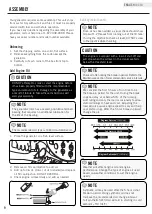
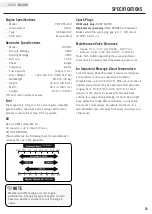
Full synthetic 5W-30 oil will aid in starting in cold 
ambient <5ºC (41ºF)

NOTE

We consider the first 5 hours of run time to be 
the break-in period for the unit. During the break 
in period stay at or below 50% of the running 
watt rating and vary the load occasionally to allow 
stator windings to heat and cool. Adjusting the 
load will also cause engine speed to vary and help 
seat piston rings. After the 5 hour break-in period, 
change the oil.

NOTE

Weather will affect engine oil and engine 
performance. Change the type of engine oil used 
based on weather conditions to suit the engine 
needs.

NOTE

Once oil has been added, a visual check should show 
oil about 1-2 threads from running out of the fill hole.
If using the dipstick to check oil level, DO NOT screw 
in the dipstick while checking.

NOTE

Your generator requires some assembly. This unit ships 
from our factory without oil and fuel. It must be properly 
serviced with fuel and oil before operation.
If you have any questions regarding the assembly of your 
generator, call our help line at 1-877-338-0999. Please 
have your serial number and model number available.

Unboxing

1.  Set the shipping carton on a solid, flat surface.
2.  Remove everything from the carton except the 

generator.

3.  Carefully cut each corner of the box from top to 

bottom.

Full Synthetic 5W-30

Degrees Celsiusº

(Outside)

(Outside)

Degrees Fahrenheitº

Содержание 100331

Страница 1: ...UCTIONS Important safety instructions are included in this manual MADE IN CHINA REV 100331 20170908 100331 MODEL NUMBER 4500 Starting Watts 3650 Running Watts PORTABLE GENERATOR Manual Start T h ree Y...

Страница 2: ...California to cause cancer or birth defects and other reproductive harm WARNING The engine exhaust from this product contains chemicals known to the State of California to cause cancer and birth defec...

Страница 3: ...the Engine 12 Do Not Overload Generator 13 Capacity 13 Power Management 13 Operation at High Altitude 13 Maintenance and Storage 14 Engine Maintenance 14 Oil 14 Spark Plugs 14 Air Filter 14 Spark Arr...

Страница 4: ...the accuracy and completeness of the information in this manual and we reserve the right to change alter and or improve the product and this document at any time without prior notice Since CPE CET hi...

Страница 5: ...s situation which if not avoided may result in minor or moderate injury CAUTION CAUTION used without the safety alert symbol indicates a potentially hazardous situation which if not avoided may result...

Страница 6: ...king Use approved transfer equipment to isolate generator from your electric utility and Notify your utility company before connecting your generator to your power system DANGER Sparks can result in f...

Страница 7: ...sparks that can start fires around dry vegetation A spark arrestor may be required The operator should contact local fire agencies for laws or regulations relating to fire prevention requirements WAR...

Страница 8: ...MINUTES Generator exhaust contains carbon monoxide This is a poison you cannot see or smell PELIGRO DANGER El uso de un generador en interiores PUEDE MATARLO EN MINUTOS El escape del generador contie...

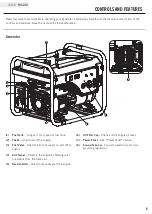
Страница 9: ...k 2 Choke Used to start the engine 3 Fuel Valve Used to turn fuel supply on and off to engine 4 Air Cleaner Protects the engine by filtering dust and debris from the intake air 5 Recoil Starter Used t...

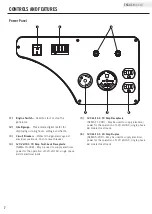
Страница 10: ...aker 4 120 Volt AC 30 Amp Twist Lock Receptacle NEMA L5 30R May be used to supply electrical power for the operation of 120 Volt AC single phase 60 Hz electrical loads 5 120 Volt AC 30 Amp Receptacle...

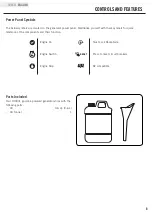
Страница 11: ...rts Oil 0 6 qt 0 6 L Oil Funnel 1 Power Panel Symbols RESET The below symbols are located on the generator power panel Familiarize yourself with these symbols for quick reference of the components and...

Страница 12: ...il will aid in starting in cold ambient 5 C 41 F NOTE We consider the first 5 hours of run time to be the break in period for the unit During the break in period stay at or below 50 of the running wat...

Страница 13: ...s warranty It is advisable to always shut off the fuel supply run the engine to fuel starvation and drain the tank when the equipment is not in use for more than 30 days NOTE Add Fuel 1 Use clean fre...

Страница 14: ...ll become hot If adequate cooling and breathing space are not supplied or if the generator is blocked or contained temperatures can become extremely heated and may lead to fire Surge Protection Electr...

Страница 15: ...ctric utility power lines If the generator will be connected to a building electrical system consult your local utility company or a qualified electrician Connections must isolate generator power from...

Страница 16: ...rong engine configuration at a given altitude may increase its emissions and decrease fuel efficiency and performance WARNING Operation at High Altitude The density of air at high altitude is lower th...

Страница 17: ...oil 5 Squeeze in a clean absorbent cloth to remove all excess oil 6 Place the filter in the assembly 7 Reattach the air filter cover and snap in place Spark Plugs 1 Remove the spark plug cable from t...

Страница 18: ...sh 5 Replace the spark arrester if it is damaged 6 Position the spark arrester in the muffler and attach with the three screws Failure to clean the spark arrester will result in degraded engine perfor...

Страница 19: ...disconnected from the generator Long Term Storage over 1 year For storage over 1 year the fuel tank and carburetor must be completely drained of gasoline 1 Be sure all appliances are disconnected from...

Страница 20: ...must be drained and the carburetor must be thoroughly cleaned This process involves technically advanced tasks For assistance please call our Technical Support line at 1 877 338 0999 If the fuel tank...

Страница 21: ...PR6ES or equivalent Make certain the spark plug gap is 0 7 0 8 mm or 0 028 0 031 in Oil Use 10 30W automotive oil Oil capacity is up to 0 6 qt 0 6 L DO NOT OVERFILL Please reference the following char...

Страница 22: ...NS Parts Diagram 1 23 24 25 26 27 28 29 30 31 32 34 35 36 37 38 39 40 41 42 43 2 3 4 5 6 7 8 9 10 11 14 15 10 16 12 17 18 44 47 48 19 20 22 21 33 13 56 57 58 59 60 61 62 64 65 66 67 68 69 70 71 72 73...

Страница 23: ...06 Lock Washer 6 4 34 1 5789 0620 1 Flange Bolt M6 x 20 Black 4 35 24 070800 00 Reversal Valve 1 36 2 06 006 Clamp 7 x 1 1 37 24 070030 00 Hole Breather Tube 1 38 122 070014 02 Pipe Reversal Valve 67...

Страница 24: ...30 32 35 37 38 12 40 41 42 43 44 46 47 21 22 23 24 31 34 36 39 53 52 45 51 50 49 55 56 57 58 54 60 62 61 63 65 66 67 68 69 70 71 72 74 25 93 94 95 92 91 90 97 78 79 80 82 83 84 85 86 87 88 76 59 12 7...

Страница 25: ...r 1 51 1 6177 06 Flange Nut M6 3 52 21 110001 00 Shaft Governor Arm 1 53 22 123000 01 Ignition Coil Silicon Rubber 1 54 1 5789 0625 Flange Bolt M6 x 25 2 55 23 110005 01 Spring Throttle Return 1 56 23...

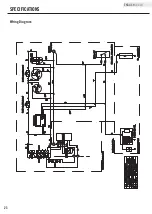
Страница 26: ...G Y GREEN WHITE RED In W L BLACK YELLOW BLUE Br W G B W BROWN IGNITION COIL SPARKING PLUG ENGINE BLOCK B EXW FW MW1 L Y Y AVR Br 30A OIL LEVEL SW Y CONTROL BOX BLOCK Y G Y EARTH TERMINAL ENG SW R W W...

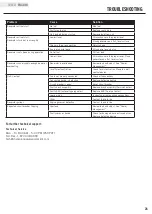
Страница 27: ...proper level Place generator on a flat level surface Generator cannot supply enough power or overheating Generator is overloaded Review load and adjust See Power Management Insufficient ventilation Ch...

Страница 28: ...quired to be performed at a facility or by a person authorized by CPE Other Exclusions This warranty excludes Cosmetic defects such as paint decals etc Wear items such as filter elements o rings etc A...

Страница 29: ...l system is warranted for two years subject to provisions set forth below If during the warranty period emission related part on your engine is defective in materials or workmanship the part will be r...

Страница 30: ...ement point for that part If the part fails prior to the first scheduled replacement the part shall be repaired or replaced by CPE according to Subsection d below Any such emissions related part repai...

Страница 31: ...ets Carburetor Purge Port Connector TO OBTAIN WARRANTY SERVICE You must take your CPE engine or the product on which it is installed along with your warranty registration card or other proof of origin...

Отзывы: