Connect Electric Power
TO AVOID INSTALLATION DIFFICULTIES, DO NOT RUN THE GARAGE DOOR OPENER UNTIL INSTRUCTED
TO DO SO. Connect to properly fused and earthed power outlet.
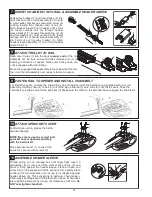
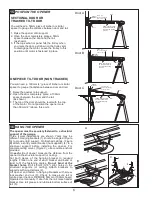
FASTEN DOOR BRACKET
Sectional and One-Piece Door Installation Procedure:
Door bracket (1) has left and right side fastening holes. If
your installation requires top and bottom fastening holes
use both the door bracket and door bracket plate (2) as
shown.
1. Centre door bracket (with or without door bracket plate,
as required) at the top inside face of door as shown.
Mark holes.
A. One-piece doors: locate bracket at inside face of
the door 0-100mm down.
B. Sectional door: 150 - 250mm below the top of the
door.
2. Fasten bracket to the door using the appropriate
screws.
A. Wooden doors
Drill 8mm holes (5/16") and fasten the door bracket with
nut, lock washer, and carriage bolt (3).
B. Sheet metal doors
Fasten with wood screws (4).
C. One-piece door optional
Fasten with wood screws (4).
1
2
A. 0-100mm
B. 150-250mm
A
B
1
4
C
1
2
3
3
1
2
4
1
2
19
4
2
4
5
5
1
3
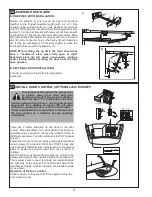
INSTALL THE LIGHT AND LENS
Install the 40 watt maximum (230-240V, E27) light bulb in
the socket (1). Hinge the bottom of the lens (2) onto the
cover from left of the hinge bars (3) as shown. Close the
lens by gently squeezing the upper corners and inserting
the tabs (4) into slots on the cover (5).
To change bulb, squeeze the upper corners of the lens to
disengage tabs. The lens will drop open, securely hinged
at bottom.
The light will turn on and remain lit for 2-1/2 minutes when
power is connected. After 2-1/2 minutes it will turn off.
18
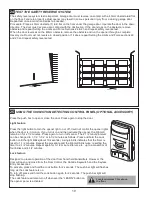
Thread one end of rope (1) through hole in top of red handle
so "NOTICE" reads right side up as shown (3). Secure with an
overhand knot (2). Knot should be at least 25mm (1") from end
of the rope to prevent slipping.
Thread other end of rope through hole in release arm of the
outer trolley (4). Adjust rope length so that handle is less than
1.8m (6 feet) above the floor. Secure with an overhand knot.
NOTE: If it is necessary to cut rope, heat seal cut end to
prevent fraying
.
Door should be released in the closed position if possible.
To Release the trolley PULL down on the red handle.
DO NOT USE THE HANDLE TO OPEN OR CLOSE THE DOOR.
DO NOT DISENGAGE THE OPENER TO MANUAL
OPERATION WITH CHILDREN , PERSONS OR
OTHER OBJECTS INCLUDING MOTOR VEHICLES
WITHIN THE DOORWAY: (The door is under significant
tension and if the door has developed a fault or incorrect
tension, it may be unsafe and may fall rapidly.)
17
7
ATTACH EMERGENCY RELEASE ROPE & HANDLE

