LM60EV / LM80EV / LM100EV / LM130EV-/ EVS / EVF
LM50EV / LM55EV-/ EVS / EVF
LM600A / LM800A / LM1000A
c
o
180s
120s
60s
1
3
2
+
-
3780 / 5580
f
a
b
LM60
d
CB3 / BAS300
g
LM850EV / LM950EV
e
12
VD
C
H
J
012
23
7
45
6
32
Страница 1: ...PEC 0003 Chamberlain GmbH Saar Lor Lux Str 19 66115 Saarbr cken Germany WEEE Reg Nr DE66256568 www liftmaster eu info liftmaster eu 42 39 67 Sensormodul Module d tecteur Sensor module Sensormodule Se...
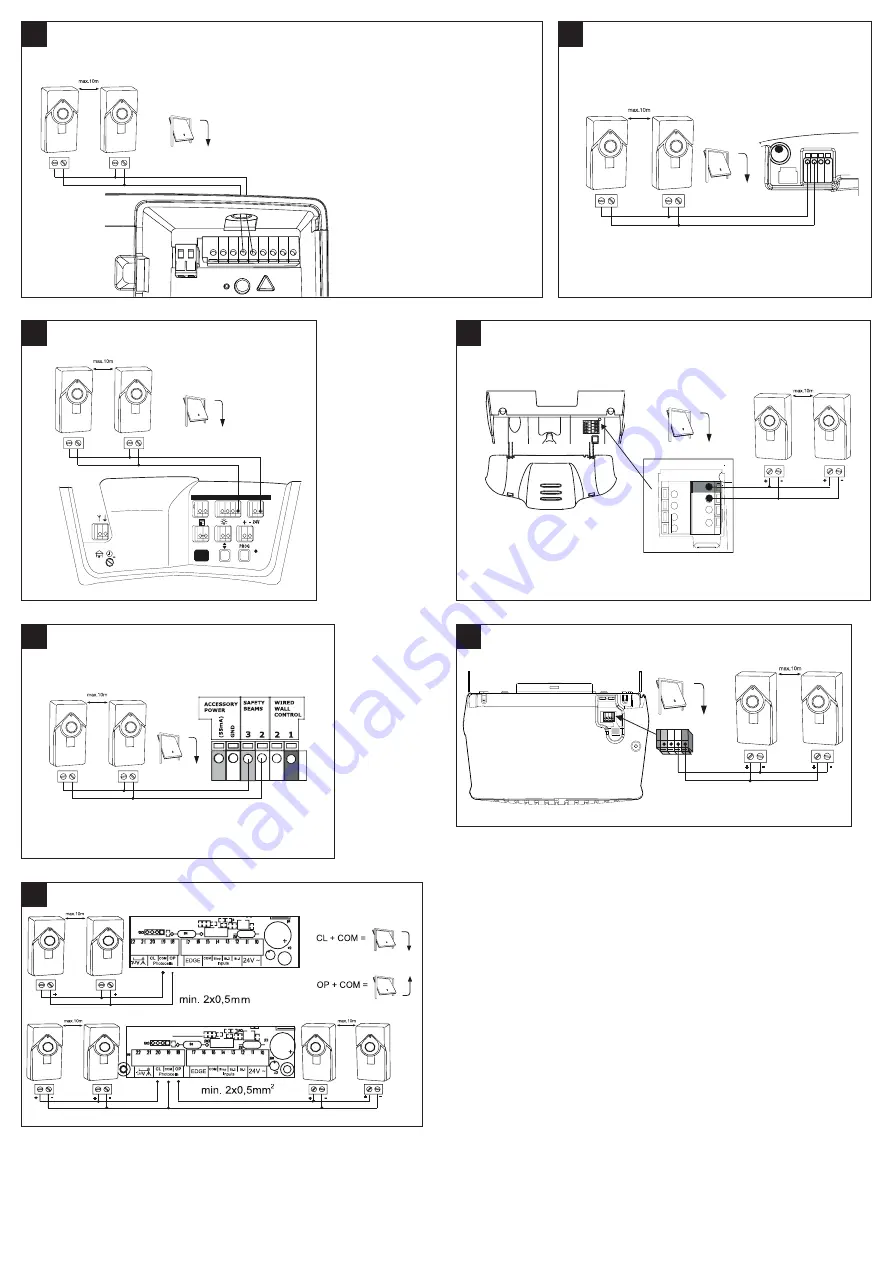
Страница 2: ...V LM80EV LM100EV LM130EV EVS EVF LM50EV LM55EV EVS EVF LM600A LM800A LM1000A c o 180s 120s 60s 1 3 2 3780 5580 f a b LM60 d CB3 BAS300 g LM850EV LM950EV e 12VD C H H J J H H J J 012 23 7 45 6 12 32 H...
Страница 3: ...PHOTO CB24 k CB11 01 2005 HC280ML HC300ML HC400ML HC600ML m CB22 j n COM PHOTO 1 2 COMS TOP CB22 l CB224 24V COM CL SP OP NP 0V COM OP EN CLS 5 6 7 89 10 11 12 COM P B PE D ANT GND STOP 13 14 15 16 17...
Страница 4: ...han 200mm 250mm above the garage floor ASSEMBLY MOUNTING The power supply must be disconnected prior to assembling mounting the safety light barrier 1 Open housing as shown in fig 1 2 Align sensor suc...
Страница 5: ...erden MONTAGE Vor der Montage der Sicherheitslichtschranke mu die Stromzufuhr abgeschaltet werden 1 Geh use wie in Bild 1 gezeigt ffnen 2 Sensor ausrichten so da die Linsen quer zum Tor genau aufeinan...
Страница 6: ...entr e MONTAGE Couper le courant avant le montage de la barri re photo lectrique 1 Ouvrir le bo tier comme indiqu la figure 1 2 Ajuster le capteur de sorte que les lentilles soit perpendiculaires la...
Страница 7: ...g uitgeschakeld worden 1 Behuizing zoals in afbeelding 1 getoond openen 2 Sensor instellen zodat de lenzen parallel aan het hek naar elkaar gericht zijn 3 Sensoren met schroeven pluggen bevestigen 4 B...
Страница 8: ...za superiore a 200 mm 250 mm da terra MONTAGGIO Prima di procedere al montaggio della fotocellula si deve disinserire la corrente elettrica 1 Aprire la scatola come illustrato nella Figura 1 2 Allinea...
Страница 9: ...es del montaje del sensor infrarrojo de seguridad se deber desconectar la alimentaci n el ctrica 1 Abrir la carcasa tal como se muestra en la figura 1 2 Alinear el sensor de tal forma que las lentes s...
Страница 10: ...de 200 mm a 250 mm acima da entrada MONTAGEM Antes de montar a barreira fotoel ctrica de seguran a tem de desligar a alimenta o de corrente 1 Abra a caixa como indicado na fig 1 2 Alinhe o sensor de...
Страница 11: ...tn ch sv teln ch z vor mus te vypnout p vod proudu 1 Otev ete sk ku jak je uk z no na obr zku 1 2 Nasm rujte senzor tak aby o ky m ily p esn na sebe nap k vrat m 3 Upevn te senzory pomoc roub hmo dine...
Страница 12: ...nyissa fel 2 Az rz kel t gy helyezze el hogy a lencs k az ajt n l keresztbe lljanak s pontosan egym sra mutassanak 3 Az rz kel ket csavarokkal tiplikkel r gz tse 4 A gar zs belter ben haszn ljon szige...
Страница 13: ...igurnosne svjetlosne rampe potrebno je prekinuti dovod struje 1 Ku i te otvoriti kao to je prikazano na slici 1 2 Usmjeriti senzore i to tako da su le e popre no prema vratima usmjerene to no jedna pr...
Страница 14: ...50mm nad wjazdem MONTA Przed monta em wietlnej zapory bezpiecze stwa nale y od czy dop yw pr du 1 Otworzy obudow jak pokazano na rysunku 1 2 Ustawi czujnik tak eby soczewki wskazywa y dok adnie na sie...
Страница 15: ...el 2004 108 2006 95 CE info chamberlain eu CB3 3 3 150 mm 200 mm 10 200 mm 250 mm 1 1 2 3 4 5 2 x 0 25mm a g a g 3 2 h n 6 7 2 1 2 IP44 40 C 60 C 20 mA 10...
Страница 16: ...rus 2004 108 EC 2006 95 EC info chamberlain eu 3 3 3 150 200 10 200 250 1 1 2 3 4 5 2 0 25 2 a g a g 3 2 b h n 6 b 7 2 1 2 IP44 40 C 60 C 20 10m...