background image

Federal Communications Commission Statement

This  device  complies  with  FCC  Rules  Part  15.  Operation  is  subject  to  the  following  two

conditions:

M

This  device  may  not  cause  harmful  interference

M

This  device  must  accept  any  interference  received,  including  interference  that  may

cause  undesired  operation.

This  equipment  has  been  tested  and  found  to  comply  with  the  limits  for  a  Class  B  digital

device,  pursuant  to  Part  15  of  the  FCC  Rules.  These  limits  are  designed  to  provide

reasonable  protection  against  harmful  interference  in  a  residential  installation.  This  equipment

generates,  uses  and  can  radiate  radio  frequency  energy.  If  this  equipment  is  not  installed

and  used  in  accordance  with  the  manufacturer's  instructions,  it  may  cause  harmful

interference  to  radio  communications.  However,  there  is  no  guarantee  that  interference  will

not  occur  in  a  particular  installation.  If  this  equipment  does  cause  harmful  interference  to

radio  or  television  reception,  which  can  be  determined  by  turning  the  equipment  off  and

on,  the  user  is  encouraged  to  try  to  correct  the  interference  by  one  or  more  of  the

following  measures:

M

Reorient  or  relocate  the  receiving  antenna.

M

Increase  the  separation  between  the  equipment  and  receiver.

M

Connect  the  equipment  to  an  outlet  on  a  circuit  different  from  that  to  which  the

receiver  is  connected.

M

Consult  the  dealer  or  an  experienced  radio/TV  technician  for  help.

The  use  of  shielded  cables  for  connection  of  the  monitor  to  the  graphics  card  is  required

to  assure  compliance  with  FCC  regulations.  Changes  or  modifications  to  this  unit  not

expressly  approved  by  the  party  responsible  for  compliance  could  void  the  user's  authority

to  operate  this  equipment.

Canadian  Department  of  Communications  Statement

This  digital  apparatus  does  not  exceed  the  Class  B  limits  for  audio  noise  emissions  from

digital  apparatuses  set  out  in  the  Radio  Interference  Regulations  of  the  Canadian

Department  of  Communications.

Manufacturer's Disclaimer Statement

The information in this document is subject to change without notice and does not represent a

commitment on the part of the vendor.  No warranty or representation, either expressed or implied,

is made with respect to the quality, accuracy or fitness for any particular purpose of this document.

The manufacturer reserves the right to make changes to the content of this document and/or the

products associated with it at any time without obligation to notify any person or organization of

such changes.  In no event will the manufacturer be liable for direct, indirect, special, incidental

or consequential damages arising out of the use or inability to use this product or documentation,

even if advised of the possibility of such damages.  This document contains materials protected

by copyright.  All rights are reserved.  No part of this manual may be reproduced or transmitted

in any form, by any means or for any purpose without expressed written consent of it's authors.

Product names appearing in this document are mentioned for identification purposes only.  All

trademarks, product names or brand names appearing in this document are registered property

of  their  respective  owners.
Printed in Taiwan

June  2001

P O S T - C O N S U M E R

RECYCLED PAPER

Содержание 6VIA6

Страница 1: ... the FCC Rules Operation is subject to the following two conditions 1 This device may not cause harmful interference 2 This device must accept any interference received including interference that may cause undesired operation This declaration is given to the manufacturer CHAINTECH EXCEL COMPUTER U S INC 4427 Enterprise ST Fremont CA 94538 U S A hattp www chaintech excel com Chaintech President Si...

Страница 2: ...ance with FCC regulations Changes or modifications to this unit not expressly approved by the party responsible for compliance could void the user s authority to operate this equipment Canadian Department of Communications Statement This digital apparatus does not exceed the Class B limits for audio noise emissions from digital apparatuses set out in the Radio Interference Regulations of the Canad...

Страница 3: ...3 1 Standard CMOS Features 13 3 2 Advanced BIOS Features 15 3 3 Advanced Chipset Features 18 3 4 Integrated Peripherals 21 3 5 Power Management Setup 23 3 6 PnP PCI Configuration 25 3 7 PC Health Status 26 3 8 Frequency Voltage Control 26 3 9 Load Fail Safe Defaults 27 3 10 Load Optimized Defaults 27 3 11 Supervisor Password User Password Setting 28 3 12 Save and Exit Setup 28 3 13 Exit Without Sa...

Страница 4: ... System BIOS supports PnP APM DMI ACPI Multi device booting features i e floppy LS120 CD DVD ROM HDD IDE SCSI ZIP ATAPI etc BIOS Wonder technology including ChipAway Virus Flash BIOS Write Protect EmbeddedFlashUtility r Embedded Ultra DMA 66 100 PCI IDE controller Supports two IDE ports up to 4 ATAPI devices Supports up to PIO Mode 4 up to 16 6MBps and Multi Mode 4 up to 66MBps with bus mastering ...

Страница 5: ...ed System Monitor Hardware 5 external voltage inputs 2 temperature sensor with thermistor for CPU and System 2 Fan speed CPU and System monitoring with ON OFF control in suspend r EmbeddedUSB Controller FourUSBports UHCIv1 0compliant Optional USB riser with additional 2 USB ports r Board Dimensions Micro ATX form factor 244mm x 194mm 4 Layers r Advanced Management Features Embedded System Monitori...

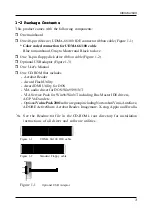
Страница 6: ... USB adaptor Figure 1 3 r One User s Manual r One CD ROM that includes Acrobat Reader Award Flash Utility Award DMI Utility for DOS VIA audio driver for DOS Win95 98 NT VIA Service Pack for Win9x WinNT including Bus Master IDE drivers AGP VxD and etc OptionalValuePack2001softwaregroupincludingNortonAntiVirus AutoSave ADOBE ActiveShare Acrobat Reader Imagemore X stop Appio and Ewalla See the Readme...

Страница 7: ... 1 3 Mainboard Layout 1 3 Mainboard Layout 1 3 Mainboard Layout 1 3 Mainboard Layout PS 2 Mouse PS 2Keyboard Printer Port GamePort USB 1 2 COM1 Line out Line in MIC COM2 JP2 FAN2 JP3 JP4 CN4B CN4A CN3 CN2 JP1 FAN1 IR1 CN1 CN6 CN14 JP5 ...

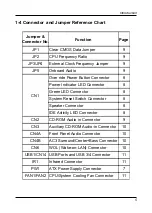
Страница 8: ...tor LED Connector 8 Green LED Connector 8 System Reset Switch Connector 8 Speaker Connector 8 IDE Activity LED Connector 8 CN2 CD ROM Audio in Connector 9 CN3 Auxiliary CD ROM Audio in Connector 10 CN4A Front Panel Audio Connector 10 CN4B AC3 Surround Center Bass Connector 10 CN6 WOL Wake on LAN Connector 10 USB1 CN14 USB Ports and USB 3 4 Connector 11 IR1 Infrared Connector 11 PW1 ATX Power Suppl...

Страница 9: ...ving a noticeable notch in the CPU s corner These markings indicate Pin 1 of the CPU 2 Pull up the lever of Socket 370 so that it is perpendicular with the surface of the mainboard Gently insert the CPU with Pin 1 at the same corner of Socket 370 that contains the end of the lever Allow the weight of the CPU to push itself into place Do not apply extra pressure as doing so may result in damaging y...

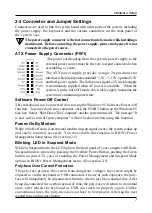
Страница 10: ...START button on the Windows 95 task bar Select Shut Down The Computer and the system turns off The message It is now safe to turn off your computer will not be shown when using this function Power On By Modem While in Soft off state if an external modem ring up signal occurs the system wakes up and can be remotely accessed You may enable this function in BIOS s Power Management Setup menu See sect...

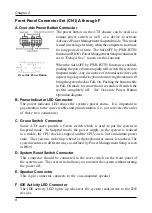
Страница 11: ...ator LED Connector The power indicator LED shows the system s power status It is important to pay attention to the correct cables and pin orientation i e not to reverse the order of these two connectors C Green Switch Connector Some ATX cases provide a Green switch which is used to put the system in Suspend mode In Suspend mode the power supply to the system is reduced to a trickle the CPU clock i...

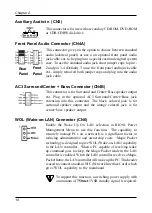
Страница 12: ...2 the CPU determinesthesystembusfrequencyspeed Set bothJP3 JP4pins to 2 3 for 66MHz FSB set only JP4 pins to 2 3 for 100MHz FSB and leave JP4 pins open and set JP3 pins to 1 2 or 2 3 for 133MHz FSB Onboard Audio JP5 This function allows you to enable or disable the on board audio You must set the jumper cap to pins 1 2 to enable or set pins 2 3 to disable this function CD ROM Audio in CN2 Use the ...

Страница 13: ...this connector The black colored jack is for surround speaker output and the orange colored jack is for center bass speaker output WOL Wake on LAN Connector CN6 Enable the Wake Up On LAN selection in BIOS s Power Management Menu to use this function The capability to remotely manage PCs on a network is a significant factor in reducing administrative and ownership costs Magic Packet technology is d...

Страница 14: ...nding on the manufacturer On standard fans the red is positive 12V the black is ground and the yellow wire is the rotation signal 2 4 Main Memory Configuration The DRAM memory system consists two banks and the memory size ranges from 32 512MBytes If you only use one bank it does not matter which one you use and if you use two or more banks it does not matter which bank you install first DRAM Speci...

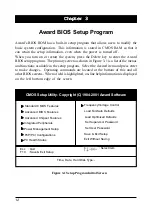
Страница 15: ...press the Delete key to enter the Award BIOS setup program The primary screen as shown in Figure 3 1 is a list of the menus and functions available in the setup program Select the desired item and press enter to make changes Operating commands are located at the bottom of this and all other BIOS screens When a field is highlighted on line help information is displayed on the left bottom edge of th...

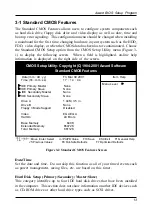
Страница 16: ... timed events such as power management saving files etc are based on this timer Hard Disk Setup Primary Secondary Master Slave This category identifies up to four IDE hard disk drives that have been installed in the computer This section does not show information on other IDE devices such as CD ROM drives or other hard drive types such as SCSI drives CMOS Setup Utility Copyright C 1984 2001 Award ...

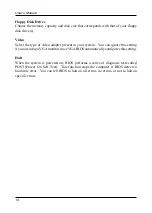
Страница 17: ... your system You can ignore this setting if you are using a VGA monitor since VGA BIOS automatically configures this setting Halt When the system is powered on BIOS performs a series of diagnosis tests called POST Power On Self Test This function stops the computer if BIOS detects a hardware error You can tell BIOS to halt on all errors no errors or not to halt on specific errors ...

Страница 18: ...been found B Cache Control CPU Internal Cache External Cache Cache memory is much faster than conventional DRAM system memory These fields allow you to enable or disable the CPUs Level 1 built in cache and Level Anti Virus Protection Disabled CPU Internal Cache Enabled External Cache Enabled CPU L2 Cache ECC Checking Enabled Processor Number Feature Enabled Quick Power On Self Test Enabled First B...

Страница 19: ...on as drive B and drive B will function as drive A Note that the boot sequence assignment mentioned directly above does not include booting from floppy drive B This function is useful if floppy drives B and A are of a different format and you want to boot from floppy drive B Boot up Floppy Seek During POST BIOS will determine if the installed floppy disk drive has 40 or 80 tracks A 360K drive has ...

Страница 20: ...CSI BIOS etc that resides in ROM Read Only Memory chips is called firmware Shadowing of firmware occurs when BIOS is copied to RAM address C0000h through DFFFFh Video BIOS loads into the C0000 C7FFF memory area when video shadowing is enabled If an expansion peripheral in your system contains ROM based firmware you need to know the address range the ROM occupies to shadow it into the correct area ...

Страница 21: ... whether the board has paged DRAM or EDO Extended Data Output DRAMs B SDRAM Cycle Length When synchronous DRAM is installed the number of the clock cycles of CAS latency depends on the DRAM timing Do not reset this setting from the default value specified by the system designer Figure 3 4 Chipset Features Setup Screen Item Help Menu Level Bank 0 1 DRAM Timing SDRAM 10ns Bank 2 3 DRAM Timing SDRAM ...

Страница 22: ...ideo RAM resulting in better system performance However if any programs write to this memory area a system error may occur F AGP Aperture Size This function determines the amount of system memory that is given to the AGP card Options range from 4MB to 128MB This is a dynamic memory allotment in that the AGP card will only use the amount of memory that it needs The remaining memory not in use will ...

Страница 23: ...ion To terminate this function set it to disabled J OnChip Modem This function must be enabled in order to use the soft modem riser card on CNR slot optional To terminate this function set it to disabled K Memory Parity ECC Check If the DRAM chips in your system support parity ECC check select Enabled ...

Страница 24: ...heral devices By choosing the Integrated Peripherals option from the Standard CMOS Features menu Figure 3 1 the screen below is displayed This sample screen contains the manufacturer s default values for the mainboard CMOS Setup Utility Copyright C 1984 2001 Award Software Integrated Peripherals Item Help Menu Level On Chip IDE Channel0 Enabled On Chip IDE Channel1 Enabled IDE Prefetch Mode Enable...

Страница 25: ...drive supports block mode most new drives do select Enabled for automatic detection of the optimal number of block read writes per sector the drive can support F Onboard FDD Controller Select Enabled if your system has a floppy disk controller FDC installed on the system board and you wish to use it If you install an add in FDC or the system has no floppy drive select Disabled in this field G COM2...

Страница 26: ... B Power Management Power management allows the computer to save electricity when it is not in use by entering increasingly deep power saving modes as shown by the diagram below C Video Off Option This setting allow you to selects the power saving modes during which the monitor goes blank Item Help Menu Level CMOS Setup Utility Copyright C 1984 2001Award Software Power Management Setup Figure 3 6 ...

Страница 27: ...mputer has an modem use this function to tell BIOS which IRQ is being occupied by the modem card When the system is in Green mode the modem requires an IRQ assignment to wake up the system and perform tasks This assignment is compliant with the APM 1 2 specification and is to be used in coordination with APM 1 2 compliant operating systems F Soft Off by PWRBTN When set to Delay 4 Sec this function...

Страница 28: ...uration Data provides a detailed format of the configuration data structures stored in flash memory Each data structure defines the resources used by a device or a card in the system This includes legacy and PCI ISA PnP devices C FDD IRQ Can Be Free This function allows user to choose if the FDD IRQ is able to be freed up The default setting is Yes and this does not allow the IRQ to be free PNP OS...

Страница 29: ...3 1 the screen below is displayed This sample screen contains the manufacturer s default values for the mainboard A CPU Host PCI Clock This field allows you to select a timing combination for CPU Host PCI clock Figure 3 8 PC Health Status Screen CMOS Setup Utility Copyright C 1984 2001 Award Software PC Health Status Move Enter Select PU PD Value F10 Save ESC Exit F1 General Help F5 Previous Value...

Страница 30: ...mized Defaults Set Supervisor Password Set User Password Setup Saving Standard CMOS Features Advanced BIOS Features Advanced Chipset Features Integrated Peripherals Power Management Setup PnP PCI Configur PC Health Status CMOS Setup Utility Copyright C 1984 2001 Award Software Esc Quit F10 Save Exit Setup Select Item Load Fail Safe Defaults Figure 3 10 Load Fail Safe Defaults Screen Load Fail Safe...

Страница 31: ...rd and supervisor password selected in BIOS Figure 3 1 The main purpose of separating user and supervisor is to allow only the supervisor to have control over the settings in BIOS The user on the other hand is only allowed to access the computer s operating system and change the user password in BIOS Note that when there is no supervisor password set the user password controls access to all BIOS s...

Страница 32: ...Setup Utility menu See Chapter 3 Don t turn off or restart your system during programming process Make sure that your floppy diskette have only one BIN file to avoid confusion FLASH MEMORY WRITER V 7 52C C Award Software 2001 All Right Reserved Warning Don t Turn Off Power Or Reset System Write OK No Update Write Fail For XXX XXXXXXX 6A69MC3DC 0 DATE 06 20 2000 Flash Type XXXXX E82802AB 3 xV 1Mb F...

Страница 33: ...30 User s Manual M e m o ...

Отзывы: