background image

INTRODUÇÃO À APLICAÇÃO 


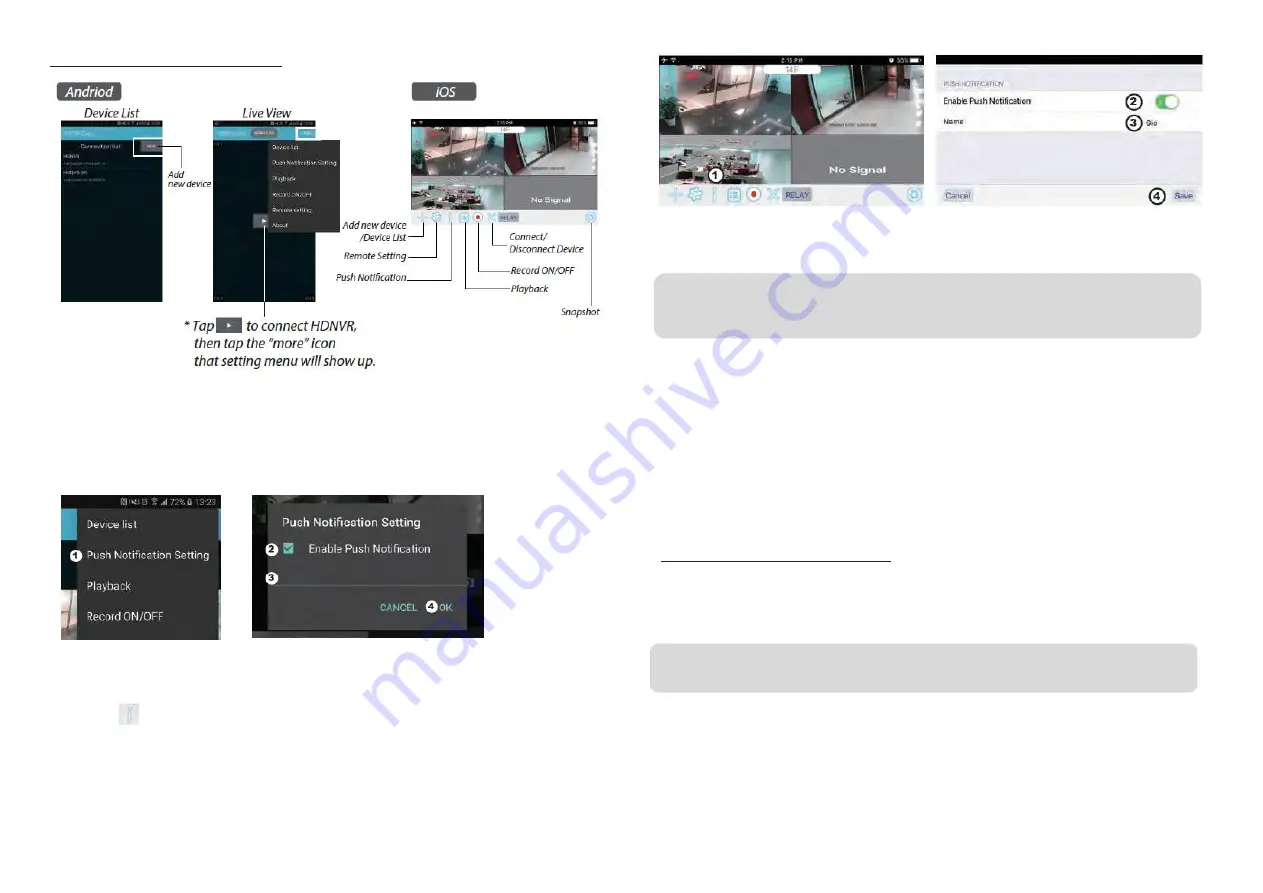
Notificação 

a. Ativar/desativar notificação: Para Android 
1. Aceda à secção "more" (mais) para tocar em "Push Notification" (Notificação). 
2. Clique/não clique para ativar/desativar a notificação. 
3. Introduza o nome de utilizador 

4. Toque em "OK" quando terminar 


Para iOS


1. Toque no ícone 

.


2. Ative/desative a notificação.


3. Introduza o nome de utilizador.


4. Toque em "Save" (Guardar) quando terminar.


b. intervalo


Aceda à configuração de notificações para definir o tempo de intervalo da notificação. Existem quatro opções


pode selecionar quanto tempo receberá a notificação


you can select how long you’ll receive the push 


Para Android


1. Toque em "Push notification setting" (Configuração de notificação)


2. Configure o tempo de intervalo da notificação


Para iOS


1. Toque em "Push notification setting" (Configuração de notificação)


2. Configure o tempo de intervalo da notificação


c. Período de tempo:


Esta função permite configurar o tempo relativo a "Do Not Disturb" (Não incomodar). Pode configurar quando a notificação deve 
iniciar


e terminar. Apenas receberá a notificação durante o tempo indicado

d. Lista:


Na secção relativa à lista, pode visualizar que dispositivos inteligentes recebem atualmente notificações do sistema.  A aplicação 
WDVR permite que, no máximo, 8 dispositivos recebam notificações. Pode remover todos os dispositivos da lista de notificações 
repondo o idioma.


PREDEFINIÇÕES DE FÁBRICA 

1. Aceda à configuração do sistema.


2. Reponha o idioma


3. As definições do sistema são repostas para as predefinições de fábrica


Nota:  receberá no seu smartphone a notificação imediatamente após o primeiro acionamento. Depois disso, a câmara envia a 
notificação de acordo com o tempo de intervalo configurado. Esta função permite-lhe receber menos notificações de um evento em 
série que ocorreu continuamente ao longo do tempo 


Nota:  altere o código de segurança predefinido e aplique o serviço de notificação dos dispositivos inteligentes quando tiver reposto 
o idioma e os parâmetros do sistema para as predefinições


Содержание 34543

Страница 1: ...to USB port 2 Twist on the antenna to the LEFT side of the console 3 Connect the Ethernet cable from the BACK of the console to your router 4 Connect the 12V power adaptor and power on the system 5 Tw...

Страница 2: ...d the pairing button on the back of the camera for 5 seconds The Green Link LED will light up which indicate the camera have been paired successfully Quick Select Menu Live View with Quad Display 1 Ca...

Страница 3: ...to exit 8 For privacy matter please change the security code on the app For Andriod 1 Go to the device list 2 Press and hold the device name the menu will appear on the panel Then tap modify 3 Tap upd...

Страница 4: ...to setup Do Not Disturb time You can setup when Push is to start and end Only during the time you will receive the push d List From list section you can see which smart devices currently receive push...

Страница 5: ...gium FR CONTENU DU KIT PR SENTATION DU PRODUIT INSTALLATION DE VOS APPAREILS A Configuration de votre moniteur 1 Ins rez la carte m moire et ou connectez le disque dur au port USB 2 Tournez l antenne...

Страница 6: ...s allume indiquant que la cam ra a t appair e avec succ s Menu de s lection rapide Visualisation en direct avec affichage Quad 1 Configuration de la cam ra appairage de la cam ra et qualit vid o 2 Co...

Страница 7: ...r 8 Pour des questions de confidentialit modifiez le code de s curit dans l application Pour Android 1 Allez dans la liste des appareils 2 Maintenez le doigt sur le nom de l appareil le menu appara tr...

Страница 8: ...riode de temps Cette fonction vous permet de param trer la p riode de temps Do Not Disturb Ne pas d ranger Vous pouvez param trer l heure de d but et de fin de la notification Push Vous ne recevrez d...

Страница 9: ...r 2 1300 Wavre Belgium NL INHOUD VAN DE SET PRODUCTOVERZICHT UW APPARATEN INSTALLEREN A Uw monitor instellen 1 Plaats de geheugenkaart en of sluit het HDD apparaat aan op de USB poort 2 Draai de anten...

Страница 10: ...ngsknop aan de achterkant van de camera en houd deze knop 5 seconden ingedrukt De groene led indicator gaat branden als de camera met succes is gekoppeld Snelkeuzemenu Liveweergave via vier schermen 1...

Страница 11: ...igingscode op de app te wijzigen Voor Android 1 Ga naar de apparatenlijst 2 Blijf drukken op de apparaatnaam tot het menu op het bedieningspaneel verschijnt Tik vervolgens op Modify wijzigen 3 Tik op...

Страница 12: ...riod tijdsduur Met deze functie kunt u de niet storen tijd instellen U kunt instellen wanneer de pushmelding moet beginnen en eindigen Alleen gedurende die periode ontvangt u een pushmelding d Lijst I...

Страница 13: ...m ES CONTENIDO DEL KIT PRESENTACI N DEL PRODUCTO INSTALACI N DE SUS DISPOSITIVOS A Configurar el monitor 1 Introduzca la tarjeta de memoria y o conecte el dispositivo HDD al puerto USB 2 Gire la anten...

Страница 14: ...en la parte posterior de la c mara durante 5 segundos El LED verde se encender para indicar que la c mara se ha emparejado correctamente Men de selecci n r pida Visi n en directo con pantalla cu drup...

Страница 15: ...ara salir 8 Por motivos de privacidad cambie el c digo de seguridad en la aplicaci n Para Android 1 Vaya a la lista de dispositivos 2 Mantenga pulsado el nombre del dispositivo y el men aparecer en el...

Страница 16: ...funci n le permite configurar el tiempo Do Not Disturb No molestar Puede configurar cu ndo empieza la notificaci n push y cu ndo acaba Solo durante ese tiempo recibir notificaciones push d Lista Desde...

Страница 17: ...tp chacon be conformity Chacon S A Avenue Mercator 2 1300 Wavre Belgium PT CONTE DO DO KIT DESCRI O GERAL DO PRODUTO INSTALAR O DISPOSITIVO A Configurar o monitor 1 Insira o cart o de mem ria e ou lig...

Страница 18: ...de tr s da c mara durante 5 segundos O LED de liga o verde acende se indicando que a c mara foi emparelhada corretamente Menu de sele o r pida Visualiza o ao vivo com ecr Quad 1 Configura o da c mara...

Страница 19: ...Por uma quest o de privacidade altere o c digo de seguran a na aplica o Para Android 1 Aceda lista de dispositivos 2 Prima continuamente o nome do dispositivo o menu apresentado no painel Toque em mod...

Страница 20: ...permite configurar o tempo relativo a Do Not Disturb N o incomodar Pode configurar quando a notifica o deve iniciar e terminar Apenas receber a notifica o durante o tempo indicado d Lista Na sec o rel...

Страница 21: ...Belgium DE PACKUNGSINHALT PRODUKT BERSICHT INSTALLATION DER GER TE A Monitor einrichten 1 Legen Sie die Speicherkarte ein und oder schlie en Sie das Festplattenger t am USB Anschluss an 2 Drehen Sie d...

Страница 22: ...Koppeln an der R ckseite der Kamera f r 5 Sekunden gedr ckt Die GR NE LED leuchtet wenn die Kamera erfolgreich gekoppelt wurde Schnellauswahlmen Live Ansicht der vierteiligen Anzeige 1 Einrichten der...

Страница 23: ...ssen 8 ndern Sie aus Datenschutzgr nden den Sicherheitscode f r die App F r Android 1 Gehen Sie zur Ger teliste 2 Tippen Sie l nger auf den Ger tenamen um das Men im Fenster anzuzeigen Tippen Sie auf...

Страница 24: ...Zeitraum Mit dieser Funktion k nnen Sie die Zeit eingeben w hrend der Sie nicht gest rt werden m chten Sie k nnen festlegen wann die Push Benachrichtigungen beginnen und enden sollen Sie erhalten dann...

Страница 25: ...g http chacon be conformity Chacon S A Avenue Mercator 2 1300 Wavre Belgium IT CONTENUTO DEL KIT PANORAMICA PRODOTTO INSTALLAZIONE DEI DISPOSITIVI A Configurazione del monitor 1 Inserire la scheda di...

Страница 26: ...nte di associazione posto sul retro della videocamera per 5 secondi Si accender una spia LED VERDE a indicare che l associazione della videocamera stata completata con successo Menu di scelta rapida V...

Страница 27: ...servatezza assicurarsi di modificare il codice di sicurezza sull app Per Android 1 Andare all elenco dei dispositivi 2 Tenere premuto il nome del dispositivo apparir il menu sul pannello Quindi toccar...

Страница 28: ...lo Questa funzione permette di impostare la modalit Non disturbare possibile impostare il momento di inizio e fine delle notifiche push Sar possibile ricevere le notifiche push solo in quell intervall...

Страница 29: ...e interferenze pericolose e 2 questo dispositivo deve accettare ogni interferenza ricevuta incluse le interferenze che possono causare un funzionamento indesiderato Con la presente Chacon dichiara che...

Страница 30: ...Smart QUAD Single Channel Record Stop SingleChannel Record All Channel Record Stop All Channel Record Volume Control Mute Vol1 Vol2 Vol3 HDNVR Tap one channel Live view full screen Tap again to retur...

Страница 31: ...torage Setup 2 Network setting 3 DHCP 4 5 Android NEW iOS 6 scan QR code ID 7 8 WDVR CAM Android 1 device list 2 Modify 3 Update iOS 1 device list 2 Edit 3 9 play Tap to turn on off the camera Turn CH...

Страница 32: ...Push Android 1 More 2 3 4 iOS 1 2 3 4 Save b you can select how long you ll receive the push Android 1 2 iOS 1 2 c Push d push WDVR CAM 8 push 1 2 3 push push...

Страница 33: ...i General Transmission frequency 2 4 GHz Transmission range 300 m open field Max power consumption EIRP 100mW Cam ra Resolution 1080P View angle 90 Suppliy voltage Adaptor 5VDC Moniteur Screen size 17...

Страница 34: ...LED po czenia co oznacza e kamera jest gotowa do parowania Menu szybkiego wyboru Podgl d na ywo na ekranie Quad 1 Konfiguracja kamery parowanie kamery i ustawianie jako ci wideo 2 Konfiguracja rejestr...

Страница 35: ...ecze stwa w aplikacji System Android 1 Przejd do listy urz dze 2 Naci nij i przytrzymaj wci ni t nazw urz dzenia Na ekranie wy wietlone zostanie menu Naci nij opcj Modify modyfikuj 3 Po zako czeniu zm...

Страница 36: ...tawienie przerwy w odbieraniu powiadomie push Mo esz ustali czas rozpocz cia i zako czenia odbierania powiadomie push Powiadomienia push b d do Ciebie dociera y tylko w tym przedziale czasowym d Lista...

Страница 37: ...on be conformity Chacon S A Avenue Mercator 2 1300 Wavre Belgium TR K T ER R NE GENEL BAKI C HAZLARIN KURULMASI A Monit r n ayarlanmas 1 Bellek kart n tak n ve veya HDD yi USB portuna ba lay n 2 Anten...

Страница 38: ...taraf ndaki e le tirme d mesine 5 saniye bas l tutun Kameran n ba ar yla e le tirildi ini g steren Ye il Ba lant LED i yanacakt r H zl Se im Men s D rtl G sterim Ekran ile Canl zleme 1 Kamera Kurulumu...

Страница 39: ...zerine dokunun 8 Gizlilik a s ndan l tfen uygulamadaki g venlik kodunu de i tirin Android i in 1 Cihaz listesine git 2 Cihaz ad n bas l tutun men panelde g r nt lenecektir Sonra modify de i tir zerin...

Страница 40: ...h Bildirim ayar na dokunun 2 Bildirim i in zaman aral ayarlay n c Zaman dilimi Bu i lev Do Not Disturb Rahats z Edilmeme zaman n ayarlaman za olanak sa lar Bildirimlerin baslayaca ve bitece i zaman ay...

Страница 41: ...AL A PRODUSULUI INSTALAREA APARATELOR A Instalarea monitorului 1 Introduce i cardul de memorie i sau conecta i unitatea HDD la mufa USB 2 R suci i antena spre partea ST NG a consolei 3 Conecta i cablu...

Страница 42: ...de 5 secunde Ledul verde se va aprinde indic nd faptul c leg tura camerei s a realizat Meniul de selectare rapid Imagine n direct cu p n la patru camere afi ate simultan 1 Configurarea camerei asocier...

Страница 43: ...ritate din aplica ie Pentru Android 1 Accesa i lista dispozitivelor 2 ine i ap sat pe numele camerei Va ap rea un meniu Ap sa i pe Modify Modificare 3 C nd a i terminat modificarea parolei ap sa i pe...

Страница 44: ...pentru notific ri c Time period Intervalul de timp Aceast op iune v permite s selecta i intervalul n care nu dori i s v deranjeze notific rile Pute i selecta nceputul i finalul intervalului n care v s...

Страница 45: ...at nu trebuie s provoace interferen e d un toare i 2 acest aparat trebuie s accepte orice interferen e recep ionate inclusiv interferen e care pot provoca func ionarea incorect a acestui Chacon declar...

Отзывы: