TM
Connecting To TalkSwitch
Quick Guide
copyright centrepoint technologies inc. 2002
www.talkswitch.com
Suggested Configuration
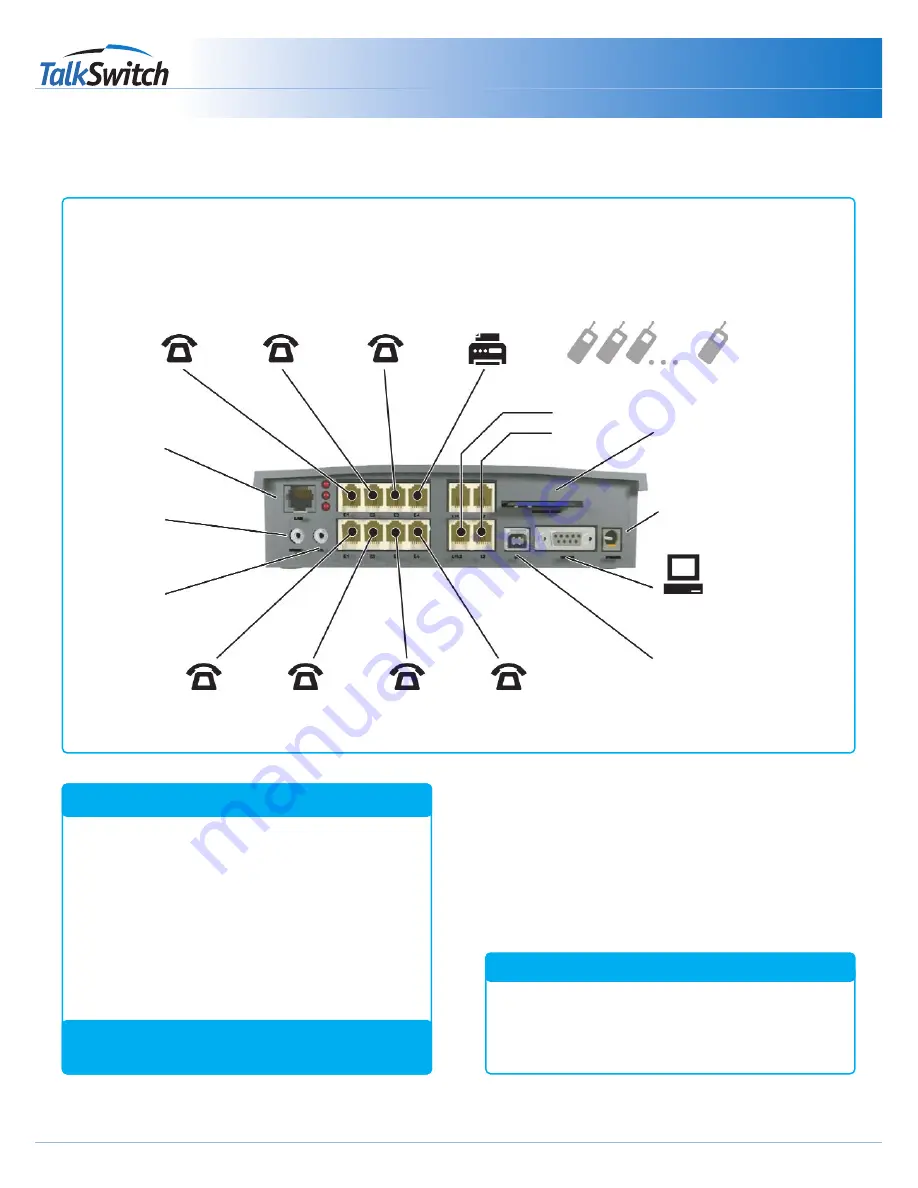
This shows the default connections to the TalkSwitch 48
and TalkSwitch 24 models.
Call Handling
Additional call handling capabilitities can be added by
installing the TalkSwitch Software.
LAN
Music-on-Hold
3.5mm jack
P.A.
3.5mm jack
‘
E1
’ jack to
Extension 111
‘
E2
’ jack to
Extension 112
‘
E3
’ jack to
Extension 113
‘
E4
’ jack to
Extension 114
‘
E5
’ jack to
Extension 115
‘
E6
’ jack to
Extension 116
‘
E7
’ jack to
Extension 117
‘
E8
’ jack to
Extension 118
Incoming
Phone Lines
L1 to L4
Remote Extensions
211, 212 ... 218
Serial Connection
to PC
Computer via the RS323 serial
cable
USB connection
to PC Computer
See pg 7 of the User Guide
AC
connection to power outlet
Memory Card Slot for Voicemail
Expansion
*
*
*
*
*
*
*
TalkSwitch 48 models only.
(receptionist)
Suggested Configuration
TalkSwitch Back Panel:
Connections from the TalkSwitch to all your telephone devices and computer, you need not add all of the phones
The fax machine should be put into local extension ‘E8’ for a TalkSwitch 48, or ‘E3’ for the TalkSwitch 24 model.
Default Equipment Settings:
Simply connect the Talkswitch to your phone system (as shown below).
Your phone system will do the following:
·
An incoming call on any line will ring all local
extensions.
·
A receptionist can manually transfer calls to local
extensions or voicemail.
·
Every local extension gets a voicemail box.
·
Extension 114 (E4) works during a power failure.
What will my phone system do?
TalkSwitch 24
2 Lines In (L1/L2 and L2 only)
4 Local Extensions (E1 - E4 only)
No Lan Connection
No Voicemail Memory Slot
TalkSwitch 48 LS and NLS
4 Lines In (as shown)
8 Local Extensions (as shown)
LAN Connection
Voicemail Memory Slot
Model Differences
Additional Call Handling Capabilities can be
added by installing the TalkSwitch Software.
(fax)


