background image

Page 5

SKU 96382

for technical questions, please call 1-800-444-3353.

operation

filling and adjusting the air spray Gun

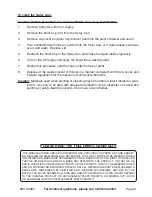
Remove the cover of the Paint Cup (30) and fill with the paint to be sprayed.

Replace and tighten the cup’s cover.

Prepare a spraying test area.

Turn on the air supply and adjust the air regulator on the compressor to no more than 
50 PSI.

Point the Spray Gun in the direction of the spray test area and press the Trigger (26).

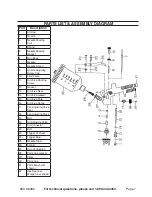
Adjust the spray pattern (horizontal or vertical) by turning the Air Cap (1).

Adjust the air-to-material mixture by adjusting the Air Adjusting Valve (20).

Adjust the spray width using the Fan Adjustment Valve (18).  Do not unscrew com-
pletely.

Adjust the amount of paint flow by using the Fluid Valve (10).  

paint preparation

Verify the percentage of paint thinning required for use with a HVLP (High Volume, Low 

Pressure) Spray Gun, with the paint or materials supplier.  Try thinning a small amount and 
testing the spray action.  Thoroughly mix material before testing.

spraying techniques

Clean area with a mild detergent and allow to dry prior to beginning.

While spraying, move the Spray Gun in parallel strokes to the object being painted.

Keep 4 to 12 inches between the Spray Gun and the object being painted. This may 
be  slightly  different  depending  on  the  flow  adjustment  and  the  type  of  paint  being 
sprayed.

Release the Trigger (26) at the end of each forward movement; Pull the Trigger again 
on the return movement.

When using a vertical pattern, move the Spray Gun in a horizontal motion; With a hori-
zontal pattern, move the Spray Gun in a vertical motion. The round pattern requires a 
greater distance from the object being painted.

Maintenance

The Spray Gun must be cleaned 

immediately

 after use.  If the paint drys inside the Spray 

Gun, cleaning is much more difficult and the unit may be permanently damaged. 

1.

2.

3.

4.

5.

6.

7.

8.

9.

1.

2.

3.

4.

5.

Содержание 96382

Страница 1: ...isit our website at http www harborfreight com To prevent serious injury read and understand all warnings and instructions before use Copyright 2007 by Harbor Freight Tools All rights reserved No portion of this manual or any artwork contained herein may be reproduced in any shape or form without the express written consent of Harbor Freight Tools For technical questions or replacement parts pleas...

Страница 2: ...never be allowed in the work area Never let them handle the Spray Gun Store idle equipment When not in use this tool must be stored in a dry location to inhibit rust Always lock up tools and keep out of reach of children Do not force this tool it will do the job better and more safely at the rate for which it was intended Do not use inappropriate attachments in an attempt to exceed the tool capaci...

Страница 3: ...and accessories When servicing use only identical replacement parts Use of any other parts will void the warranty Only use accessories intended for use with this tool Clean sprayer with care Use nonflammable solvents Avoid fire danger Do not smoke while using the Spray Gun Never spray near open flames pilot lights stoves heaters or any other heat source Most solvents and coat ings are highly flamm...

Страница 4: ...anual If any parts are missing or broken please call Harbor Freight Tools at the number on the cover of this manual as soon as possible Assembly For best results a regulator should be connected to the Spray Gun as shown below moisture filter Clean the sprayer out by flushing with a nonflammable solvent Check all seals before connecting to the air supply Slide the Paint Cup Gasket 28 over the Cup C...

Страница 5: ...me Low Pressure Spray Gun with the paint or materials supplier Try thinning a small amount and testing the spray action Thoroughly mix material before testing Spraying Techniques Clean area with a mild detergent and allow to dry prior to beginning While spraying move the Spray Gun in parallel strokes to the object being painted Keep 4 to 12 inches between the Spray Gun and the object being painted...

Страница 6: ... when painting or cleaning may be harmful or fatal if inhaled or swal lowed Use only in an area with adequate ventilation Use a respirator or mask when painting or using cleaning solvents Do not use around flames 1 2 3 4 5 6 7 8 PLEASE READ THE FOLLOWING CAREFULLY The manufacturer and or distributor has provided the parts list and assem bly diagram in this manual as a reference tool only Neither t...

Страница 7: ...djusting Screw Cap 10 Fluid Valve 11 Air Valve Packing Screw 12 Gasket 13 Air Valve Seat 14 Air Valve Gasket 15 Air Valve Pole 16 Air Valve Spring 17 Fan Adjusting Valve Seat 18 Fan Adjusting Valve 19 Bolt 20 Air Adjusting Valve 21 Air Connector 22 Bolt 23 Trigger Connect 24 Trigger Stud 25 Needle Stud 26 Trigger 27 Cup Connection 28 Paint Cup Gasket 29 Filter 30 Paint Cup 31 Paint Brush not shown...

Страница 8: ...on tingent special or consequential damages arising from the use of our product Some states do not allow the exclusion or limitation of incidental or consequential damages so the above limitation of exclusion may not apply to you This warranty is expressly in lieu of all other warranties express or implied including the warranties of merchantability and fitness To take advantage of this warranty t...

Отзывы: