background image

Page 9

SKU 96087

for technical questions, please call 1-800-444-3353.

InSPECtIOn, MAIntEnAnCE, And CLEAnIng

WARnIng! 

 Make sure the Power Switch (23) of the Air Compressor is in its 

“Off”


position, all air pressure has been released from the unit,  and the unit is unplugged 
from its electrical outlet before performing any inspection, maintenance, cleaning 
procedures, or leaving the unit unattended.

before each use,

 inspect the general condition of the Air Compressor.  Check for 

loose screws, misalignment or binding of moving parts, cracked or broken parts, 
damaged electrical wiring, loose air fittings, and any other condition that may affect 
the safe operation of the Compressor.  If abnormal noise or vibration occurs, have 
the problem corrected before further use.  

do not use damaged equipment.

daily, 

purge the Air Tank (17) of all air and moisture to prevent corrosion.  To do so, 

slowly and carefully unscrew (no more than four threads) the Drain Valve (18) until 
the compressed air and condensation begins to be released from the Tank.  Allow 
sufficient time for all of the air and condensation to escape from the Tank.  Then, 
firmly re-tighten the Drain Valve.

CAutIOn!  All maintenance, service, or repairs not mentioned in this manual 
must only be performed by a qualified service technician.

1.

2.

3.

4.

tROubLESHOOtIng

Problem

Possible Cause

Possible Solution

Compressor will not start.

Blown fuse or circuit breaker tripped.
Overload Protector tripped.
Loose electrical connections.

1.
2.
3.

Replace or reset fuse/circuit breaker.
Reset Overload Protector.
Make sure Compressor is plugged into a 
working, 120 volt, grounded, electrical outlet.

1.
2.
3.

Low pressure.

Air Tank pressure too low.

1.

Allow Air Tank pressure to reach at least 105 
PSI.
Check Valve by pulling on ring.  If condition 
persists, have a qualified service technician 
replace Valve.

1.

2.

Safety Valve releasing.

Defective Pressure Switch.

1.

Have a qualified service technician replace 
Pressure Switch.
Replace Safety Valve.

1.

2.

Power Switch will not turn off 
Compressor.

Defective Power Switch.

Immediately unplug Compressor from its 
electrical outlet.  Do not operate Compressor until 
a qualified service technician can replace Power 
Switch.

2.  Air leak in Safety Valve.

Defective Safety Valve.

2.

to Prepare the Compressor for Storage: 


When done using the Compressor for the day, 

Pull out on the Safety Valve (5) to release remaining air pressure from the tool.  Then 

disconnect the air hose (not included) from the Compressor.  

(See figure A.)

Remove any moisture in the Air Tank (17) by opening the Drain Valve (18).  Then, 

retighten the Drain Valve.  

(See figure A.)

WARnIng!

 Allow the Air Compressor to completely cool.  Then store the unit in a 

clean, dry, safe location out of reach of children.

1.

2.

3.

Содержание 96087

Страница 1: ...the Air Compressor Always lift the Air Compressor using its Handle a 3491 Mission Oaks Blvd Camarillo CA 93011 Visit our website at http www harborfreight com To prevent serious injury read and understand all warnings and instructions before use Copyright 2007 by Harbor Freight Tools All rights reserved No portion of this manual or any artwork contained herein may be reproduced in any shape or for...

Страница 2: ...nspection maintenance and cleaning procedures parts list and assembly diagram Keep your invoice with this manual Write the invoice number on the inside of the front cover Keep this manual and invoice in a safe and dry place for future reference GENERAL SAFETY RULES AND PRECAUTIONS WARNING READ AND UNDERSTAND ALL INSTRUCTIONS Failure to follow all instructions listed below may result in electric sh...

Страница 3: ...ol of the air tool in unexpected situations Use safety equipment Always wear eye protection Always wear ANSI approved safety impact glasses and hearing protection under a full face shield during use TOOL USE AND CARE Do not force the tool Use the correct tool for your application The correct tool will do the job better and safer at the rate for which it is designed Do not use the Compressor if the...

Страница 4: ...FR 1910 134 and or Canadian Standards Associations CSA In the event the Air Compressor is used for the purpose of breathing air application and proper in line safety and alarm equipment is not simultaneously used existing warranties are void and Harbor Freight Tools disclaims any liability whatsoever for any loss personal injury or damage DANGER Never attempt to repair or modify the Air Tank 17 We...

Страница 5: ... WARNING Risk of fire or explosion Do not spray flammable liquid in a confined area or towards a hot surface Spray area must be well ventilated Do not smoke while spraying or spray where spark or flame is present Arcing parts Keep Com pressor at least 20 feet away from explosive vapors such as when spraying with a spray gun Risk of bursting Do not adjust Regulator to result in output pressure grea...

Страница 6: ...re cord and three prong grounding plug The plug must be connected to a properly grounded outlet If the tool should electri cally malfunction or break down grounding pro vides a low resistance path to carry electricity away from the user reducing the risk of electric shock See 3 Prong Plug and Outlet The grounding prong in the plug is connected through the green wire inside the cord to the groundin...

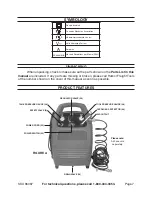
Страница 7: ...umber shown on the cover of this manual as soon as possible PRODUCT FEATURES SYMBOLOGY Double Insulated Canadian Standards Association Underwriters Laboratories Inc V Volts Alternating Current A Amperes n0 xxxx min No Load Revolutions per Minute RPM OVERLOAD PROTECTOR 24 TOOL PRESSURE GAUGE 28 REGULATOR VALVE 30 POWER SWITCH 23 TANK PRESSURE GAUGE 28 SAFETY VALVE 5 AIR OUTPUT POWER CORD 35 FIGURE ...

Страница 8: ...o turn the Regulator Valve clockwise to increase or counterclockwise to decrease the PSI The Tool Pressure Gauge 28 will indicate the PSI being delivered to the air hose See Figure A NOTE When the maximum air pressure 135 PSI is reached as indicated by the Tank Pressure Gauge 28 the motor will stop The Compressor will automatically restart when the air pressure drops below 100 PSI See Figure A IMP...

Страница 9: ... service technician 1 2 3 4 TROUBLESHOOTING Problem Possible Cause Possible Solution Compressor will not start Blown fuse or circuit breaker tripped Overload Protector tripped Loose electrical connections 1 2 3 Replace or reset fuse circuit breaker Reset Overload Protector Make sure Compressor is plugged into a working 120 volt grounded electrical outlet 1 2 3 Low pressure Air Tank pressure too lo...

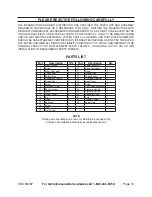
Страница 10: ... Drain Valve 1 NOTE Some parts are listed and shown for illustration purposes only and are not available individually as replacement parts PLEASE READ THE FOLLOWING CAREFULLY THE MANUFACTURER AND OR DISTRIBUTOR HAS PROVIDED THE PARTS LIST AND ASSEMBLY DIAGRAM IN THIS MANUAL AS A REFERENCE TOOL ONLY NEITHER THE MANUFACTURER OR DISTRIBUTOR MAKES ANY REPRESENTATION OR WARRANTY OF ANY KINDTOTHE BUYERT...

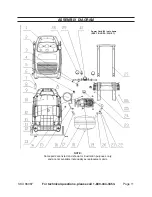
Страница 11: ...nical questions please call 1 800 444 3353 ASSEMBLY DIAGRAM Power Cord 35 not shown SEE FIGURE A PAGE 7 NOTE Some parts are listed and shown for illustration purposes only and are not available individually as replacement parts ...

Страница 12: ...pecial or consequential damages arising from the use of our product Some states do not allow the exclusion or limitation of incidental or consequential damages so the above limitation of exclusion may not apply to you This warranty is expressly in lieu of all other warran ties express or implied including the warranties of merchantability and fitness To take advantage of this warranty the product ...

Отзывы: