background image

Page 10

For technical questions, please call 1-888-866-5797.

Item 93755 


SA

FE

TY

OP
ERA

TI

O

N

MAINT

ENANC

E

SE

TUP

Assembly

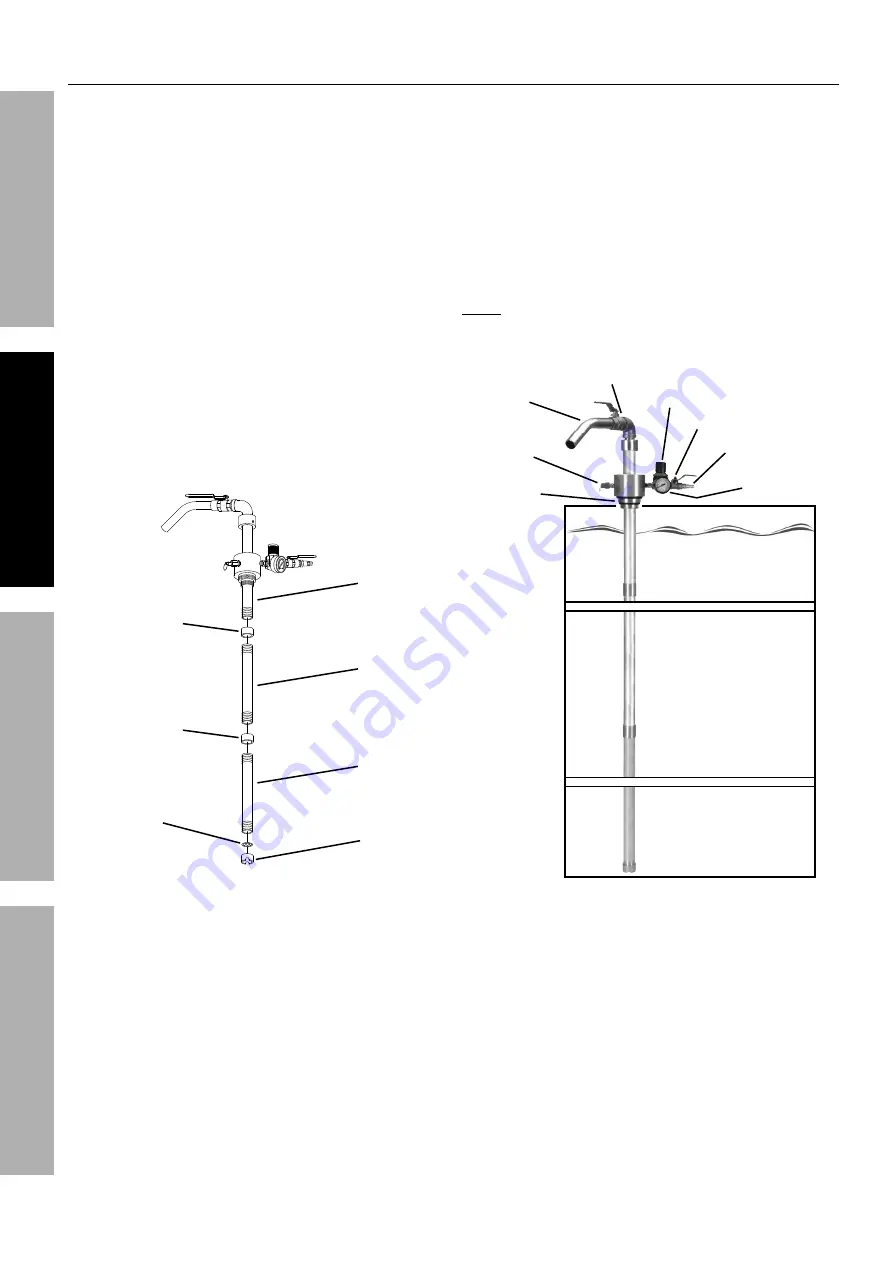
1.  Wrap 4" of pipe sealer tape (not included) around 

the male threads located on the lower section of 

Suction Tube A (5).  Then firmly screw a Suction 

Tube Coupler (7) onto the Suction Tube.  

2.  Wrap 4" of pipe sealer tape around the male 

threads on both ends of Suction Tube B (6).  Then 

firmly screw one end of Suction Tube B into the 

Suction Tube Coupler attached to Suction Tube A.

3.  Firmly screw the remaining Suction Tube Coupler 

onto the lower section of Suction Tube B.

4.  Wrap 4" of pipe sealer tape around the 

male threads on both ends of the remaining 

Suction Tube C (8).  Then firmly screw one 

end of Suction Tube C into the Suction Tube 

Coupler attached to Suction Tube B.

5.  Insert the Oil Filter (9) into the Inlet Plug (10).  

Then, firmly screw the Inlet Plug onto the 

lower section of Suction Tube C.

Inlet Plug 

(10)

Oil Filter 

(9) 

Suction Tube 

Coupler (7)

Suction 

Tube A  

(5)

Suction Tube 

Coupler (7)

Suction 

Tube B  

(6)

Suction 

Tube C  

(8)

Figure C:  Suction Tube Setup

6.  Unscrew and remove the large bung from 

the barrel of liquid to be extracted.

7.  Insert the lower section of the Drum Extractor 

through the bung of the barrel.  Then 

firmly screw the Drum Extractor into 

the female threads of the bung.

8.  To adjust the length of the tube in the 

barrel, grasp the regulator assembly 

and twist it up or down on the pipe.

Note: 

The male threads of the Drum Extractor 

are designed to fit a 1-1/2" or 2" diameter 

bung.  Refer to Figure D: Barrel Setup.

Barrel

(not included)

Outlet 

Tube

Air Inlet Ball Valve

Regulator

Pressure 

Gauge

Air Quick Coupler

Outlet Ball Valve

Pressure 

Release 

Valve

1-1/2"

~

2" 

Diameter 

Threads

Figure D:  Barrel Setup

Содержание 93755

Страница 1: ...d When unpacking make sure that the product is intact and undamaged If any parts are missing or broken please call 1 888 866 5797 as soon as possible Copyright 2022 by Harbor Freight Tools All rights...

Страница 2: ...ty warnings and instructions Failure to follow the warnings and instructions may result in serious injury Work Area 1 Keep the work area clean and well lit Cluttered benches and dark areas increase th...

Страница 3: ...essories or storing the tool Such preventive safety measures reduce the risk of starting the tool unintentionally Turn off and detach the air supply safely discharge any residual air pressure and rele...

Страница 4: ...e tool before connecting the air supply A loose accessory may detach or break during operation 6 Obey the manual for the air compressor used to power this tool 7 Install an in line shutoff valve to al...

Страница 5: ...g concerning Risk of Hearing Loss Wear hearing protection WARNING marking concerning Risk of Respiratory Injury Wear NIOSH approved dust mask respirator WARNING marking concerning Risk of Explosion Sp...

Страница 6: ...ote For additional information regarding the parts listed in the following pages refer to the Assembly Diagram near the end of this manual Note This air tool may be shipped with a protective plug cove...

Страница 7: ...onnected Note Air flow and therefore tool performance can be hindered by undersized air supply components The air hose must be long enough to reach the work area with enough extra length to allow free...

Страница 8: ...r Hose Connects air to tool B Filter Prevents dirt and condensation from damaging tool or workpiece C Regulator Adjusts air pressure to tool D Lubricator optional For air tool lubrication E Coupler an...

Страница 9: ...bration reduction E Main Air Line 3 4 minimum recommended Distributes air to branch lines F Ball Valve To drain moisture from system G Branch Air Line 1 2 minimum recommended Brings air to point of us...

Страница 10: ...ached to Suction Tube B 5 Insert the Oil Filter 9 into the Inlet Plug 10 Then firmly screw the Inlet Plug onto the lower section of Suction Tube C Inlet Plug 10 Oil Filter 9 Suction Tube Coupler 7 Suc...

Страница 11: ...nd set its regulator to 10 PSI Do not exceed 10 PSI 4 Set the Regulator on the Drum Extractor up to 10 PSI Stay within air pressure capacity Do not operate the Extractor above 10 PSI Note The rate of...

Страница 12: ...spect the general condition of the Drum Extractor Check for loose hardware or housing misalignment or binding of moving parts cracked or broken parts any other condition that may affect its safe opera...

Страница 13: ...of the Drum Extractor is adjusted to compensate for the viscosity of the liquid being extracted Do not exceed maximum air pressure 6 Remove Drum Extractor from the barrel and check for blockages in t...

Страница 14: ...HER REPAIRS TO THE ORIGINAL PRODUCT OR REPLACEMENT PARTS THERETO OR ARISING OUT OF HIS OR HER INSTALLATION OF REPLACEMENT PARTS THERETO Parts List Record Product s Serial Number Here Note If product...

Страница 15: ...Page 15 For technical questions please call 1 888 866 5797 Item 93755 SAFETY OPERATION MAINTENANCE SETUP Assembly Diagram 28 4 1 3 2 5 6 7 8 9 10 12 11 16 18 29 17 14 13 19 20 15 21 22 23 24 27 25 26...

Страница 16: ...amages so the above limitation of exclusion may not apply to you THIS WARRANTY IS EXPRESSLY IN LIEU OF ALL OTHER WARRANTIES EXPRESS OR IMPLIED INCLUDING THE WARRANTIES OF MERCHANTABILITY AND FITNESS T...

Отзывы: