SKU 93005
For technical questions, please call 1-800-444-3353
Page 5
Gas Detection
1.
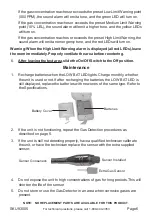
Charge batteries. Plug the Power Adapter cord plug into the Charger Adapter
Connector on the side of the unit. Then, plug the Power Adapter into a 110 VAC
electrical outlet. Allow batteries to charge for 8 hours before using the Gas
Detector.
2.
Warm-up Gas Detector. Slide the On/Off Switch to the On position and wait for
at least 10 seconds.
During this time, All Detection LEDs will first light green, then yellow, and finally
red.
3.
In an area with clean air, slowly adjust the Sensitivity Adjust Knob so as to light
the lower LED only.
4.
Perform a sample test. In a safe area, place the unit no closer than four inches
from a known combustible gas (i.e., cigarette lighter gas) and check the display
for a high reading. Then move the unit where the air is clear. The reading should
go to low again.
5.
Adjust direction and place the Gooseneck Gas Sensor in the room where the
atmosphere is to be tested.
Note: Gases that are heavier than air, such as propane, can be detected nearer the
floor.
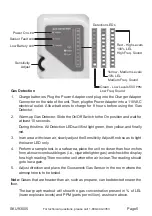
The bar graph readout will show the gas concentration present in % of LEL
(lower explosive levels) and PPM (parts per million), as shown above.
Detection LEDs
Red - High Levels
100% LEL
High Freq. Sound
Yellow - Medium Levels
10% LEL
Medium Freq. Sound
Green - Low Levels 500
PPM
Low Freq. Sound
Sensitivity
Adjust
Power On
LED
Sensor Fault
LED
Low Battery
LED


