Page 10
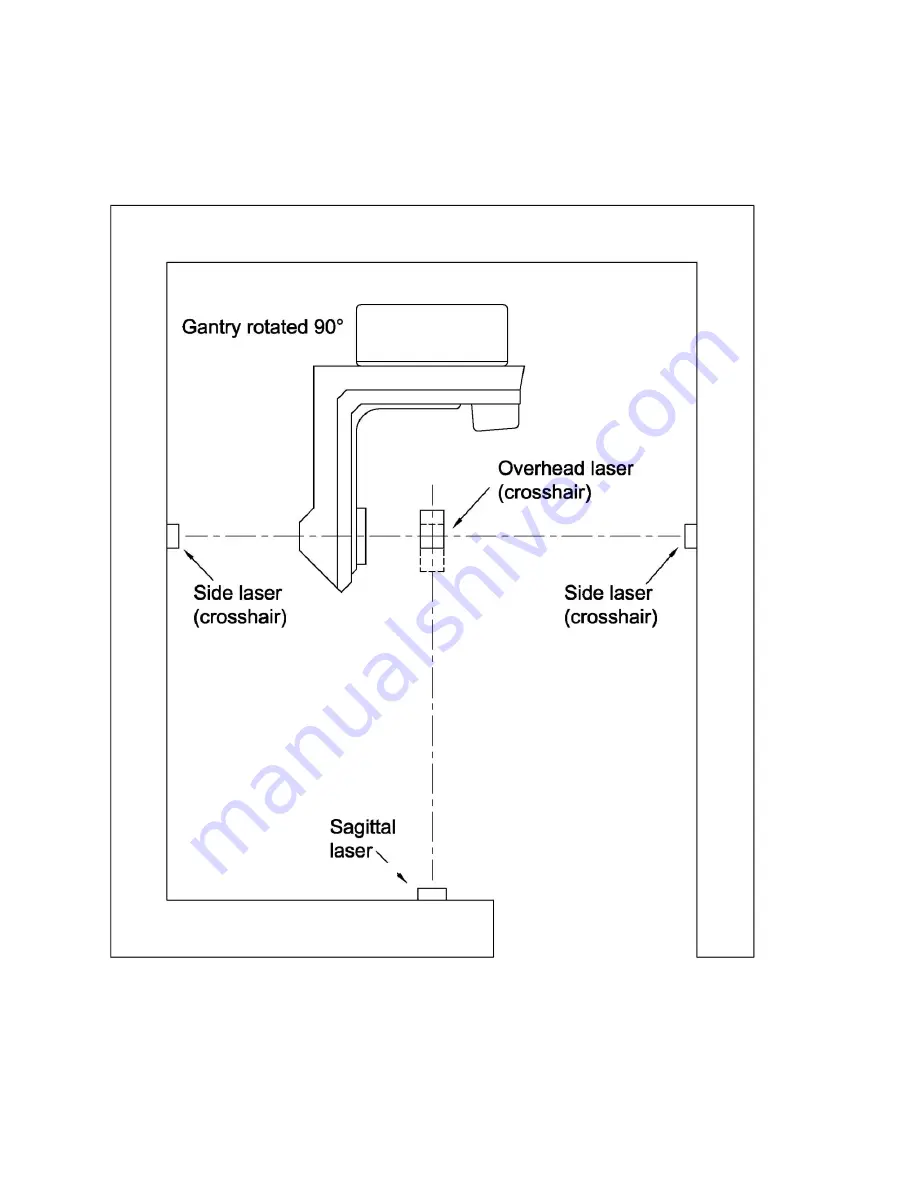
2.3 Typical Room Layout Example
Unit #1
Unit #2
Unit #3
Unit #4
Страница 1: ...The MAXX 700 User Installation Manual Version 2 0 January 2020...
Страница 2: ...e installation 8 2 2 Power Supply 8 2 3 Typical Room Layout Example 10 2 4 Location of Installation 11 2 5 Powering Up The MAXX 700 System 12 3 Troubleshooting 13 3 1 Operation Failure 13 3 2 Other Pr...
Страница 3: ...e control to operate the unit 1 1 Intended Use The MAXX 700 lasers are intended to be used to align patients for medical diagnostic imaging and radiation therapy They are intended to be used in a clin...
Страница 4: ...ls and floors settle and as building materials dry out If the equipment or the lasers have been moved it is advised to realign the lasers to the isocenter before use CAUTION The laser light is a risk...
Страница 5: ...ending on whether the lasers are being used in Europe or North America Safety Labels For Europe The wavelength is 450 nm for a blue laser The wavelength is 532 nm for a green laser The wavelength is 6...
Страница 6: ...de The PAN ID The PAN ID is the network identifier number of the wireless network within a room The remote control and all of the laser units in the room must have the same PAN ID to communicate with...
Страница 7: ...ir Beam Fan Out Crosshair Tolerance Line Straightness 60 in each axis 90 14 4 arc seconds 0 05mm deviation over 3m at 3m distance Electrical Power Supply Input 100 240V AC 50 60Hz 0 8A Output 12V DC 1...
Страница 8: ...the MAXX 700 S Sagittal are used with different systems A typical system consists of Two MAXX 700 CH crosshair lasers mounted on each side beam crosshairs along the X axis One MAXX 700 CH crosshair l...
Страница 9: ...tion Some facilities prefer to connect all the lasers to one wall switch so all of the lasers are able to be turned on and off together from a convenient location Some facilities connect the lasers to...
Страница 10: ...Page 10 2 3 Typical Room Layout Example Unit 1 Unit 2 Unit 3 Unit 4...
Страница 11: ...cket for the front can be used to install all of the units This is highly recommended for ceiling mounted crosshair lasers MAXX 700 CH as well as sagittal lasers MAXX 700 S Figure 2 6 Adjustable Mount...
Страница 12: ...re 2 7 Powering Up A MAXX 700 A The Power LED on the bottom left side should be on immediately B The Unit Number LED displays the unit number C The laser starts beaming and the brightness of the laser...
Страница 13: ...this is not the case go to the next step 4 Shut down all of the units and power down the remote control Wait at least 10 seconds then power up the laser units followed by the remote control The netwo...
Страница 14: ...e switched off and the power must be disconnected from the supply using the appliance inlet WARNING No modifications may be made to the remote control as this will result in the Cemar Electro Inc warr...
Страница 15: ...ste upon disposal For proper treatment recovery and recycling please contact your disposal local supplier for further information In a case that a laser fails to function properly please contact our c...
Страница 16: ...igations or rights including without limitation any other warranties expressed or implied e g implied warranties of merchantability or fitness for a particular purpose Under no circumstances shall Cem...
Страница 17: ...Cemar Electro Inc service representatives are available to work with facility planners architects and hospital personnel throughout the planning and installation process Service department hours are...
Страница 18: ...Type Compliance Declaration The MAXX 700 series which comprises wireless communication equipment complies with Directive 2014 53 EU The full text of the EU Declaration of Conformity is available at th...
Страница 19: ...treatment recovery and recycling please contact your dealer or supplier for further information Date of Manufacture Manufacturer Part Number Serial Number Lot Number Authorized Representative Europe D...