background image

Set Run Time, then press ENTER. (2:30 is recommended but may be adjusted).

1.1.7. 

Set Hold Time, then press ENTER.  (15:00 is recommended but may be adjusted.)

1.1.8. 

Set Stirring to “OFF”, then press ENTER.

1.1.9. 

Set Cooling to “OFF”, then press ENTER.

1.1.10. 

Set “Next Stage = (N)”, then press ENTER.

1.1.11. 

Set “Save Method = (Y)”, then press ENTER.

1.1.12. 

Create a method name using the arrow keys, highlight “Exit”, and press ENTER.  The 

1.1.13. 

method is now saved in the software.

To use an existing method:

1.2. 

Press the Open Folder key.

1.2.1. 

Use the right arrow key to scroll to the desired method name, then press ENTER.

1.2.2. 

Set up the vessel.

2. 

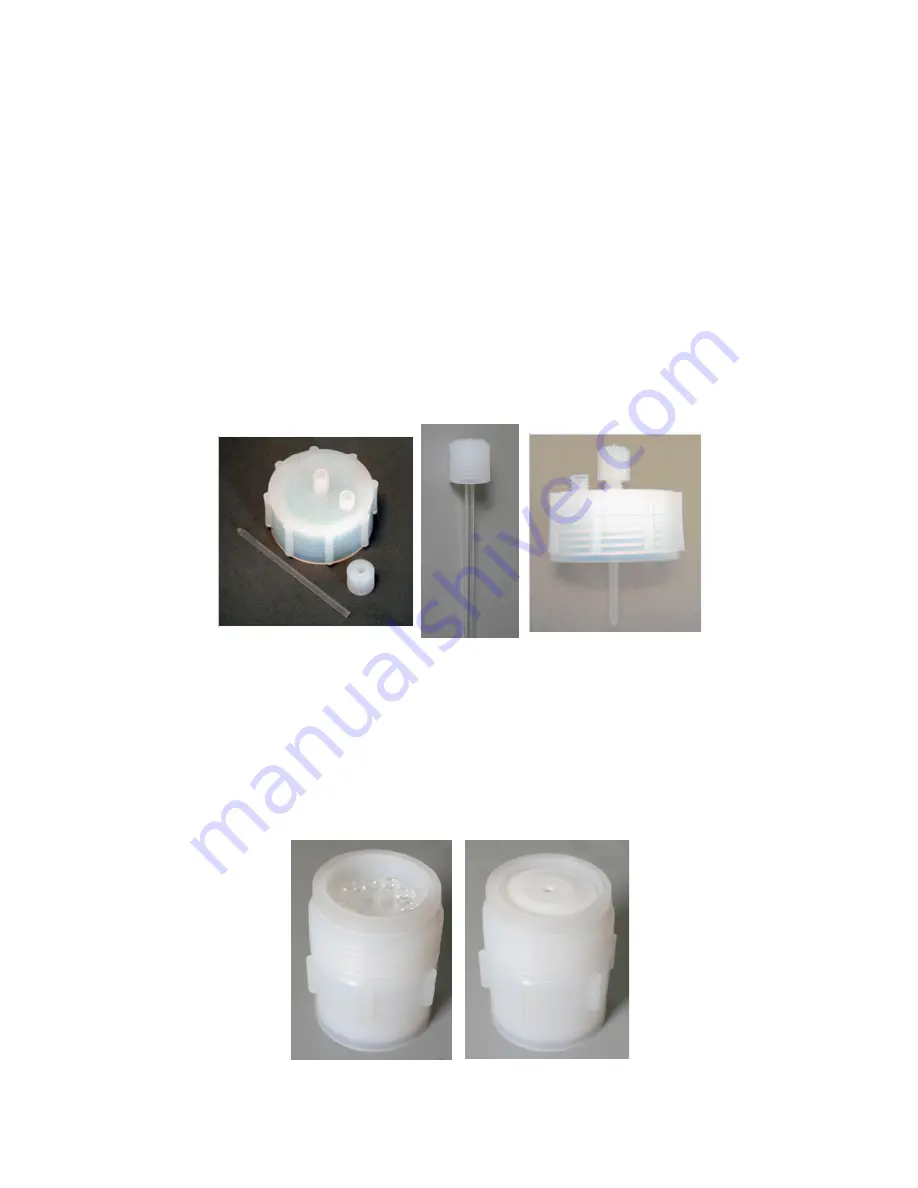
Slide the thermowell (closed end first) though the top of an open ferrule nut until the top of the 

2.1. 

thermowell is even with the top of the nut (Figure 2, center picture).

Pass the closed end of the thermowell through the center port of the 2-port vessel cap until 

2.2. 

the nut meets the threaded port.  Tighten the nut finger tight onto the threaded port to create a 

secure seal (Figure 2, right picture).  Do not use a wrench, as this will damage the threads.


Add the protein solution to the microvials and dry using a vacuum centrifuge.  Using forceps, 

2.3. 

insert the vials to the microvial insert tray.

Add 10 mL of 6N HCl with 1% Phenol to the vessel body.

2.4. 

Place the insert tray into the vessel body.  Fit the condensation shield over the vials (Figure 3).

2.5. 

Figure 2.  Thermowell Assembly.

Figure 3.  Microvial Loading.

NOTE

Run Time is the time it takes for the Discover to reach the maximum temperature.  The Hold Time is the 

time the Discover maintains the maximum temperature.  

Содержание Discover Protein Hydrolysis

Страница 1: ...rature control 2 1 box Connect the other end of the cable to COM2 on the read of the Discover Figure 1 Connect the blue fiber optic temperature probe to the temperature control box taking care not 2 2 to bend the probe Figure 1 Instrument Connection Ports COM2 indicated in red Pressure Port indicated in yellow 600313 Rev 5 10 6 2008 NOTE The Discover Protein Hydrolysis is only compatable with Disc...

Страница 2: ... the right arrow key to 5 5 change to DEVICE FIBER OPTIC and press ENTER Press EDIT 5 6 The screen should say TEMPERATURE If yes press ENTER Otherwise use the right 5 7 arrow key to scroll to TEMPERATURE and press ENTER Highlight Enter Calibration and press ENTER 5 8 Press EDIT then enter the 7 digit GF located on the white band at the base of the fiber optic 5 9 probe Press ENTER The calibration ...

Страница 3: ...t until the top of the 2 1 thermowell is even with the top of the nut Figure 2 center picture Pass the closed end of the thermowell through the center port of the 2 port vessel cap until 2 2 the nut meets the threaded port Tighten the nut finger tight onto the threaded port to create a secure seal Figure 2 right picture Do not use a wrench as this will damage the threads Add the protein solution t...

Страница 4: ...l from the bath Thread the tubing 2 9 from the To Vessel port on the valve panel assembly through the top of the attenuator port opening Secure the end of the tubing onto the open port of the vessel using an open ferrule nut Figure 5 Place the vessel assembly into the Discover microwave cavity Secure the attenuator into 2 10 position Figure 5 Insert the fiber optic probe though the attenuator port...

Страница 5: ...d then to Run Press the PLAY key to run your selected hydrolysis program 4 At the conclusion of the hydrolysis and cooling cycle remove the temperature probe from the vessel 5 assembly Remove the attenuator then remove the vessel from the Discover cavity The vessel assembly will 6 still be connected to the valve panel Turn the valve handle to Vent to release the remaining nitrogen pressure Disconn...

Страница 6: ...4530 Fiber Optic Temperature Control 541175 Discover Protein Hydrolysis 200 240V 50 60Hz 925482 Includes the Following Bioscience Discover 200 240V 50 60Hz 908010 Discover Protein Hydrolysis Option 925590 Vacuum Pump 200 240V 50 60Hz 544540 Fiber Optic Temperature Control 541175 ACCESSORIES PRODUCT NAME PART Complete Valve Panel Assembly 908275 Reaction Vessel Top with 2 Ports 148460 Reaction Vess...

Отзывы: