5
2
1
3
6
4
ENGLISH - 7
ENGLISH - 8
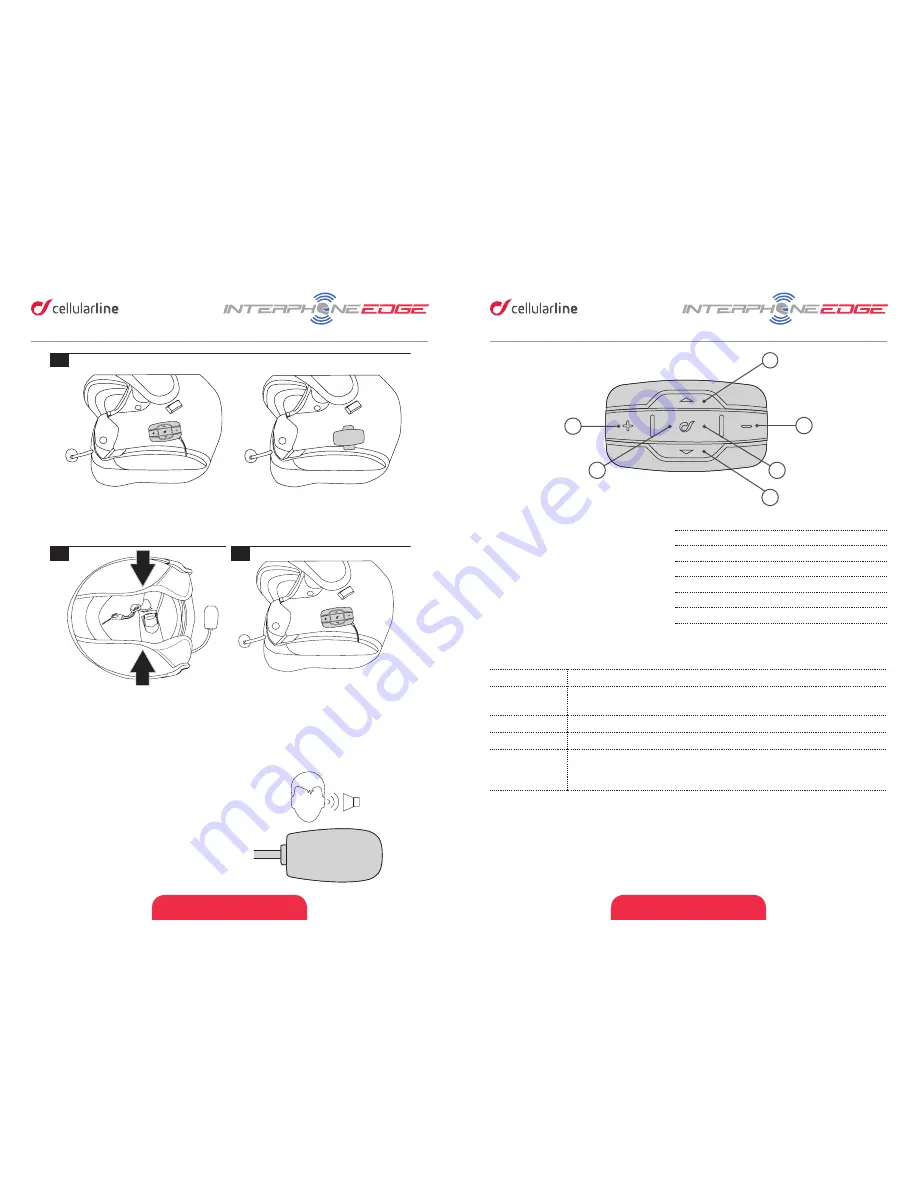
Pic.2
(1)
MFB button
(2)
UP button
(3)
DOWN button
(4)
button
(5)
Volume - button
(6)
Led
2.1 Main Commands (Pic.2)
Power on
Press MFB button (1), led (6) flashes.
Power off
Press and hold MFB button (1) until you hear message. Led (6) flashes
red for few seconds.
Volume
Press buttons (4) to increase or (5) to decrease.
Mute
Press button (5) for about 2 seconds.
Menu
Press buttons (2) or (3) to scroll the menu items. Press MFB button
(1) to select an item. Once selected a menu item, you come back to
“INTERCOM” menu (Standby)with a short press of MFB button.
1
3
2
4
5
6
7
8
MIC
5
2
1
3
6
4
1 - MFB Multifunction/on-off button
2 - Menu UP button
3 - Menu DOWN button
4 - + volume button
5 - – volume button
6 - Multifunction LED
* see the user manual
for complete instructions.
WARNING ON THE BATTERY OF THE PRODUCT
Fully charge the battery before using the product for the first time.
Do not store the product without charging it. Failure to do so may cause irreversible da-
mage to the battery capacity. Charge the battery every TWO months.
WARNING ON THE WATER RESISTANCE OF THE PRODUCT
The external unit (control unit), connected to the audio kit, is classified IP67 according to
the IEC60529 standard. The control unit, can therefore be immersed in a meter of fresh
water for a maximum of 30 (thirty) minutes.
Despite this classification, the device is not immune to greater stress, such as prolonged
immersions or high pressure water jets.
Using the product during intense meteorological phenomena, at high speeds, may be
equivalent to subjecting the product to a high pressure jet.
FOLLOW ALL SUGGESTIONS CAREFULLY TO AVOID DAMAGING THE DEVICE:
Do not immerse the product in fresh water which is more than a metre deep for more than
30 minutes.
Do not store the product when still wet: dry it with a clean, soft cloth.
Do not expose the product to salt water or ionised water, drinks or other liquids.
If the device is exposed to liquids other than fresh water, wash the device with cold fresh
water and dry it carefully with a clean, soft cloth.
Do not expose the product to high pressure water jets.
CHAPTER 1 – COMPOSITION OF THE KIT
CHAPTER 2 – INSTALLATION INSTRUCTIONS
QUICK GUIDE
CHECK FOR SOFTWARE UPDATES ON WEBSITE
www.interphone.com
Locate the area in correspondence
with the ear
If possible, remove the two
cushions or padding
Position the strips of Velcro
for the speakers
Filp-up/jet helmet
Full face helmet
Choose the microphone to use:
Place the speakers
(!) Warnings on installation:
1. The centre of the speakers must be placed
in correspondence with the ears, as close as
possible.
2. The marking “MIC” on the microphone
must be directed towards the mouth.
Choose the bracket to use, to be attached on the left side of the helmet:
Sticker
Re-install the cushions
Bracket
Install the control unit
Содержание Interphone EDGE
Страница 1: ...USER MANUAL...


