


2835 Columbia Street • Torrance, CA 90503 U.S.A.
Telephone: 310.328.9560 • Fax: 310.212.5835
©2011 Celestron • All rights reserved. • Printed in China • 01-11
www.celestron.com
Warranty – two years.
See the Celestron website for Accessory warranties.
Product design and specifications are subject to change
without prior notification.
Designed and intended for those 13 years of age and older.
M
OvINg
The
T
RIpOd
TO
L
OCATe
O
bjeCTS
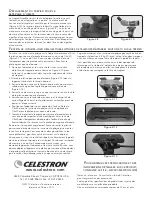
The AstroMaster tripod is easy to move wherever you want to
point it. The up and down (altitude) is controlled by the pan
handle (long handle on the left in Figure 2-10). The side-to-side
(azimuth) is controlled by the azimuth lock (Figure 2-9). The
pan handle and the azimuth lock are both loosened by turning
the handle and lock counterclockwise. When loose, you can
find your objects easily and then lock the controls. To lock the
controls in place, turn them clockwise.
Figure 2-9
Figure 2-10
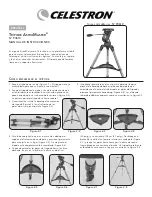
To attach your optical instrument to the tripod, you will need to
use the supplied Dovetail Bracket with a 1/4x20 screw (Figure
2-11). The 1/4x20 screw will thread into the tripod adapter
threaded hole of your instrument. To attach the Dovetail Bracket :
1. Loosen the knob and safety screw on side of the tripod head
(as shown in Figure 2-11), so they do not protrude into the top
of the tripod head.
2. Slide the Dovetail Bracket (Figure 2-12) into the recess on the
top of the tripod head.
3. Tighten the knob on the tripod head to hold the Dovetail
Bracket securely in place (Figure 2-13).
4. Tighten the safety screw until the tip touches the side of the
Dovetail Bracket.
5. Make sure the pan handle and azimuth lock are fully locked
before the next step.
6. Position the tripod adapter or the threaded 1/4x20 hole of
your optical instrument over the 1/4x20 screw in the
Dovetail Bracket.
7. Turn the thumbwheel knob of the Dovetail Bracket
counterclockwise to thread the 1/4x20 screw into the tripod
adapter or threaded hole to secure the instrument to the
Dovetail Bracket.
Note: You can also attach the Dovetail Bracket to your optical
instrument first and then attach the assembly to the tripod. So,
you have the option to use either way to attach your instrument
to the tripod whichever suits your preference.
You may want to distribute the balance of weight of your optical
instrument equally over the tripod. Position the tripod to be
level horizontally and then loosen the knob and safety screw
slightly. Then, you can move the Dovetail Bracket slightly in either
direction and tighten the knob and safety screw and recheck the
balancing until you are satisfied.
The maximum amount of weight of an optical instrument to be
attached to the tripod is about 10 pounds (4.5kg) depending on
the length, width, etc. and how the weight is distributed.
You can also attach some telescope optical tubes to the tripod
using their dovetail bars which would fit right into the Dovetail
Bracket if the bars are the right size to fit into the tripod head.
A
TTAChINg
S
pOTTINg
S
COpeS
/b
INOCULARS
/T
eLeSCOpe
O
pTICAL
T
UbeS
/C
AMeRAS
/
eTC
.
TO
The
T
RIpOd
Figure 2-11
Figure 2-12
Figure 2-13
F
OR
COMpLeTe
SpeCIFICATIONS
ANd
pROdUCT
INFORMATION
,
vISIT
:
www
.
CeLeSTRON
.
COM
Содержание ASTROMASTER 93610
Страница 11: ......
Страница 12: ...www celestron com...


