background image

– 12 –

Viewing Images/Movies on your TV

To view photo images and/or watch your captured movie/video:

1. Attach the supplied video cable to the “TV Out” port on the IS70 and the 

“TV IN” port on the TV.

2. Select the “Line” channel on your TV.

3. Turn the power on to the IS70 and it will be in the Photo Mode.

4. Press the down/mode button which will take you to the Optional Menu Screen. 

5. Use the arrows to go to the Playback mode and then push “ok”.

6. Now you will have displayed your saved images and video/movie on your 

television screen as it would be displayed on the LCD screen.

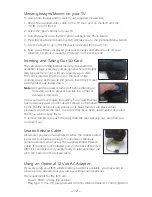
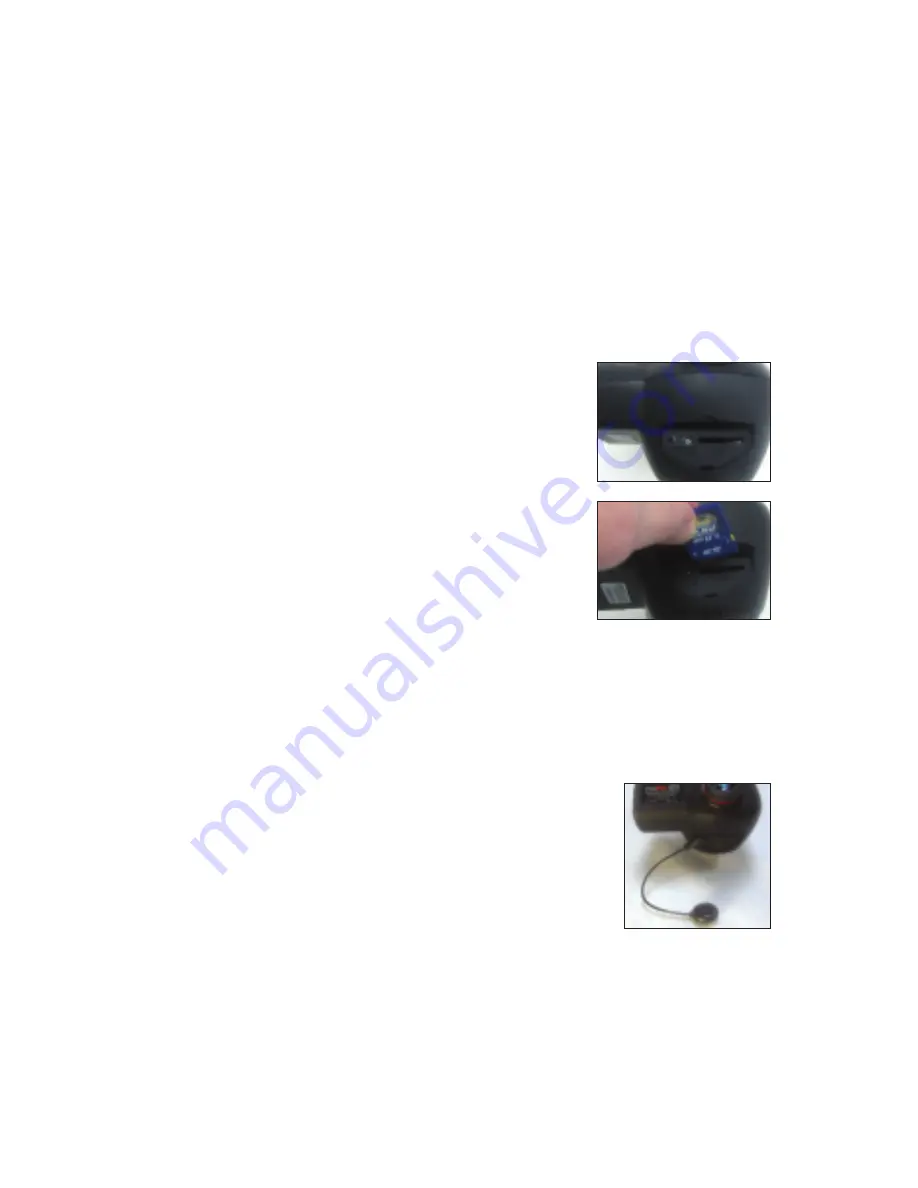
Inserting and Taking Out SD Card

The camera has 32MB internal memory. To expand the
available storage, you may add an optional Secure Digital
(SD) type memory card, with any capacity up to 2GB. 
The card is inserted into the slot on the back of the 
spotting scope, as shown in the picture. Insert the SD card
with the label side facing down.

Note:

be sure the power is turned off before inserting or
removing cards to prevent possible loss of files or
damage to the card.

A new card will not require formatting, but a card that has
been previously used in other devices should be formatted
by the VistaPix before storing photos on it. Note that this will erase all files 
previously stored on the card, so be sure they have been downloaded or copied
first if you wish to keep them.

To remove the SD card push the card, then the card will pop out, and then you
can take it out.

Shutter Release Cable

All cameras produce small vibrations when the shutter button
is pressed to capture an image. To minimize or eliminate 
camera vibration you may use the supplied Shutter Release
Cable. It connects to the labeled port on the back of the IS70.
After it is connected and you are ready to take an image, just
press the button on the release cable.

Using an Optional 12 Volt AC Adapter

If you are using your IS70 where electrical current is available, you may want to
procure an AC Adapter that you can use without using batteries.

The requirements for the IS70 are:

Power - 9VDC - 2Amp (Tip positive)
Plug Type: 3.15-6.3 V, plug diameter 4.00mm, interior diameter 1.70mm (EIAJ-02)


Содержание 52212

Страница 1: ...IS70 70mm SPOTTING SCOPE AND 3 1MP DIGITAL CAMERA USER MANUAL model 52212 ...

Страница 2: ...stallation 13 Panorama Maker Installation 13 DirectX Installation 13 Downloading Photos Movies 14 Specifications 15 Warranty 16 INTRODUCTION Congratulations on your purchase of the Celestron VistaPix IS70 the spotting scope with a built in 3 1MP digital camera You can use this digital spotting scope like a normal spotting scope for visual observations Just look through the eyepiece and focus that ...

Страница 3: ...g to focus your desired object on the LCD screen The object will appear smaller since you are viewing it at low power 7 Again the best focus is reached when the number displayed on the focus scale is at the maximum and sharp focus is seen on the LCD screen Now the low power and high power cameras are in focus with each other 8 To make minor changes in focus when looking through the eyepiece rotate...

Страница 4: ...Eyepiece at 14x Magnification 70mm Objective Lens NEVER USE A VISTAPIX TO LOOK AT THE SUN Looking at or near the sun may cause instant and irreversible damage to your eye Eye damage is often painless so there is no warning to the observer that damage has occurred until it is too late Do not point the spotting scope at or near the sun Children should always have adult supervision while observing Di...

Страница 5: ...n Magnify or minimize the size of the picture on the LCD play back photos Magnify or minimize the image in photo or video mode OK Exit buttons MENU S Power on off Button Capture Image SNAP Button Shutter Start Stop recording MONITOR IDENTIFICATION When you turn the power on the first screen that appears is the Photo Mode screen see 1 below To continue on to the Main Menu press the Down Mode button...

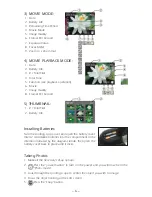
Страница 6: ...2 Battery Life Installing Batteries Turn the spotting scope over and open the battery cover Insert 2 AA Alkaline batteries into the compartment in the direction indicated by the diagrams inside then press the battery cover back in place until it clicks SNAP Taking Photos 1 Make all the necessary set up options 2 Press the power button to turn on the power and you will now be in the Photo mode 3 Lo...

Страница 7: ...Press the up button once and the icon will be displayed 2 Look through the spotting scope to center the object you wish to image 3 Focus the object looking at the LCD screen 4 Press the snap button and the image will be taken in about 10 seconds Focus Assist Sharp Focus Meter 1 Set the camera switch to low power 2 Use the camera focus ring to focus the object Look at the focus scale on the left si...

Страница 8: ...ETUP MENU OPERATION Follow the arrows in checking each option and when complete push the exit or ok button For VIDEO playback select NTSC or PAL These are the two main television systems used for playback of movies you take NTSC is used throughout North America as well as in Japan South Korea and parts of South America PAL is used throughout most of Europe Australia China and parts of South Americ...

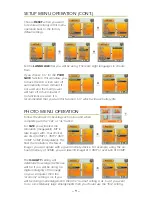
Страница 9: ...our computer then the economy setting is ok if you will be doing small enlargements then the normal setting is ok but if you want to do some relatively large enlargements then you should use the fine setting PHOTO MENU OPERATION SETUP MENU OPERATION CONT Choose RESET when you want to restore all settings in this menu operation back to the factory default settings Set the LANGUAGE that you will be ...

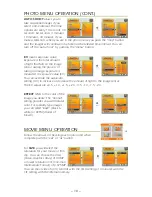
Страница 10: ...0 seconds 3 minutes 10 minutes 30 minutes If you make a selection when you are in the photo mode you push the snap button and the images will continue to be taken at the selected time interval You can turn off the auto shoot by pushing the menu button EV means exposure value Exposure is the total amount of light that falls on the image sensor during the process of taking an image Exposure is measu...

Страница 11: ... you want to delete files Then press OK or Exit MENU S FRAME is the setting of the frames per second The more frames per second the smoother motion appears on your movie or film clip The higher quality selection is 30 FPS EV means exposure value Exposure is the total amount of light that falls on the image sen sor during the process of taking an image Exposure is measured in exposure value EV You ...

Страница 12: ...g or removing cards to prevent possible loss of files or damage to the card A new card will not require formatting but a card that has been previously used in other devices should be formatted by the VistaPix before storing photos on it Note that this will erase all files previously stored on the card so be sure they have been downloaded or copied first if you wish to keep them To remove the SD ca...

Страница 13: ...the Panorama Maker software the same way you did for the PhotoBase software Panorama Maker is used to create spectacular panoramic scenes DirectX DirectX is a Microsoft Windows technology that enables high performance graphics when you re watching video replay on your computer DirectX is typically installed on most computers but if you are having problems viewing your videos then install this soft...

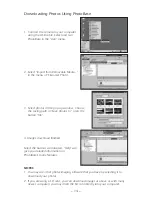
Страница 14: ...dow Choose the saving path in Save photos to press the button OK 4 Images download finished Select the buttons as indicated Help will give you detailed information on PhotoBase s many features NOTES 1 You may use other photo imaging software that you have by selecting it to download your photos 2 If you are using a SD card you can download images as above or with many newer computers you may inser...

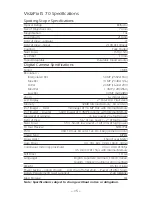
Страница 15: ...3 0 MP Fine with Internal Memory of Images Low res 600 images 0 3MP Economy with Internal Memory Mag level of camera 7x low power 24x high power Field of View 5 6 low power 2 high power Near Focus 5ft 1 5m low power 10ft 3m high power TV Out Preview NTSC PAL Ports USB TV Out SD card 12v DC Snap camera control Image Type MPEG Focus Assist Sharp Focus Meter Auto Shoot 10s 30s 60s 3min 10min 30min Co...

Страница 16: ...d repair Further product malfunction or deterioration due to normal wear is not covered by this warranty CELESTRON DISCLAIMS ANY WARRANTIES EXPRESS OR IMPLIED WHETHER OF MERCHANTABILITY OF FIT NESS FOR A PARTICULAR USE EXCEPT AS EXPRESSLY SET FORTH HEREIN THE SOLE OBLIGATION OF CELESTRON UNDER THIS LIMITED WARRANTY SHALL BE TO REPAIR OR REPLACE THE COVERED PRODUCT IN ACCORDANCE WITH THE TERMS SET ...

Страница 17: ... 17 ...
Страница 18: ...reet Torrance CA 90503 U S A 310 328 9560 www celestron com Copyright 2006 Celestron All rights reserved Product specifications or instructions may change without prior notice or obligation Item 52212 INST 10 00 08 06 ...

Отзывы: