background image

Softener adjustment

The efficiency of your dishwasher depends on the softness of the tap water.  To ensure best efficiency, the dishwasher 
is equipped with a system that reduces the hardness in the mains water supply.  The efficiency will increase when the 
system is correctly set.  To find out the water hardness level of  your water supply you can use the test strip supplied or 
alternatively contact your local water board.

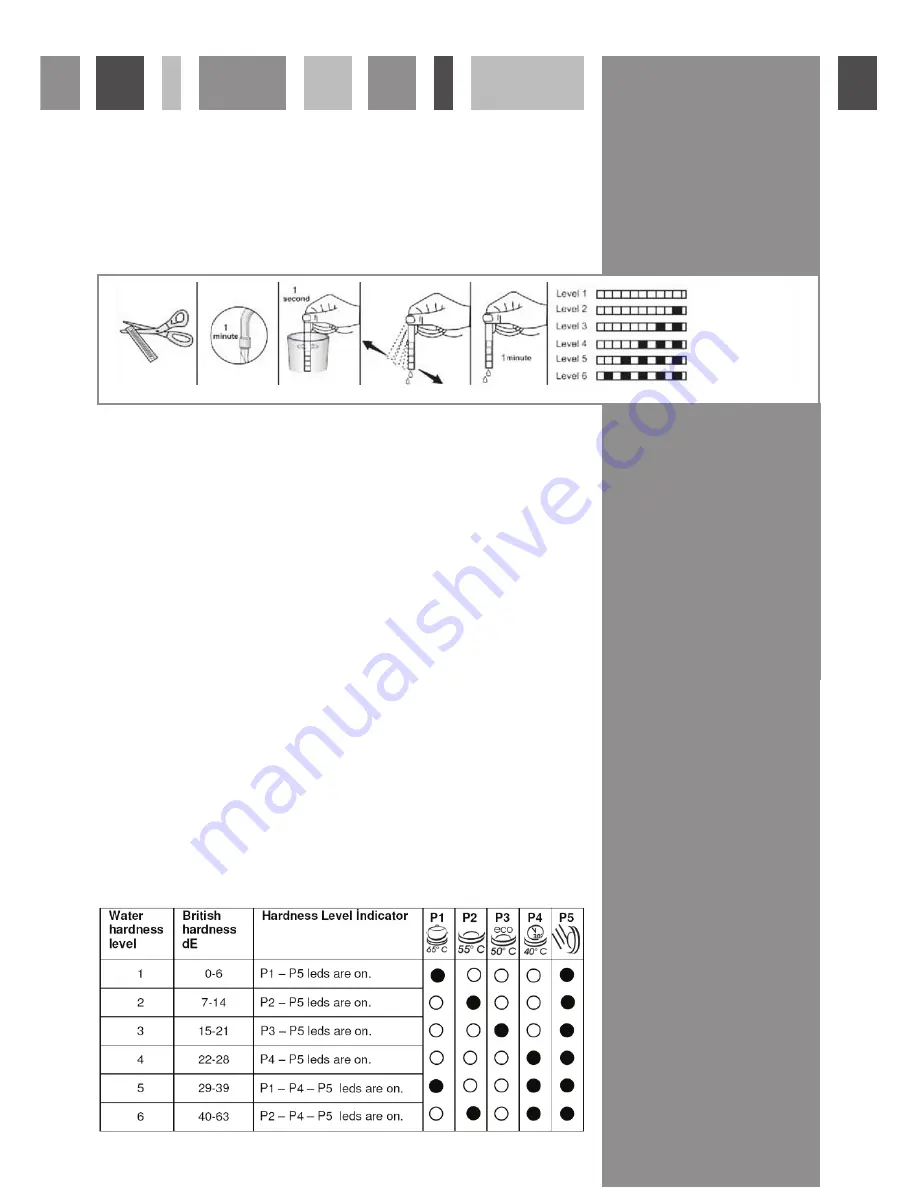
1.  Open the testing strip.

2.  Run water through the tap for one minute.

3.  Hold the testing strip in water for one second.

4.  Shake the testing strip after taking it out of the water

5.  Wait for one minute 

6.  Check the number of marks on the strip to see the level of water hardness.

If the hardness of the water you use is above 60 dE or if you are using well water; you are recommended to use filter and 

water refinement devices.

Please note: The level of water hardness is preset to level 3.

1.  Press and hold down the programme selection button

2.  Press the power button to switch on the dishwasher

3.  Keep the programme selection button pressed until the five programme indicator lights and the end of programme  
 

indicator light flash.

4.  To adjust the level, press the programme selection button until the required level is selected.  The  programme lights  
 

will illuminate as in the table of water hardness settings. 

5.  To store the selected water hardness level, press the power button. 

Testing strip

Adjusting salt consumption

Table of Water Hardness Level Settings

NOTE:

The washing effectiveness of your machine depends on the softness of the tap water. For this

reason, your machine is equipped with a system that reduces the hardness in mains water

supply. The washing effectiveness will increase when the system is correctly set. To find out

the water hardness level of water in your area, contact your local water board or determine

water hardness level by using the test strip(if available).

If the hardness of the water you use is above 90 dF (French hardness) or if you are using well

water; you are recommended to use filter and water refinement devices.

Hardness level is adjusted to level 3 as a factory setting.

9

ENGLISH

Open the

testing

strip.

Run

water

through

your tap

for 1

min.

Keep the

testing

strip in

water for 1

sec.

Shake the

testing strip

after taking it

out of water.

Wait for

1 min.

Make your machine’s water hardness

setting according to the result

obtained through the testing strip.

No Lime
Very low lime content
Low lime content
Medium lime content
Lime content
High Lime content

If the hardness of the water you use is above 63dE or if you are using well water; you are recommended to use filter and 
water refinement devices.

Содержание WC140

Страница 1: ...rtment The Group Ltd Harby Road Langar Nottinghamshire NG13 9HY T 01949 862 012 F 01949 862 003 E service cda eu W www cda eu Passionate about style WC140 Integrated Dishwasher Manual for Installation Use and Maintenance ...

Страница 2: ...avoids possible negative consequences for the environment and health It also enables the constituent materials to be recovered saving both energy and resources As a reminder of the need to dispose of household appliances separately the product is marked with a crossed out wheeled dustbin mportant he CDA Group Ltd cannot be held responsible for injuries or losses caused by incorrect use or installa...

Страница 3: ...hree six or nine hours duration To set the delay timer press the delay timer button 3 This will switch on the delay timer for three hours and the 3h light will illuminate To change the duration press the delay timer button again until the light next to the required time 6h or 9h is illuminated To cancel the timer press the delay timer button again until none of the delay timer indicator lights are...

Страница 4: ...rogramme Selection button until the required Programme Indicator light is illuminated Then close the door The dishwasher will begin the new programme from the point at which the old programme stopped Cancelling a programme It is possible to cancel the programme once the programme has started First open the door slightly to reduce the risk of water spillage Press and hold the Programme Selection bu...

Страница 5: ...ain detergent compartment b figure 2 has lines to allow for specific amounts of detergent These are marked at either 15 cm3 or 25 cm3 to be used depending on how dirty the dishes are If your dishes are in need of an intensive wash then add 5 cm3 of detergent into the prewash section of the compartment a figure 2 3 Then close the detergent compartment lid until the latch locks Please note You shoul...

Страница 6: ...uired level is selected The programme lights will illuminate as in the table of water hardness settings 5 To store the selected water hardness level press the power button Testing strip Adjusting salt consumption Table of Water Hardness Level Settings NOTE The washing effectiveness of your machine depends on the softness of the tap water For this reason your machine is equipped with a system that ...

Страница 7: ...e rinse aid when the rinse aid indicator light on the control panel is illuminated fig 4 Rinse Aid To fill the rinse aid compartment 1 Open the rinse aid compartment by turning and removing the cap as shown in figure 4 2 Fill the rinse aid compartment until the rinse aid indicator goes dark as shown in figure 5 where a indicates the compartment is empty and b indicates the compartment is full 3 Re...

Страница 8: ...g them to the side 2 Remove the upper basket and relocate the alternate set of wheels on the runner as shown in figure 8 pushing the basket back into place 3 Close the basket retaining clips The images below are designed as guidance as to best practice for loading the dishwasher fig 7 fig 8 Upper basket Lower basket Bad loads ...

Страница 9: ...r basket should be adjusted to high position Cups should be placed on to the dish rack pins Detergent Rinse aid 5 25 cm3 in accordance with EN50242 DIN 44990 IEC 436 international norms Rinse aid dosage adjustment 4 Programme test Economic 50 C in accordance with EN 50242 international norms ...

Страница 10: ...r consumption liters 17 2 16 5 15 7 12 4 4 5 Warning Short programmes do not include a drying stage The values and times provided above have been obtained under laboratory conditions according to relevant standards This information can change depending on the conditions of the dishwasher s use and environment network tension water pressure water input temperature and environment temperature P re w...

Страница 11: ...pwards 1 Pull and remove the metal plastic filter 3 Then pull the coarse filter out of the micro filter 2 Rinse it with lots of water under the tap Refit the metal plastic filter Insert the coarse filter into the micro filter in a way that the marks will correspond to one another Attach micro filter into the metal plastic filter and turn to the direction of arrow and it is locked when the arrow on...

Страница 12: ...DA service if the error resumes Continual fill error Close the tap and contact CDA service The waste water in the machine cannot be discharged Drain hose is blocked The filters of your machine might be blocked Restart the dishwasher and cancel the programme If the error continues contact CDA service Heater error Contact CDA service Alarm is active against water overflow Turn off the dishwasher and...

Страница 13: ...gramme selected Spray arm blocked Filters clogged or incorrectly fitted Water drain pump blocked White stains on the dishes Insufficient detergent added Rinse aid setting is too low Insufficient dishwasher salt added Water softener setting is too low Salt compartment cap not completely closed The dishes are not completely dry at the end of the programme A programme without a drying stage was selec...

Страница 14: ...3 should be used As the colours of the wires in the mains lead of this appliance may not correspond with the coloured markings identifying the terminals in your plug proceed as follows The wire which is coloured GREEN and YELLOW must be connected to the terminal which is marked with letter E or by the Earth symbol or coloured GREEN and YELLOW The wire which is coloured BLUE must be connected to th...

Страница 15: ...essary Only use the water inlet supplied with the appliance If the water pressure is above 10 bar a pressure relief valve should be used After connecting the water supply check to ensure there are no leaks The water outlet can either be connected to a water drain or to a sink outlet spigot This connection should be at a minimum of 50 cm and a maximum of 110 cm from the floor The drain hose should ...

Страница 16: ...Group Ltd Harby Road Langar Nottinghamshire NG13 9HY T 01949 862 012 F 01949 862 003 E service cda eu W www cda eu Passionate about style To contact our Customer Care Department or for Service please contact us on the details below ...

Страница 17: ...plied with a fitting template and these instructions should be followed as normal However the fitting template needs to be located lower down the fascia door this is shown below The amount of offset Y depends on the height of the fascia door and can be calculated as WC140 X 723mm WC350 WC360 X 725mm For example if you have a 731mm tall fascia door and are fitting a door to a WC140 then Y 731 723 8...

Страница 18: ......

Отзывы: