background image

INSTALLATION MANUAL 

V1.3EN 

BLEU


TITANE


RT

I

-EZ 

CCEI  

INSTALLATION 

The heater can be connected directly to pipes with diameter 50 mm or 63 mm.  
To use our equipment in the best conditions, we recommend observing the following 
parameters in the case of a water treatment with chlorine: 

• pH between 6.9 and 7.5. 
• Chlorine free active between 0.4 and 1.4 mg / l. 

In the case of other type of water treatment, the installer has to check compatibility 
with our equipment. 
 

Hydraulic connection 

The heater must be installed before any water treatment device. It is strongly 
recommended to keep the pipelines of the heater filled with water. After 
stopping the pump, the heater must not be emptied by gravity. 

The heater can be inserted into a pipe of diameter 63 mm or 50 mm. In 50mm case, 
the two adaptor provided must be affixed to both ends of the heater. No additional 
piece of PVC is required. 
All heaters are supplied with a flow switch. From factory, the heater is configured to 
operate with water moving from left to right. (See diagram below). 


It is possible to reverse the direction of flow of water by turning the flow switch: 

-  Switch the filtration pump off and ensure that the heater is not under pressure. 
-  Unscrew the flow switch. Turn the flow switch 180 degrees. (Do not remove 

the gasket that is under the cap). Screw the flow switch. 

-  Switch on the filtration pump to check that there is no leakage. 
-  Close the heater and check that the heater stops immediately when the filter 

pump is off. 

Electrical connection 

The heater must be powered from a line protected by a 30 mA differential device 
(GFCI). The power supply cable must have a section adapted to the power of the 
heater. The appliance must be correctly grounded.


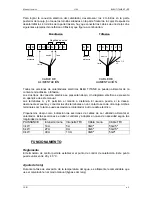
To achieve the electrical connection of the heater, unscrew the 4 screws at the back 
of the box (do not touch the screws are on the front of the box). After unscrewing the 
4 screws from the rear, you must connect the wires according to one of two examples 
given below (single or three phase).  
Replace the housing by screwing the four screws from the back of the box.


The table below shows cable section to be used according to the power of the 
heater. The cable section must adjusted according to the length of cables. 
 

Flow direction

Содержание Bleu Titane RTI-EZ 3kW

Страница 1: ...INSTALLATION MANUAL V 1 3EN ELECTRIC HEATER BLEU TITANE RTI EZ...

Страница 2: ...INSTALLATION MANUAL V1 3EN BLEU TITANE RTI EZ CCEI p 2...

Страница 3: ...I EZ CCEI p 3 SOMMAIRE PRESENTATION 4 SPECIFICATIONS 4 INSTALLATION 5 Hydraulic connection 5 Electrical connection 5 PRINCIPLE OF OPERATIONS 6 Regulation 6 Time clock setting 6 OPERATION AND MAINTENAN...

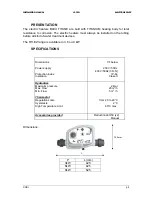
Страница 4: ...nd of water treatment devices The RTi EZ range is available in 3 6 ou 9 kW SPECIFICATIONS Dimensions Power supply Protection index Insolation Cf below 230V 50Hz 400V 50Hz 3F N IP 44 Clase II Hydraulic...

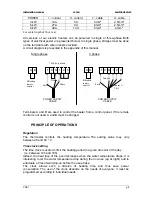
Страница 5: ...diagram below It is possible to reverse the direction of flow of water by turning the flow switch Switch the filtration pump off and ensure that the heater is not under pressure Unscrew the flow swit...

Страница 6: ...must be bridged PRINCIPLE OF OPERATIONS Regulation The thermostat controls the heating temperature The setting value may vary between 20 and 40 C Time clock setting The time clock is useful to limit t...

Страница 7: ...t may contain ice Similarly we must ensure that the circuit does not contain air Before the first start Ensure that the heater starts when increasing the set temperature beyond the current temperature...

Страница 8: ...8 RTi EZ Date de vente Puissance N de lot D claration CCEI SA FR 1507 073 804 973 testifies that pool heater RTi EZ complies to European Directives requirements 2006 95 CE and 2004 108 CEE Emmanuel B...

Страница 9: ...CCEI p 1 MANUAL TECNICO V 1 3E CALENTADOR ELECTRICO BLEU TITANE RTI EZ...

Страница 10: ...TITANE RTI EZ CCEI p 2 RESUMEN PRESENTACI N 3 CARACTER STICAS 3 INSTALACI N 4 CONEXI N HIDR ULICA 4 Direcci n del flujo de agua 4 CONEXION ELECTRICA 4 FUNCIONAMIENTO 5 LANZAMIENTO MANTENIMIENTO DEL C...

Страница 11: ...s r pida y m s simple de calentar una piscina La gama de calentador BLEU TITANE con una resistencia nica permite a los poderes de 3 6 o 9 kW CARACTER STICAS Generales Dimensiones Tensi n de alimentaci...

Страница 12: ...n No necesita extra piezas de PVC Direcci n del flujo de agua Todos los calentadores se suministran con un interruptor de flujo Inicialmente el calentador est dise ado para funcionar con el agua se m...

Страница 13: ...minales en un contacto seco de otra caja Ambos terminales por lo tanto puede esclavizar el calentador a otro cuadro el ctrico Proponemos abajo como indicaci n las secciones de cables de ser utilizado...

Страница 14: ...ng n escape Tambi n se necesita controlar el ajuste correcto de los cables un cable malamente apretado causar una calefacci n de la ensambladura Antes del primer uso hay que ser seguro de que el siste...

Страница 15: ...ia N de lote Declaraci n La sociedad CCEI SA FR 1507 073 804 973 declara que el calentador RTi EZ cumple las exigencias de seguridad y compatibilidad electromagn tica de las directivas europeas 2006 9...

Отзывы: