-3-
e
ASSEMBLY
Tools required:
Philips head screwdriver
Note: Remove any transit protection material
before assembly.
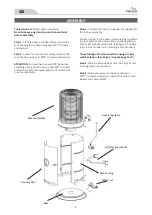
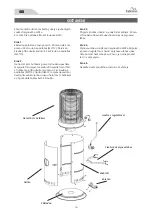
Step 1.
Place the base on a flat surface. Secure the
rear housing to the base using 5pcs M5*10 screws
and washers.
Step 2.
Secure The burner assembly outside of the
rear housing using 5pcs M5*10 screws and washers.
ATTENTION:
To close the door well, lift the burner
assembly by one hand to secure 5pcs M5*10 screws
and washers with the lowest position of screw holes
in burner assembly.
Step 3.
Connecting hose and regulator (if supplied) to
the burner assembly.
Put gas cylinder on the base and connecting regulator
to a gas cylinder, then assembly 2 cylinder belts and
ensure gas cylinder using belts. (See Page 5 “Connect-
ing to a Gas Cylinder” and “Securing a Gas Cylinder”)
Check leakage for all connections using a soapy
water solution. (See Page 6 “Gas Leakage Test”)
Step 4.
Slide the housing door onto the hinge of rear
housing, close door and lock.
Step 5.
Attach wheels set to the base with 2pcs
M6*12 screws and washers. (Ignore this step in case
wheels set is assembled).
Burner assembly
Housing door
Base
Wheels set
Rear housing
Belts for gas cylinder
Hose & regulator


