background image

Assemblaggio Carenatura -035000- Kit Box Assembly Instructions. 

035000 Assembly Instructions February ‘06 


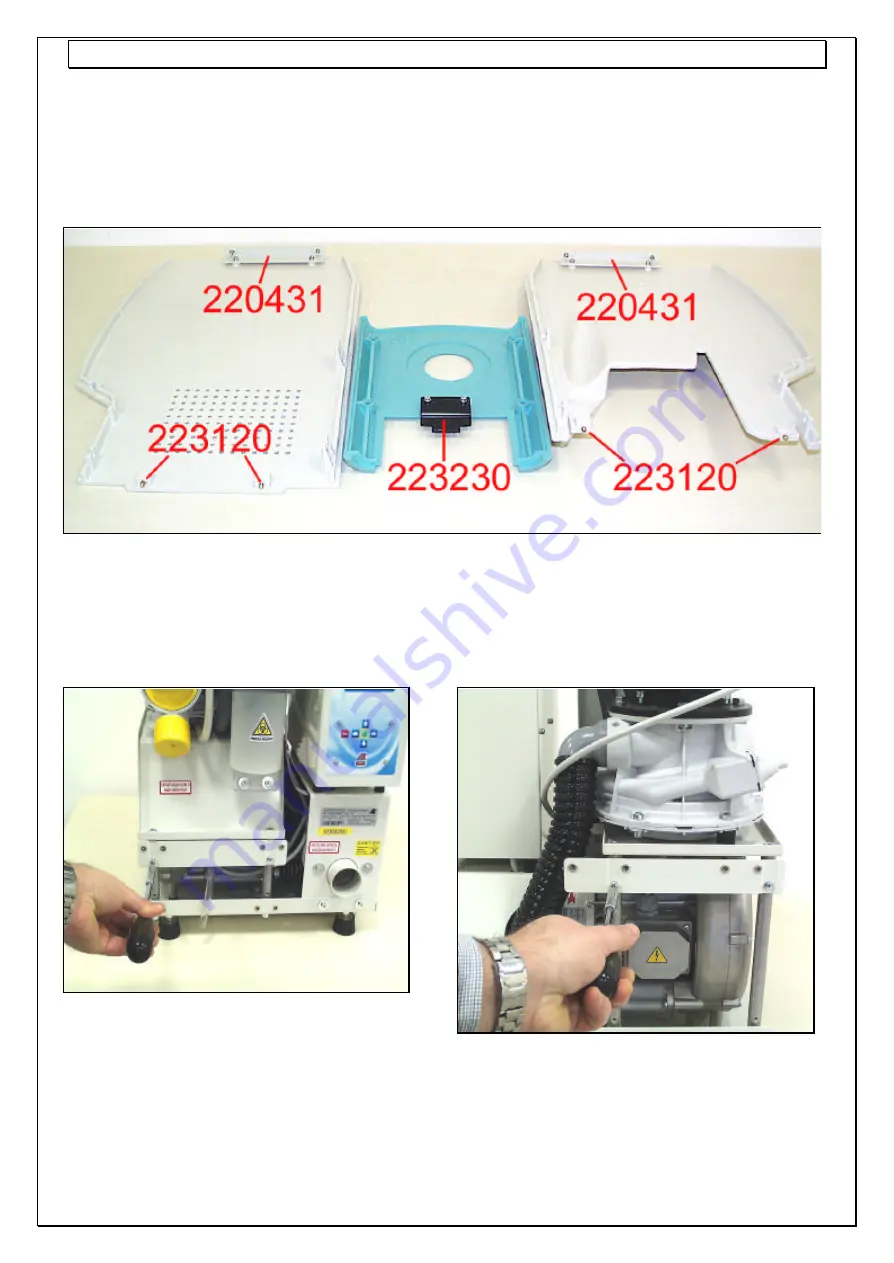
Avvitare i 4 perni (223120) nella parte inferiore delle 
fiancate. 
Montare i due angolari (220431) e la piastra superiore 
(223230) utilizzando le viti 250943, le rondelle grover 
250722 e le rondelle  piane 250735 (Fig. 3). 


Tighten the 4  screws (223120) on the bottom of the side 
panels. 
Use the screws 250943, the lock washers 250722 and the 
disc rings 250735 to screw the 2 angle bars (220431) and 
the top plate (223230) together (Fig. 3).    


Fig. 3 


Montare la piastra anteriore (223228) quindi la piastra 
posteriore (223229) utilizzando le viti 250937 (Fig. 4 e 
Fig. 5). 


Mount the front plate (223228) and the back plate 
(223229) using the screws 250937 (Fig. 4 and Fig. 5). 


Fig. 4 


Fig. 5 


Содержание 035000

Страница 1: ...Assemblaggio Carenatura 035000 Kit Box Assembly Instructions 035000 Assembly Instructions February 06 1...

Страница 2: ...Assemblaggio Carenatura 035000 Kit Box Assembly Instructions 035000 Assembly Instructions February 06 2...

Страница 3: ...gically dangerous materials Questo simbolo significa un immediato pericolo di morte e per la salute delle persone La non osservanza di queste avvertenze ha degli effetti gravissimi sulla salute e pu p...

Страница 4: ...annello lato sinistro 2 Pannello lato destro 3 Coperchio superiore 4 Pannello posteriore 5 Pannello rimovibile anteriore 6 Pannello anteriore The kit box code 035000 for Turbo Smart is now available A...

Страница 5: ...250722 e le rondelle piane 250735 Fig 3 Tighten the 4 screws 223120 on the bottom of the side panels Use the screws 250943 the lock washers 250722 and the disc rings 250735 to screw the 2 angle bars...

Страница 6: ...tenzione al cavo Flat del sensore d amalgama agganciare i due perni sul basamento del Turbo Smart quindi inserire le viti 250937 con rondelle 250703 avvitandole parzialmente Fig 8 fare la stessa opera...

Страница 7: ...ig 11 Fig 10 Fig 11 Inserire il pannello anteriore 6 Fig 1 come mostrato in Fig 12 quindi fissarlo con le viti 251113 e le rondelle piane 250735 Fig 12 Avvicinare i due pannelli laterali destro e sini...

Страница 8: ...ebruary 06 8 Avvicinare i due pannelli laterali destro e sinistro quindi attraverso i fori sul pannello posteriore serrare le viti sottostanti Fig 14 Place the 2 side panels in the corresponding seats...

Страница 9: ...Assemblaggio Carenatura 035000 Kit Box Assembly Instructions 035000 Assembly Instructions February 06 9...

Страница 10: ...Assemblaggio Carenatura 035000 Kit Box Assembly Instructions 035000 Assembly Instructions February 06 10...

Страница 11: ...Assemblaggio Carenatura 035000 Kit Box Assembly Instructions 035000 Assembly Instructions February 06 11...

Страница 12: ...ructions February 06 12 CATTANI S p A Via Natta 6 A 43100 Parma ITALY Tel 39 0521 607624 Fax 39 0521 607628 607855 ESAM S p A Via Natta 4 A 43100 Parma ITALY Tel 39 0521 607613 Fax 39 0521 607628 6078...

Отзывы: