background image

CATEYE V3n

Quick Start Manual

Setting up the computer

Measuring screen

(Setup completed)

Setting the hour

Setting the minute

Entering the tire circumference

Setting the speed unit

Preparation for setting up

Formatting operation

Setting the date display

Setting the year

Setting the month

Setting the day

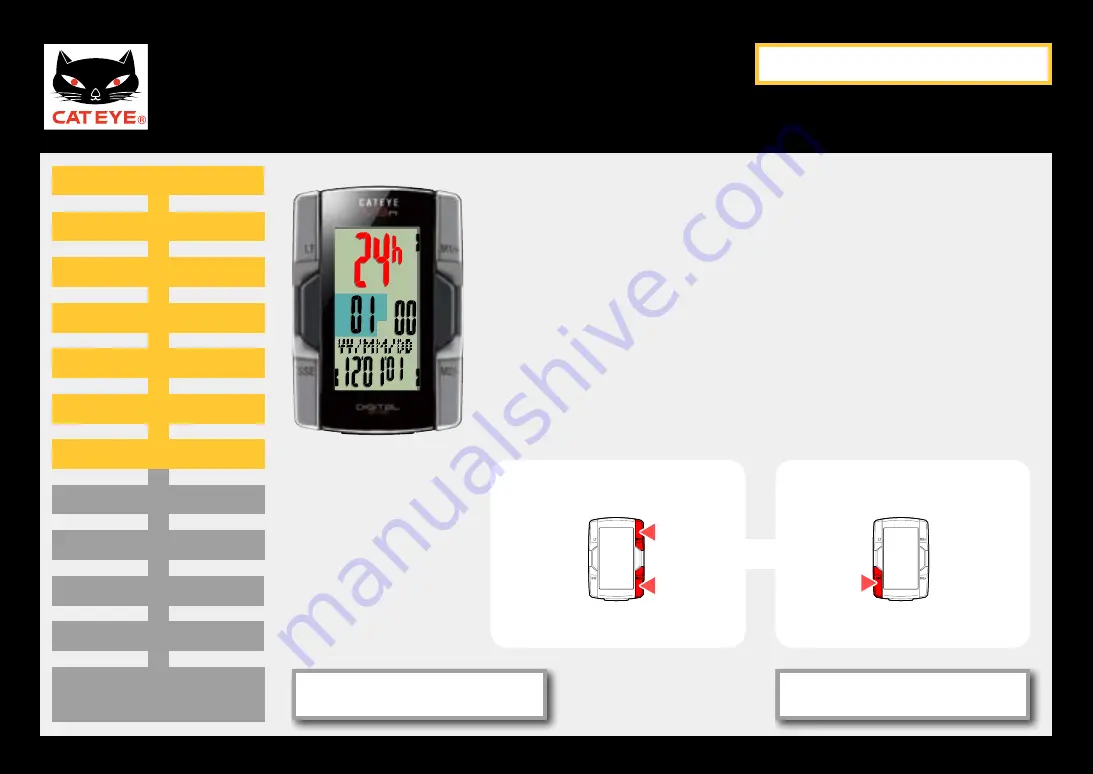
Setting the clock display

Setting the clock display

When the M1/+ button or the M2/- button is pressed, ei-

ther “12h” or “24h” is selected for the clock display. Se-

lect the display of your choice. 
After selecting, press the SSE button to proceed to the 

next step “Setting the hour”. 

Clock display

SSE

24h 

 12h

To the next step 

M1/+

M2/-

Return to Contents

Next

Return

Содержание CC-TR210DW

Страница 1: ...Click the button and follow the instructions CATEYE V3n CC TR210DW TR310TW Quick Start START ...

Страница 2: ...wear the heart rate sensor Please set up the unit according to the specified procedure then it will be ready for use as a cyclocomputer Before use read the instruction manual that comes with the product thoroughly to the end to understand the functions of this unit and to use it safely in a correct manner Pacemaker users should never use the heart rate sensor Next ...

Страница 3: ...PDF contains a movie file When you click on the movie screen a message regarding security appears Click the Trust in the text or Play button to close the message Click the screen again to play the movie Next ...

Страница 4: ...lick the item you wish to view Return to a Cover Setting up the computer How to install the speed sensor movie How to wear the heart rate sensor movie Provided as standard with TR310TW How to install the bracket movie Registering a new sensor ...

Страница 5: ...erating the buttons as follows Check the button position before you start setting up SSE M1 M2 MENU Front Back Press the SSE button the M1 but ton and the M2 button on the front of the computer Press the MENU button on the back of the computer Next ...

Страница 6: ...peration Setting the year Setting the hour Setting the minute Entering the tire circumference Setting the speed unit Preparation for setting up Preparation for setting up Open the battery cover on the back of the computer using a coin and then pull out the insulation sheet After pulling out replace the battery cover as before Open Close Insulation sheet Return to Contents Next Return ...

Страница 7: ...ering the tire circumference Setting the speed unit Formatting operation Preparation for setting up Formatting operation While pressing the MENU button on the back of the computer press the AC button About 3 seconds later a test pattern is displayed on the screen Then release the MENU button The date clock setting screen appears and the set up starts AC MENU Test pattern Setting the date display R...

Страница 8: ...play Formatting operation Preparation for setting up Setting the date display When the M1 button or the M2 button is pressed either YY MM DD MM DD YY or DD MM YY is selected for the date display Select the display of your choice After selecting press the SSE button to proceed to the next step Setting the year The following description is for the case when YY MM DD is selected Date display SSE YY M...

Страница 9: ...etting the speed unit Preparation for setting up Formatting operation Setting the date display Setting the year Setting the year Pressing the M1 button increases the value Year of the date flashing and pressing the M2 button decreas es it Enter any value After entering press the SSE button to proceed to the next step Setting the month Year SSE Increase the value To the next step M1 M2 Return to Co...

Страница 10: ...it Preparation for setting up Formatting operation Setting the date display Setting the year Setting the month Setting the month Pressing the M1 button increases the value Month of the date flashing and pressing the M2 button de creases it Enter any value After entering press the SSE button to proceed to the next step Setting the day Month SSE Increase the value To the next step M1 M2 Return to Co...

Страница 11: ... setting up Formatting operation Setting the date display Setting the year Setting the month Setting the day Setting the day Pressing the M1 button increases the value Day of the date flashing and pressing the M2 button decreas es it Enter any value After entering press the SSE button to proceed to the next step Setting the clock display Day SSE Increase the value To the next step M1 M2 Return to ...

Страница 12: ...n Setting the date display Setting the year Setting the month Setting the day Setting the clock display Setting the clock display When the M1 button or the M2 button is pressed ei ther 12h or 24h is selected for the clock display Se lect the display of your choice After selecting press the SSE button to proceed to the next step Setting the hour Clock display SSE 24h 12h To the next step M1 M2 Retu...

Страница 13: ...ar Setting the month Setting the day Setting the clock display Setting the hour Setting the hour Pressing the M1 button increases the value Hour of the clock flashing and pressing the M2 button decreas es it Enter any value When you selected 12h enter the value correspond ing to AM PM After entering press the SSE button to proceed to the next step Setting the minute Hour SSE Increase the value To ...

Страница 14: ...h Setting the day Setting the clock display Setting the hour Setting the minute Setting the minute Pressing the M1 button increases the value Minute of the clock flashing and pressing the M2 button de creases it Enter any value After entering press the MENU button to change to the Measuring screen and then proceed to the next step En tering the tire circumference Minute Increase the value To the n...

Страница 15: ...tering the tire circumference Enter the tire circumference mm of your bicycle with 4 digits using the tire circumference reference table Pressing the M1 button increases the value flashing and pressing the M2 button decreases it Pressing the SSE button moves to the next two digits After entering press the MENU button to proceed to the next step Setting the speed unit Entering the tire circumferenc...

Страница 16: ... display Setting the hour Setting the minute Entering the tire circumference Setting the speed unit Setting the speed unit Setting the speed unit When the M1 button or the M2 button is pressed ei ther km or mile is selected for the measurement unit Select the display of your choice Press the MENU button to move to the measuring screen km h mph M1 M2 MENU Setup is completed To the measuring screen ...

Страница 17: ...e clock display Setting the hour Setting the minute Entering the tire circumference Setting the speed unit Measuring screen Setup completed Now setup of the computer is completed For the speed sensor installation return to Contents and see related videos Instruction video on how to wear the heart rate sensor is also available Measuring screen Return to Contents Return Return to Contents ...

Страница 18: ...CATEYE V3n Quick Start Manual How to install the bracket If the video does not play please click here YouTube movie Return to Contents ...

Страница 19: ...CATEYE V3n Quick Start Manual How to install the speed sensor If the video does not play please click here YouTube movie Return to Contents ...

Страница 20: ...CATEYE V3n Quick Start Manual How to wear the heart rate sensor If the video does not play please click here YouTube movie Return to Contents ...

Страница 21: ...6x3 00 2170 28 590 26x1 1 8 1970 37 590 26x1 3 8 2068 37 584 26x1 1 2 2100 650C Tubular 26x7 8 1920 20 571 650x20C 1938 23 571 650x23C 1944 ETRTO Tire size L mm 25 571 650x25C 26x1 571 1952 40 590 650x38A 2125 40 584 650x38B 2105 25 630 27x1 630 2145 28 630 27x1 1 8 2155 32 630 27x1 1 4 2161 37 630 27x1 3 8 2169 18 622 700x18C 2070 19 622 700x19C 2080 20 622 700x20C 2086 23 622 700x23C 2096 25 622...

Страница 22: ...supplied with this device are synchronized For any other sensors synchronize the sensor ID according to the following procedure The Q series 2 4GHz digital sensor can also be used Speed sensor ISC 10 SPEED CADENCE Heart rate sensor HR 10 Next ...

Страница 23: ...for sensor ID Switching to the Searching for sensor ID screen From the measurement screen press the MENU button to switch to the Menu screen Press the M2 button 3 times to change to the Searching the sensor ID screen with SENSOR ID displayed and press the SSE button Measuring screen Menu screen M2 M2 M2 M2 M2 M2 M2 M2 M2 M2 MENU Searching the sensor ID Return to Contents Next Return ...

Страница 24: ...nges the display as HR SP1 and SP2 in order In case of speed sensor Select SP1 or SP2 The sensor supplied with this device has been registered as SP1 Once you change this the sensor supplied with this device cannot be used Select SP2 when you register it for your second bicycle In case of heart rate sensor Select HR Once you change the sensor ID the sensor supplied with this device cannot be used ...

Страница 25: ...ching for sensor ID Pressing the SSE button switches to the Standby for the sen sor ID screen Then press the RESET button on the sensor A sensor ID signal is sent when you press and then re lease the RESET button For the Q series 2 4GHz digital sensor follow the in structions described in the instruction manual SSE Start of searching for sensor ID Speed sensor Heart rate sensor If the video does n...

Страница 26: ...or selection To Searching for sensor ID Completion of searching for sensor ID ID OK appears when the computer receives an ID signal from the sensor correctly After searching press the MENU button 2 times to return to the measurement screen Setup is completed To the measuring screen MENU Completion of searching for sensor ID In case of SP1 and SP2 Current speed In case of HR Heart rate Press 2 time...

Отзывы: