ENG
-11
ENG
-10
ENG
MENU
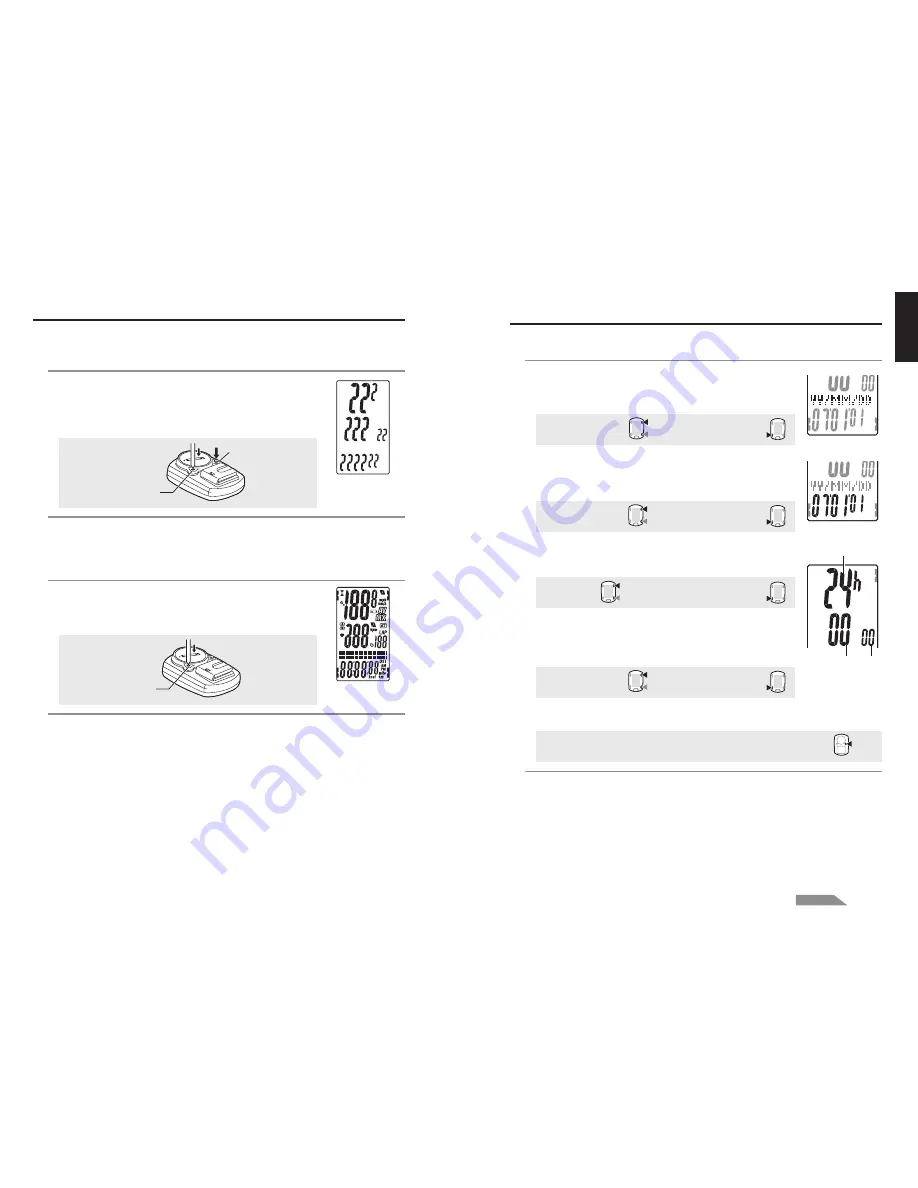
2. Date/Clock setting
Set the current date and time.
1. Select the date display format.
Select the date display format from “
YY/MM/DD
”, “
MM/DD/
YY
”, and “
DD/MM/YY
” using the
M1/+
and
M2/-
buttons,
and confirm with the
SSE
button.
Switch the display:
M1/+
M2/-
Confirm:
SSE
2. Enter the “Year”, “Month” and “Day.”
Enter the “Year”, “Month” and “Day” in the display order
selected in Step 1 using the
M1/+
and
M2/-
buttons, and
confirm with the
SSE
button. Enter the last 2 digits of the year.
Increase/decrease:
M1/+
M2/-
Confirm:
SSE
3. Select the clock display format.
Select “24 hour” or “12 hour” using the
M1/+
and
M2/-
buttons,
and confirm with the
SSE
button.
24h
↔
↔
↔
↔
↔
12h:
M1/+
M2/-
Confirm:
SSE
4. Enter the “Hour” and “Minute.”
Enter the “Hour” using the
M1/+
and
M2/-
buttons, confirm
with the
SSE
button, and then enter the “Minute” in the
same way.
Increase/decrease:
M1/+
M2/-
Confirm:
SSE
5. After you set the date/clock, press the
MENU
button to
proceed to the next set up item.
For the formatting operation: To the “Tire circumference input” screen below
For the restarting operation: To the measurement screen and ready for use
(or)
(or)
(Back)
(or)
Display format
Hour Minute
1. Formatting/Restarting operation
Formatting operation
Caution:
All data are reset to the default and deleted.
1. While pressing the
MENU
button on the back of the
computer, press
AC
button.
Release the
MENU
button when a test pattern is displayed
on the screen. The date/clock setting screen appears.
Continue with date/clock setting.
Formatting operation:
* When all screen items light up without any test pattern displayed on the screen,
the formatting operation has not been completed properly. Perform the formatting
operation again.
Restarting operation
1. Press the
AC
button on the back of the computer.
After all screen items light up for a second, the date/clock
setting screen appears.
Continue with date/clock setting.
Restarting operation:
* Most of the settings and file data saved are retained for the restarting operation
(see chart on page 9).
After a test pattern is
displayed, all screen
items light up.
All screen items light
up (for a second).
(At initial purchase, or reset all to default.)
(When you replace batteries, or an error is displayed.)
MENU
AC
AC
(or)
Continue


