background image

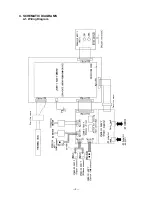
— 4 —

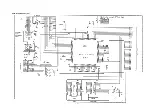
4-2. Main PCB Z568-1 (1/2)

Содержание QG-100

Страница 1: ...JULY 1996 without price QG 100 ZX 568 ...

Страница 2: ...ITION 15 7 2 PRINTING SPECIFICATION 15 7 3 OPERATION CHECK 17 8 TROUBLE SHOOTING 21 9 DISASSEMBLY 25 10 PARTS LIST 10 1 Z568 1 ASS Y COMPONENTS OTHERS 27 10 2 PRINTER UNIT 31 10 3 CHASSIS UNIT 34 10 4 CHASSIS ASS Y 37 10 5 HEAD HOLDER ASS Y 40 10 6 PLATEN ASS Y 43 10 7 CASSETTE CASE ASS Y 45 10 8 MOTOR CHASSIS ASS Y 47 11 EXPLODED VIEW DISASSEMBLY VIEW 11 1 EXPLODED VIEW Z568 1 ASS Y COMPONENTS 30...

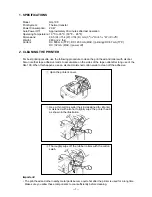
Страница 3: ...e print head and rollers with alcohol Also note that tape adhesive tends to accumulate on the sides of the tape outlet after long use of the QG 100 When this happens use an alcohol moistened cotton swab to clean off the adhesive 1 Open the printer s cover 2 Use a thin cotton swab the kind designed for infants moistened with alcohol to lightly wipe the printer head as shown in the illustration 3 Th...

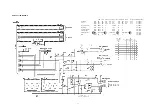
Страница 4: ... 2 3 BLOCK DIAGRAM ...

Страница 5: ... 3 4 SCHEMATIC DIAGRAMS 4 1 Wiring Diagram ...

Страница 6: ... 4 4 2 Main PCB Z568 1 1 2 ...

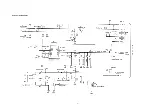
Страница 7: ... 5 4 3 Main PCB Z568 1 2 2 ...

Страница 8: ... 6 4 4 Power PCB Z568 S1 ...

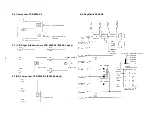
Страница 9: ...ON ON OFF OFF P75 90P TAP3 OFF ON OFF ON OFF ON OFF ON OFF P76 91P Tape mono color TAP4 MONO L COLOR H P70 85P Tape length TAP5 Short H Long L P71 86P Ink ribbon position TAP7 White L Black H KI6 83P Paper position TAP8 White L Black H KI5 82P Starting position TAP9 Home position L Platen down L After cutting tape H KI4 81P TAP10 H L L KI3 80P JAM TAP11 jam L not jam H KI7 84P ...

Страница 10: ... VDD ON2170 R LF 4 7 1 2 Paper Ribbon sensor PCB Z568 S3 Z568 S3 Ass y S05 SI5 VDD PAPER SENSOR ON2171 CS S04 SI4 VDD RIBBON SENSOR ON2171 CS 4 6 Cam sensor PCB Z568 S2 CUTTER SENSOR HOME POSITION SENSOR AD2 PRINT light dark CONTRAST 4 8 Key Matrix Z568 E4 ...

Страница 11: ... D converter of LSI1 61 64 RTOA0 RTOA3 O Data for stepping motor control 4 bits 65 66 RTOB0 RTOB3 O Data for DC motor control 2 bits 69 SBI0 I Serial data input from QV camera 70 SBO0 O Serial data output to QV camera 71 P42 O Control signal for power supply of stepping motor 73 74 IRQ0 IRQ1 I Interrupt request from gate array LSI2 75 76 KO0 KO1 O Key scanning signal 77 79 KI0 KI2 I Key scanning s...

Страница 12: ... Digital ground for LSI2 60 72 Analog terminal not used 73 VDD I Power supply for LSI2 74 VSS Digital ground for LSI2 75 Analog terminal not used 76 PON I Forced power on 77 POFF I Forced power off 78 80 Analog terminal I not used 85 TCON O Control for power VP power on off 86 RSO O Reset output from LSI2 87 RSI I Reset signal to LSI2 88 VDE I Detection of low voltage VDD1 4 30 4 35 V 94 95 INT1 0...

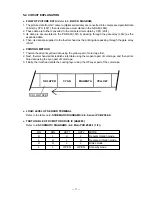
Страница 13: ...the gate array LSI2 PRINTING METHOD 1 Thermal head prints yellow data using the yellow part of color tape first 2 Next thermal head prints reddish violet data using the magenta part of color tape and then prints blue data using the cyan part of color tape 3 Finally thermal head prints the coating layer using the OP layer part of the color tape OP LAYER COLOR TAPE YELLOW MAGENTA CYAN LOGIC LEVEL OF...

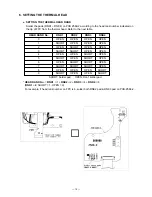
Страница 14: ...RNK3 RNK4 0 OPEN OPEN OPEN OPEN 1 SHORT OPEN OPEN OPEN 2 OPEN SHORT OPEN OPEN 3 SHORT SHORT OPEN OPEN 4 OPEN OPEN SHORT OPEN 5 SHORT OPEN SHORT OPEN 6 OPEN SHORT SHORT OPEN 7 SHORT SHORT SHORT OPEN 8 OPEN OPEN OPEN SHORT 9 SHORT OPEN OPEN SHORT SHORT Solder pad OPEN Don t solder pad HEAD RANK No RNK1 1 RNK2 2 RNK3 4 RNK4 8 RNK1 4 SHORT 1 OPEN 0 For example if head rank number on FPC is 6 solder bo...

Страница 15: ...rance gauge Refer to the right figure 4 Print half tone pattern Refer to 7 3 OPERATION CHECK 5 If abnormal picture blurred and striped picture appears try to turn the head shaft Z568 again Turning this shaft clockwise the thermal head moves to the left and printed picture tends to be blurred Turning this shaft counterclockwise the thermal head moves to the left and printed picture tends to be stri...

Страница 16: ...inter power may turn on automatically when you connect the adaptor and plug into a wall socket If this happens be sure to turn off the digital camera and the QG 100 before connecting the SB 62 cable Make sure the AC adaptor and SB 62 cable plug are connected securely to the digital camera and the QG 100 Push them in as far as they will go We recommend that you use the digital camera s AC adaptor t...

Страница 17: ...cally The color of an image printed on the printer may vary a little from the color of the actual item 7 1 SENSOR POSITION See to 11 1 EXPLODED VIEW Z568 1 ASS Y COMPONENTS 30 page 7 2 PRINTING SPECIFICATION Printing method thermal printing Printing head 384 dots Resolution 200 dpi dots per inch Gradation number 64 gradation Tape cartridge 18 36 46 mm width tape Printing size Standard printing 3 v...

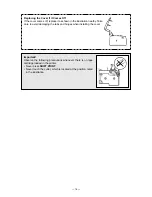
Страница 18: ...tration nearby Take care to avoid damaging the tabs and hinges when installing the cover Important Observe the following precautions whenever there is no tape cartridge loaded in the printer Never press SHIFT PRINT Never touch the cutter which is located at the position noted in the illustration ...

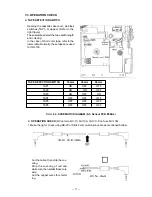
Страница 19: ...r QG 100 TAPE DETECTION SWITCH 18mm 36mm 46mm TAP1 ON OFF OFF TAP2 ON ON OFF TAP3 ON OFF ON TAP4 OFF OFF OFF TAP5 OFF OFF OFF TAP6 OFF OFF OFF Refer to 4 SCHEMATIC DIAGRAM 4 5 Sensor PCB Z568 2 OPERATION CHECK QV camera QV 10 QV 10A QV 30 Don t use QV 100 1 Make the jig for check using SB 20 or SB 62 communication cable as mentioned bellow Cut the cable then strip the cov ering Strip the covering ...

Страница 20: ... green 3 Remove this jig 4 Turn on QV camera power 5 Connect QG 100 to QV camera using SB 62 communication cable POWER LED1 ON OFF LED2 SHIFT MINILABEL DISP MODE PRINT CUT 5 MEMORY CHECK Press button CHECK ITEM QV CAMERA S DISPLAY 1 ROM SUM Check For example 2 S RAM Check 3 PS RAM1 Check 4 PS RAM2 Check O OK X NG 1 O DA37h 2 O 3 O 4 O ...

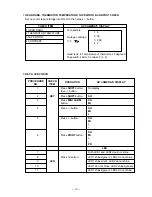
Страница 21: ...do not shine 9 LED LED1 shines red LED2 do not shine 10 LED1 do not shines LED2 shines green 11 LED1 shines green LED2 do not shine 7 HEAD RANK THERMISTOR TEMPERATURE TAPE WIDTH CONTRST CHECK Set any color tape cartridge into QG 100 then press button CHECK ITEM QV CAMERA S DISPLAY 1 HEAD RANK For example 2 THERMISTOR TEMPATURE 3 TAPE WIDTH No tape cartridge 4 CONTRAST 3 Head rank 6 Temperature of ...

Страница 22: ...rred and striped picture is good 10 MONOCHROMIC PICTURE PRINTING CHECK Set the tape cartridge 6 46mm monochromic tape to QG 100 then press SHIFT button Next press PRINT button A monochromic picture as shown bellow will be printed Check the printed picture An extreme abnormal picture uneven stirred and striped picture is bad Slightly uneven stirred and striped picture is good A picture sticking bro...

Страница 23: ...the cartridge Important During printing never touch the tape as it come out and never allow the tape outlet to become blocked Printing is scratched blurred broken etc Possible Cause Recommended Action Incorrect print density setting Adjust the print density Tape cartridge is not loaded correctly Load the tape cartridge correctly Printer head and rubber rollers are dirty Clean the printer head and ...

Страница 24: ...ress in SB 62 cable plugs as far as they will go 3 Turn on digital camera and QG 100 power in the sequence under Data Communications Digital camera error display no response from QG 100 keys cannot display digital camera images Possible Cause Recommended Action Improper cable connections 1 Turn off QG 100 power 2 Turn off digital camera power 3 Turn on digital camera and QG 100 power in the sequen...

Страница 25: ...operations listed below are performed when the SHIFT indicator is lit SHIFT Performs the same function as the QV Digital Camera s MODE button switches be tween multi image and single image display SHIFT Performs the same function as the QV Digital Camera s DISP button displays page number SHIFT PRINT Cuts tape SHIFT SHIFT Second SHIFT operation cancels first operation SHIFT MINI LABEL MINI LABEL o...

Страница 26: ...rate its POWER switch if the camera is not connected correctly to the QG 100 or if you perform an improper operation while they are connected If this happens use one of the following procedures to correct the problem When operating under battery power 1 Remove the batteries from the digital camera 2 Reload the battries back into the digital camera When operating under AC adaptor power 1 Unplug the...

Страница 27: ... plate 2 Disconnect FPC and FFC joiner from con nector 3 Remove 5 screws pointed by arrows then remove printer unit from the main unit Ferrite core 5 Turn over the printer then remove the FPC black protector plate Black plate 6 Disconnect FPC from casseette case Cassette case FPC FPC FFC joiner ...

Страница 28: ... 26 7 Disconnect the 4 connectors pointed by arrows 8 Remove 4 screws pointed by arrows 9 Separate cassette case and mechanical chassis of printer unit Cassette case Mechanical chassis ...

Страница 29: ...nector 006208513210000 QG 100 Common 1 C CN3 3501 9758 Connector B11B PH SM3 TB QG 100 Common 1 C N CN4 3502 1620 FFC connector 006208515210000 QG 100 Common 1 C N 1 6417 7940 Shield case A Z568 A341150 1 QG 100 Common 1 X N 2 6417 7950 Shield case B Z568 A341151 1 QG 100 Common 2 X N 3 6418 6420 Tape F Z568 A442209 1 QG 100 Common 2 X The following electronic parts will be not supplied from CASIO...

Страница 30: ...C MC34063ARM1 QG 100 Common 1 B N Q1 2254 0469 Chip FET MTD20P03HDLT4 QG 100 Common 1 B N Q2 2250 1435 Digital transistor DTC144EKA T146 QG 100 Common 1 B N Q3 4 2259 2597 Digital transistor DTC114YKA T146 QG 100 Common 2 B D1 2390 2184 Diode SB30 03P TC QG 100 Common 1 C D2 2390 1533 Schottoky diode SB20 03P TC QG 100 Common 1 C D3 2390 2513 Schottoky diode 1SS319 TE85L QG 100 Common 1 C EMI1 3 3...

Страница 31: ...00 Common 1 C N 22 6418 6880 Z568 1 ass y A140444D 1 QG 100 Common 1 B N 23 6418 7050 Z568 E4 unit A341191 1 QG 100 Common 1 C N 24 6418 6890 Z568 S1 unit A341193B 1 QG 100 Common 1 C N 25 6417 7650 Knob Z568 A341155 1 QG 100 Common 1 C N 26 6417 7590 Rubber key Z568 A140435 1 QG 100 Common 1 C N 27 6417 7630 Push lever Z568 A341125 1 QG 100 Common 1 C N 28 6417 7620 Push button Z568 A240654 1 QG ...

Страница 32: ... 30 11 EXPLODED VIEW DISASSEMBLY VIEW 11 1 EXPLODED VIEW Z568 1 ASS Y COMPONENTS ...

Страница 33: ...G 100 Common 1 X N 7 6418 2240 PSP washer Z568 A442123 1 QG 100 Common 1 X N 8 6418 6900 Chassis unit A140451B 1 QG 100 Common 1 C N 9 6417 7480 SP ST sub ass y A341208 1 QG 100 Common 1 C N 10 6418 6910 Cassette case ass y A240673 1 QG 100 Common 1 C N 11 6418 6920 Motor chassis ass y A341196 1 QG 100 Common 1 C N 12 6417 7201 Scissors sub ass y A341068A 1 QG 100 Common 1 C N 13 6418 1030 Adhesiv...

Страница 34: ... 32 11 2 DISASSEMBLY VIEW PRINTER UNIT 1 2 ...

Страница 35: ... 33 DISASSEMBLY VIEW PRINTER UNIT 2 2 ...

Страница 36: ...X N 8 6417 8330 Platen spacer Z568 A441783 1 QG 100 Common 1 X 9 6400 9740 Cut washer A L240 A412353 1 QG 100 Common 1 X 10 6410 7120 Spring T L263 C413536 1 QG 100 Common 1 X N 11 6417 7890 Gear D Z568 A341105 1 QG 100 Common 1 X N 12 6417 7970 HS cover Z568 A341209 1 QG 100 Common 1 X N 13 6417 8420 HS spring Z568 A441874 1 QG 100 Common 1 X N 14 6418 6940 Chassis ass y A140410A 1 QG 100 Common ...

Страница 37: ... 35 11 3 DISASSEMBLY VIEW CHASSIS UNIT 1 2 ...

Страница 38: ... 36 DISASSEMBLY VIEW CHASSIS UNIT 2 2 ...

Страница 39: ... L240 A412353 2 QG 100 Common 7 X 15 6405 2550 Cut washer D L240 A412353 4 QG 100 Common 1 X 16 6415 5370 Brake spring Z561 A440615 1 QG 100 Common 1 X 17 6415 5230 Winder top Z561 A340675 1 QG 100 Common 1 X N 18 6416 5900 Clutch felt B Z592 A441415 1 QG 100 Common 1 X 19 6415 5140 Clutch plate Z561 A340400 1 QG 100 Common 1 X N 20 6417 8490 Clutch spring Z568 A441949 1 QG 100 Common 1 X 21 6400 ...

Страница 40: ... 38 11 4 DISASSEMBLY VIEW CHASSIS ASS Y 1 2 ...

Страница 41: ... 39 DISASSEMBLY VIEW CHASSIS ASS Y 2 2 ...

Страница 42: ...7 8500 Tape E Z568 A441967 1 QG 100 Common 1 X N 6 6417 8290 Head shaft Z568 A441777 1 QG 100 Common 1 X N 7 6417 8300 Head spring Z568 A441778 1 QG 100 Common 1 X N 8 6417 7910 Head holder A Z568 A341127 1 QG 100 Common 1 X 9 2114 4543 Thermal head KPT 48 8MPF2 CA QG 100 Common 1 B N 10 6417 7410 Head holder sub ass y A341129 1 QG 100 Common 1 X Parts prices will be informed separately by Parts P...

Страница 43: ... 41 11 5 DISASSEMBLY VIEW HEAD HOLDER ASS Y 1 2 ...

Страница 44: ... 42 DISASSEMBLY VIEW HEAD HOLDER ASS Y 2 2 ...

Страница 45: ...417 8250 Main bearing Z568 A441766 1 QG 100 Common 1 X N 5 6417 7471 RA sub ass y A341206A 1 QG 100 Common 1 X N 6 6418 6990 Z568 S4 ass y A341192B 1 QG 100 Common 1 C Z568 S4 ASS Y N 7 6417 7550 Wire sub ass y E A441814 1 QG 100 Common 1 X N 8 3122 3381 Photosensitive device ON2170 R LF QG 100 Common 1 C Parts prices will be informed separately by Parts Price List Notes N New parts R A Essential ...

Страница 46: ... 44 11 6 DISASSEMBLY VIEW PLATEN ASS Y ...

Страница 47: ...0 Common 1 C CN205 3501 7553 Connector B6B ZR SM3 TF QG 100 Common 1 C N 9 3725 2800 FFC joiner B Z568 A441811 1 QG 100 Common 1 C The follwing electronic parts will be not supplied by CASIO C10 Chip capacitor GRM39B102K50PT QG 100 Common 1 C12 Chip capacitor GRM39F104Z25PT QG 100 Common 1 C13 14 Chip capacitor GRM40F105Z16PT QG 100 Common 2 R1 5 6 12 23 Chip resister MCR03EZHJ473 QG 100 Common 5 ...

Страница 48: ... 46 11 7 DISASSEMBLY VIEW CASSEETTE CASE ASS Y ...

Страница 49: ...Common 1 X N 4 6417 7400 M chassis sub ass y A341070 1 QG 100 Common 1 X N 5 6418 7090 Motor ass y A441848A 1 QG 100 Common 1 C MOTOR ASS Y N 6 6417 7540 Wire sub ass y D A441812 1 QG 100 Common 1 X N 7 6417 8030 Worm gear Z568 A441679 1 QG 100 Common 1 X N 8 3222 0175 DC motor NF183G QG 100 Common 1 C Parts prices will be informed separately by Parts Price List Notes N New parts R A Essential Q Q...

Страница 50: ... 48 11 8 DISASSEMBLY ASS Y MOTOR CHASSIS ASS Y ...

Страница 51: ......

Страница 52: ...MA0900461A ...

Отзывы: