13
EN
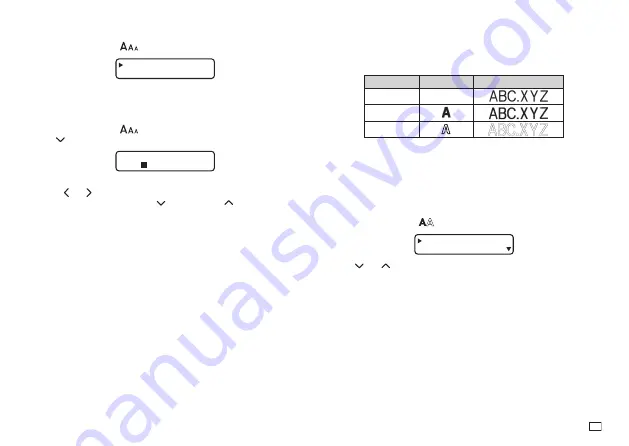
Using Auto Sizing (AUTO)
1. Press
FUNC
and then
to display the size setting menu.
AUTO
MANUA L
2. Make sure to select
AUTO
and then press
OK
.
x
Now the character size is automatically set.
To specify character sizes (MANUAL)
1. Press
FUNC
and then
to display the size setting menu.
2. Use to select
MANUAL
and then press
OK
.
✕
3
3
HE I GHT
I DTH
W
3. Specify the character size you want.
x
Use and to move the highlighting between the two dimensions.
x
To change a dimension, press
to increase it or
to decrease it.
(You also can enter a value using the number keys. )
4. When the character size you want to specify is on the display, press
OK
to
select it and return to the text display.
Character Styles
There are three character styles that you can assign; normal, bold, and
outline. The following shows examples of each.
Style
Indicator
Sample
Normal
None
Bold
Outline
The character style indicators will show you when a character style is being
used.
Important!
x
Only one character style can be in effect at a time. You cannot combine
character styles.
To specify a character style
1. Press
FUNC
and then
to display a menu of character styles.
NORMA L
BOLD
2. Use and
to move the pointer to the style you want to use.
3. When the pointer is located at the style you want to specify, press
OK
to
select it and return to the text display.
Содержание KL-130
Страница 1: ...User s Guide KL 130 EN RJA533401 001V01 Supported Tape Widths 6 mm 9 mm 12 mm 18 mm...
Страница 2: ...Important Be sure to keep all user documentation handy for future reference...
Страница 28: ...26 EN Built in Logos PRICE Labels SIGN Labels...
Страница 29: ...27 EN WORK Labels ATTENTION...
Страница 31: ...APP 1 Accented Characters A C D E G H I J K L N O R Appendix S T U Y Z...
Страница 32: ...APP 2 a c d e g h i j k l n o r s t u y z...


