background image

APPENDIX

105

 PLAY Mode

PLAY tab menu

Zoom

Protect

Dubbing

Resize

Copy

Favorites

On/Off / All Files : On/Off / Cancel

*

EX-M1 only

640 x 480 / 320 x 240 / Cancel

Built-in 

 Card / Card 

 Built-in / Cancel

Show / Save / Delete / Cancel

Set Up tab menu

Beep

Startup

Date Style

Adjust

Language

Format

On / Off

On / Off

YY/MM/DD / DD/MM/YY / MM/DD/YY

Time setting

 / English / Français / Deutsch /

Español / Italiano

Format / Cancel

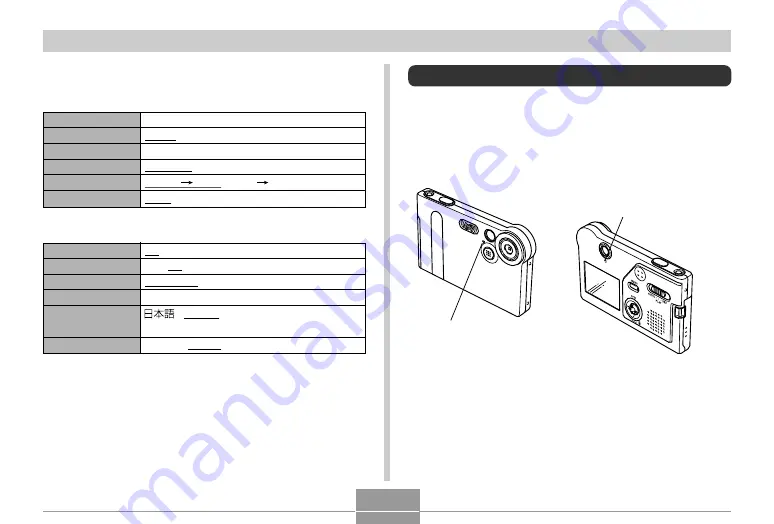
Indicator Lamp Reference

Camera Indicator Lamps

The camera has two indicator lamps: an operation/flash
charge lamp and a self-timer lamp. These lamps light and
flash to indicate the current operational status of the camera.

*

There are two lamp flash patterns.
Pattern 1 flashes once per second, while Pattern 2 flashes twice
per second. The table below explains what each flash pattern indi-
cates.

Self-timer lamp

Operation/Flash charge lamp

Содержание EX-M1 - 1

Страница 1: ...number You can have up to 900 folders in memory at the same time Folder names are gen erated as shown below Example Name of the 100th folder Each folder can hold files numbered up to 9 999 Trying to store the 10 000th file in a folder causes the next serially numbered folder to be created Folder names are generated as shown below Example Name of the 26th file Extension CIMG0026 JPG Serial number 4...

Страница 2: ...the menu screen Protecting Files Once you protect a file it cannot be deleted You can protect files individually or you can protect all files in memory with a single operation To protect a single file 1 In the PLAY mode press MENU 2 Select the PLAY tab select Protect and then rock the controller to the right 3 Rock the controller left or right to scroll through files and display the one you want t...

Страница 3: ...DPOF stand for Digital Print Or der Format which is a format for recording on a memory card or other medium which digital camera images should be printed and how many copies of the image should be printed Then you can print on a DPOF compatible printer or at a professional print service in ac cordance with the file name and number of copies settings recorded on the card With this camera you should...

Страница 4: ...nd display the one you want to print To insert the date during printing NOTE To insert the date during printing you need to use the following procedure to turn on the date insertion fea ture before configuring other print settings 1 In the PLAY mode rock the controller up DPOF 2 Rock the controller up or down to select Date and then click 3 Rock the controller up or down to select On and then clic...

Страница 5: ... can specify up to 99 for the number of copies Specify 00 if you do not want to have the image printed 4 Click the controller to complete the procedure 4 Rock the controller up or down to specify the number of copies You can specify up to 99 for the number of copies Specify 00 if you do not want to have the image printed Repeat steps 3 through 4 to configure settings for other images if you want 5...

Страница 6: ...n holds the copy right for PRINT Image Matching and PRINT Image Matching II Exif Print Exif Print is an internation ally supported open stan dard file format that makes it possible to capture and dis play vibrant digital images with accurate colors With Exif 2 2 files include a wide range of shooting condition information that can be inter preted by an Exif Print printer to produce better looking ...

Страница 7: ...FAVORITE folder is automati cally assigned a file name that is a serial number 0001 to 9999 Using the FAVORITE Folder You can copy snapshots from a file storage folder page 92 to the FAVORITE folder in built in memory page 92 This makes it easy to keep track of important files To copy a file to the FAVORITE folder 1 In the PLAY mode press MENU 2 Select the PLAY tab select Favor ites and then rock ...

Страница 8: ...ht scrolls at high speed File Name To delete a file from the FAVORITE folder 1 In the PLAY mode press MENU 2 Select the PLAY tab select Favorites and then rock the controller to the right 3 Rock the controller up or down to select Delete and then click 4 Rock the controller left or right to select the file you want to delete from the FAVORITE folder 5 Rock the controller up or down to select Delet...

Страница 9: ... appear on the monitor screen for about two seconds whenever you turn on the camera 1 Enter the REC mode or the PLAY mode If you are specifying an image for the startup screen display that image before advancing to the next step You can specify a snapshot image or a movie image that is two seconds or less in length 2 Press MENU 3 Select the Set Up tab select Startup and then rock the controller to...

Страница 10: ...ate 1 In the REC mode or PLAY mode press MENU 2 Select the Set Up tab select Date Style and then rock the controller to the right 3 Rock the controller up or down to select the setting you want and then click Example October 23 2002 Select this format YY MM DD DD MM YY MM DD YY To display the date like this 02 10 23 23 10 02 10 23 02 Do this Rock the controller left or right Rock the controller up...

Страница 11: ...g built in memory deletes any data stored in it IMPORTANT Note that data deleted by a format operation cannot be recovered Check to make sure you do not need any of the data in memory before you format it Formatting memory deletes all files in memory even files that are protected page 65 1 Check to make sure there is no memory card loaded in the camera If there is a memory card loaded in the camer...

Страница 12: ...ing or removing a memory card Be sure to orient the card correctly when inserting it Never try to force a memory card into the slot when you feel resistance See the instructions that come with the memory card for information about how to use it Though the camera also supports use of an MMC MultiMediaCard in place of an SD memory card the data processing speed in the case of an MMC is much slower t...

Страница 13: ...card into the camera s card slot Doing so creates the risk of damage to the camera and card If you are not using a memory card be sure to insert the dummy card into this slot to protect against dust and damage The dummy card is intended for use with this camera only Never insert it into the card slot of any other type of device Should water or any foreign object ever get into the card slot immedia...

Страница 14: ...bility op eration etc Note that data deleted by a memory card format op eration cannot be recovered Check to make sure you do not need any of the data on the memory card be fore you format it Formatting a memory card that contains files deletes all the files even those that are protected page 65 1 Load the memory card into the camera 2 Turn on the camera Next enter the REC mode or PLAY mode and pr...

Страница 15: ...cause data to become corrupted or even lost Al ways make sure that you always back up important data on other media MO disc computer hard disk etc If a memory card starts to behave abnormally you can re store normal operation by reformatting it However we rec ommend that you always take along more than one memory card whenever using the camera far away from the home or office We recommend that you...

Страница 16: ...ight to select the file you want to copy 4 Rock the controller up or down to select Copy and then click This starts the copy operation and displays the mes sage Busy Please wait The file reappears on the monitor screen after the copy operation is complete 4 Rock the controller up or down to select Built in Card and then click This starts the copy operation and displays the mes sage Busy Please wai...

Страница 17: ... the bundled CD ROM The CD ROM that comes bundled with the camera contains the following software Photo Loader for Windows Macintosh This software loads image data saved in JPEG and AVI for mat from a digital camera onto your computer The Windows version lets you transfer WAV format audio data to the camera Photohands for Windows This software is used to retouch and print image files USB Driver fo...

Страница 18: ...sh This software reads electronically documented PDF files It is used to read the instruction manuals of Digital Camera Photo Loader and Photohands included on the attached CD ROM NOTE See the user documentation files PDF on the bundled CD ROM for details about using Photo Loader and Photohands See Reading instruction manual PDF file on pages 83 Windows and 86 Macintosh of this manual for more inf...

Страница 19: ...nuals are present for a par ticular language Before using Start the computer and insert the CD ROM into the CD ROM drive The MENU will automatically be launched NOTE Depending on the configuration of the computer the menu may not launch automatically In this case open the driver in which the CD ROM is inserted and double click menu exe to launch the MENU Selecting the Language First select the lan...

Страница 20: ...formation when upgrading or reinstalling Photo Loader or when changing your PC Software Installation 1 Click on Software in the menu 2 Click on the application you want to install 3 Click Install button 4 Follow the installation instructions IMPORTANT If the procedures are not followed as described you may not be able to browse existing library control in formation and calendar type HTML files wit...

Страница 21: ...r the ap plications and instruction manuals are present for a particu lar language Names of folders and files vary depending on the language used Select the software in the language to be used before installing Different names of folders and files will be de scribed in the following way in this document Folder names in every language zzzzzzzz zzzzzzzz will be replaced by the following languages En...

Страница 22: ... Important file 3 Open Installer folder to open readme file 4 Install according to the procedure IMPORTANT Users upgrading to the new version of Photo Loader from the previous version and users using library man agement data and HTML files created using the old version should read the Important file in the Photo Loader folder on the CD ROM included and carry out the continuation process of library...

Страница 23: ...IO USB StorageDriver and CASIO USB StorageClassShim in the UsbDriver folder into the Extensions folder 8 The installation is completed Confirm that you have CASIO USB StorageDriver file and CASIO USB StorageClassShim file in the Ex tensions folder and restart your Macintosh 9 When the operating system has started up connect the digital camera to the Macintosh with the USB cable 10 Turn on the digi...

Страница 24: ...B Driver Delete CASIO USB StorageDriver file and CASIO USB StorageClassShim file in the Extensions folder The uninstallation process is now complete 2 Reading instruction manual Opening PDF file by Acrobat Reader Reading an instruction manual of a camera 1 Open Manual folder 2 Open zzzzzzzz folder in Digital Camera folder 3 Open camera_xx pdf Reading an instruction manual of Photo Loader 1 Open Ma...

Страница 25: ...at is equipped with a USB port makes it possible to transfer files to a computer simply by placing the camera onto the cradle Note that you need to install a USB driver on your computer page 79 Once you use the cradle to establish a USB con nection the computer sees the camera as an external stor age device card reader writer If you plan to transfer files from the camera s built in memory to your ...

Страница 26: ...ctor A USB cable bundled 3 Plug Connector B on the bundled USB cable to the USB port of the USB cradle To connect the USB Cable 1 Connect the AC power cord to the AC adaptor and then plug the other end of the AC power cord into a household power outlet 2 Connect the AC adaptor to the DC IN 5 3V con nector of the USB cradle USB Connector B USB cable bundled ...

Страница 27: ... cradle Do not leave the same image displayed on your com puter screen for a long time Doing so can cause the image to burn in on the screen Take care when connecting the USB cable to the USB cradle The USB port and the cable plug are shaped for proper positioning Plug the USB cable into the ports securely as far as it will go Proper operation is not possible if connections are not correct Be sure...

Страница 28: ...camera to the Trash Next turn off the camera and then remove the camera from the USB cradle Using a Memory Card to Transfer Images to a Computer The procedures in this section describe how to transfer im ages from the camera to your computer using a memory card Using a Computer with a Built in SD Memory Card Slot Insert the SD memory card directly into the slot Using a Computer with a Built in PC ...

Страница 29: ...for an SD memory card MMC for details about how to use them Memory Data Images recorded with this camera and other data are stored in memory using DCF Design Rule for Camera File System protocol DCF protocol is designed to make it easier to ex change image and other data between digital cameras and other devices DCF Protocol DCF devices digital cameras printers etc can exchange images with each ot...

Страница 30: ... audio snapshot FAVORITE folder Folder that contains Favorites image files DPOF file folder Folder that contains DPOF files MP3 files folder Folder that contains MP3 files Memory Directory Structure Directory Structure DCIM Parent Folder 100CASIO Storage folder CIMG0001 JPG Image file CIMG0002 AVI Movie file CIMG0003 WAV Audio file 1 CIMG0004 JPG Audio snapshot image file 1 CIMG0004 WAV Audio snap...

Страница 31: ...t all the contents inside a DCIM folder as a set and al ways keep them together You can change the name of the DCIM folder on your computer Changing the name to a date is a good way to keep track of multiple DCIM folders However be sure you change the name of the DCIM folder back to DCIM before you copy it back to memory for play back on the camera The camera does not recognize any folder name oth...

Страница 32: ...chnology Supported Files MPEG 1 Audio Layer 3 Bit Rate 32 to 320 kbps VBR compatible Sampling Frequencies 32 44 1 48kHz Maximum Number of Playback Files 999 Transferring Audio Files to the Camera 1 Establish a connection between the camera and your computer page 87 2 Transfer the MP3 files from your computer to the camera s AUDIO file If you cannot find a folder named AUDIO in camera memory create...

Страница 33: ...the Camera for Audio Player Operation Perform the following steps to prepare the camera for opera tion as an audio player 1 Turn off the camera and remove its connector cover Connector cover 2 Connect the LCD remote controller to the camera s connector and then plug the stereo headphones into the Headphones jack of the LCD remote controller LCD Remote Controller Stereo Headphones Headphones jack C...

Страница 34: ... Camera connector IMPORTANT All remote controller buttons are disabled when the camera s mode selector is set to REC or PLAY The camera s monitor screen is off while the camera is in the AUDIO mode Except for the power button all other camera buttons are disabled Never try to connect any other type of remote control ler besides the one that comes with the camera Also never try to use the supplied ...

Страница 35: ...of the current track 2 Track name artist name volume level Shows the ID3 tag ID3V1 which is the track name and artist name alphabetic characters only contained in the file During volume level adjustment shows the current vol ume level 3 Playback status indicator This icon indicates the current playback status This type of icon Rotation clockwise while flashing Flashing Steady and unmoving Indicate...

Страница 36: ...ter play back is stopped Basic Remote Controller Operations To start playback Press the button The remote controller beeps to indicate that playback has started Pressing the button while the camera is off turns on power and starts playback To pause playback Press the button remote controller beeps Pressing the button resumes playback remote controller beeps If you leave playback paused for about t...

Страница 37: ...the bottom of the list the list will scroll to show other tracks Currently selected track Specifying the Audio Playback Mode You can use the following procedure to select one of three playback modes normal playback all track repeat or 1 track repeat 1 In the AUDIO mode start audio playback The initial default mode is normal playback 2 Press the remote controller s playback mode button to cycle thr...

Страница 38: ...med PLAYLIST TXT 2 Configure the play list by specifying the tracks you want to play in the sequence you want to play them See Example PLAYLIST TXT File Contents on page 101 for information about how to configure a play list 3 Place the camera onto the USB cradle and es tablish a link with your computer page 88 4 Place the PLAYLIST TXT file into the AUDIO folder of the camera 3 Press the remote co...

Страница 39: ...yback the MP3 file named ROCK0002 MP3 which is located in folder named ROCK AUDIO001 MP3 AUDIO002 MP3 POPS ROCK ROCK0002 MP3 1 4 Example PLAYLIST TXT File Contents Example Folder Structure AUDIO Folder containing MP3 files AUDIO001 MP3 MP3 file AUDIO002 MP3 MP3 file PLAYLIST TXT PLAYLIST file POPS Folder containing MP3 files POPS0001 MP3 MP3 file POPS0002 MP3 MP3 file ROCK Folder containing MP3 fi...

Страница 40: ...he lock switch back in the other direction NOTE The camera s power button continues to be opera tional even while remote controller button operations are disabled NOTES If there is no PLAYLIST TXT file in the camera s AU DIO folder all tracks are played back in the order they are saved in memory Playback of any tracks that are not included in the PLAYLIST TXT file is skipped To change to a differe...

Страница 41: ... to remain aware of traffic and road condi tions around you LCD Remote Control Error Messages The following describes the error messages that appear on the LCD remote controller s display IMPORTANT The camera beeps over the headphones when an error occurs NoData ERROR Cause Playback attempted when there is no MP3 data in memory 1 Built in memory data is corrupted 2 Memory card is not formatted or ...

Страница 42: ...de and PLAY mode and their settings The settings that are underlined in the following table are initial defaults REC Mode REC tab menu REC Mode Flash Self timer Indicators Size Quality Digital Zoom EV Shift Memory tab menu Beep Startup Date Style Adjust Language Format On Off On Off YY MM DD DD MM YY MM DD YY Time setting English Français Deutsch Español Italiano Format Cancel Set Up tab menu REC ...

Страница 43: ...DD YY Time setting English Français Deutsch Español Italiano Format Cancel Indicator Lamp Reference Camera Indicator Lamps The camera has two indicator lamps an operation flash charge lamp and a self timer lamp These lamps light and flash to indicate the current operational status of the camera There are two lamp flash patterns Pattern 1 flashes once per second while Pattern 2 flashes twice per se...

Страница 44: ...t Formatting Powering down Meaning Operation Flash Charge Lamp Self timer Lamp Color Green Status Lit Color Status Power on LCD remote controller not connected Meaning Operation Flash Charge Lamp Self timer Lamp Color Green Amber Green Green Green Green Red Red Red Red Green Status Lit Pattern 1 Lit Pattern 2 Pattern 1 Pattern 2 Lit Lit Pattern 1 Pattern 1 Pattern 2 Color Red Red Status Pattern 1 ...

Страница 45: ...mps light and flash to indicate the current operational status of the cradle and camera CHARGE lamp USB lamp Color Red Green Amber Red Status Lit Lit Lit Flashing Color Green Green Status Lit Flashing Charging Charging complete Charge standby Charge error USB connection Accessing computer Meaning USB lamp CHARGE lamp ...

Страница 46: ...the battery page 24 If the battery goes dead soon after being charged it means the battery has reached the end of its life and needs to be re placed Purchase a separately available NP 20 recharge able lithium ion battery 1 Turn power back on 2 Charge the battery page 24 1 Align the mode selector with REC 2 Wait until the flash unit finishes charging 3 Transfer files you want to keep to your comput...

Страница 47: ...e op posite direction of the arrow marking to unlock the controls 7 Check the files you are trying to play page 94 8 Check to make sure the PLAYLIST TXT file lists the MP3 files you want to play Charge the battery page 24 Sunlight or light from another source is shining di rectly into the lens during recording A memory card with non DCF images recorded with another camera is loaded in the camera 1...

Страница 48: ...cation is in progress 1 Camera is not set securely on the USB cradle 2 USB cable is not connected securely 3 USB driver is not installed 4 Camera is turned off Remove the battery from the camera reinsert it and then try again 1 On the REC tab menu change the Indicators setting to LCD ON page 50 2 After confirming that the computer is not access ing camera memory disconnect the USB cable 1 Check th...

Страница 49: ...not be displayed by this camera There is no FAVORITE file You attempted to copy files from built in memory to a memory card while there is no memory card loaded in the camera page 77 The battery is dead The battery is dead so the recorded image or audio recording file could not be saved The memory card is not formatted Format the memory card page 76 Some problem occurred with the memory card Turn ...

Страница 50: ... Normal Economy Approximate Image File Size 1050KB 710KB 370KB 680KB 460KB 250KB 190KB 140KB 90KB Built in flash memory 12MB 10 shots 15 shots 30 shots 16 shots 24 shots 42 shots 57 shots 75 shots 120 shots SD Memory Card 64MB 53 shots 79 shots 154 shots 82 shots 126 shots 220 shots 294 shots 386 shots 618 shots Approximate Memory Capacity and File sizes Snapshots Data Size Recording Time 150KB se...

Страница 51: ... Flash Modes Auto Off On Red eye reduction Approximate Flash Range 1 meter to 2 meters Recording Functions Snapshot with audio for EX M1 only self timer Night Scene Movie with au dio for EX M1 only voice recording EX M1 only Audio is monaural Audio Recording Time EX M1 only Audio Snapshot Approximately 30 seconds maximum per image Voice Recording Approximately 50 minutes with built in memory After...

Страница 52: ... not guarantee that you will be able to achieve this level of operation Low tem peratures shorten battery life Voice recording times are based on continuous recording while audio playback times are based on continuous output through headphones Voice recording and audio playback times apply to the EX M1 only Power Consumption DC 3 7V Approximately 3 0W 80 minutes 480 shots 110 minutes 80 minutes 33...

Страница 53: ...D mm 3 7 W x 2 2 H x 1 6 D excluding projections Weight Approximately 56 g 2 0 oz LCD Remote Controller Bundled with EX M1 Only Input Output Terminals Camera connector headphones jack ø3 5mm stereo mini jack Cord Length Approximately 0 8m 31 5 Dimensions 74 5 W x 16 H x 11 D mm 2 9 W x 0 6 H x 0 4 D excluding projections excluding cradle Weight Approximately 28 g 1 0 oz Power Supply Use only the s...

Отзывы: