IOM-DA0
5
11. Clean all reusable metal parts according to
owner's procedures.
D. Inspection of Parts:
1. After inspection remove from the work area
and dis card the old “soft goods” parts (i.e.
o-rings, seals, gaskets, etc.) after in spec tion.
These parts MUST be re placed with fac to ry
supplied new parts.
2. Inspect the metal parts that will be reused. The
parts should be free of surface con tam i nants,
burrs, oxides, and scale. Rework and clean
parts as necessary. Surface con di tions that
affect the regulator performance are stated
below; replace parts that can not be re worked
or cleaned.
3. QC
Requirements:
a. Plug
(20);
1. 16 rms finish on its seating surface
for tight shutoff.
2. No major defects on bottom guide
spin dle.
b. Cage
(19);
1. 16 rms finish on cylinder bore. No
“ledges” formed due to wear from
moving dynamic side seal (27) or
wiper seal (16).
c. Lower guide bushing (24) (non-re place-
able):
1. 16 rms finish in bore.
2. Max 0.015 inch (0.38 mm) clearance
be tween plug (20) spindle and lower
guide bushing (24).
4. Staging Material for Reassembly.
a. Inspect and clean parts, as necessary,
from the spare parts kit.
b. Lay out all the regulator parts and check
against the bill of material.
E. Reassembly of the ITA:
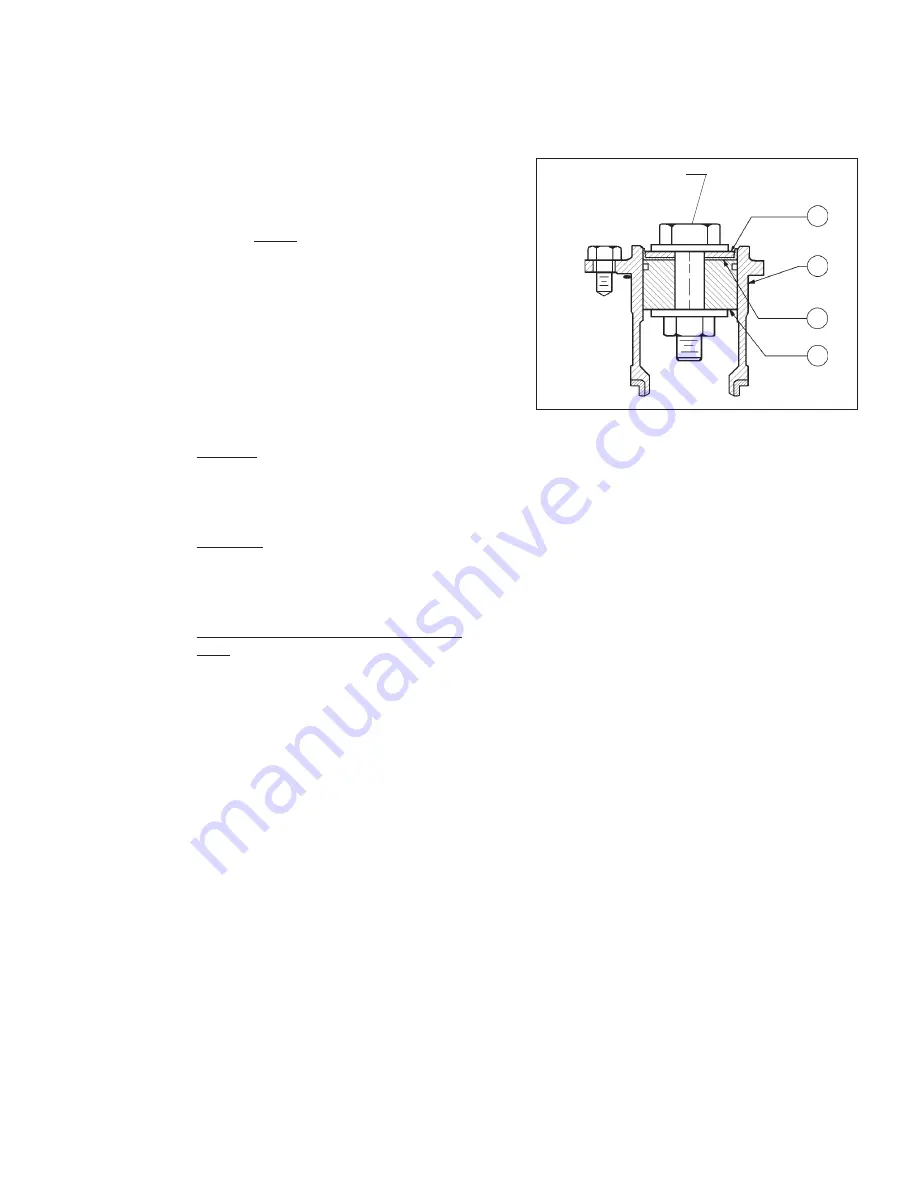
1. When replacing the wiper seal (16), the re-
placement wiper seal (16) is “pre-formed”.
It may, however, require re-forming. Under
normal circumstances, this step may not be
required. If needed, reform the wiper seal
(16) by press ing the temporary assembly of
parts into the cage (19) backwards as shown
in Figure 3. The wiper seal (16) is best left in
this position overnight (minimum of two (2)
hours) prior to final re as sem bly.
2. After re-forming the wiper seal, remove parts
(13, 16, 17) from cage (19) and disassemble
this tem po rary assembly.
Figure 3:
Temporary Wiper Seal Assembly
Not supplied. Use any
bolt, two washers and
nut of same approximate
hole size.
17
19
16
13
3. Place wiper washer (17) into “cup” of wiper
seal (16). Holding these parts between thumb
and forefinger, in sert into cage (19) at an ap-
proximate 45° angled approach with wiper
washer (17) on bottom, wiper seal (16) on
top with turned-down lip of wiper seal en ter-
ing cage first. Rotate wiper seal and wiper
washer to a level po si tion approximately half
way down into cage. Allow wiper washer to
rest on bottom of cage.
4. Stretch the corrugated, metal, piston ring
en er giz er of the dynamic seal (27) over the
lower cir cum fer ence of piston-guide bearing
(13). Using thumbs, work the energizer into
the bearing groove.
5. Carefully stretch and slip one of the piston
ring seals over the lower circumference of
pis ton-guide bearing (13), taking care not to
“cut” the piston ring seal. Using thumbs, work
the piston ring seal into the groove of the
bearing. Repeat this procedure with a second
piston ring seal.
NOTE:
A piston ring as sem bly
(PRA) (27), consists of one metal corrugated
energizer and two piston ring seals
6.
Position piston-guide bearing (13) over and
into upper end of cage (19) until the lower
piston ring seal touches the upper lip of the
cage. While gently applying force to press the
piston-guide bearing into the cage, si mul ta ne-
ous ly use fin gers to lightly circumferentially
press the first piston ring seal inwards into
the piston-guide bearing groove until the first


