background image

Line Thermal Printer DEP-50

22

23

User’s Manual

!

CAUTION

!

CAUTION

y

The printer cover is not stationary (Opening/Closing). After detaching it,
be careful not to lose or break it

y

Do not insert a ragged or dog-eared end of the paper roll, because it could
result in a paper jam or insertion error.

y

If the paper roll is still slack, rewind the paper to remove the slack

y

If the paper roll is tilted, rais the head-up lever to correct the paper roll
posotion, or pull out the paper roll and set it again.

y

Do not open the printer cover while printing.

y

Do not hold or press the paper roll while printing, because it could cause a
paper jam.

y

After the paper is set, the printer is made ready to start printing. Note that if
data is remaining in the buffer, the printer will start printing after the paper is set.

y

Do not run the printer with its cover removed, because it could cause
malfunctioning or an irregularity of the sensor.

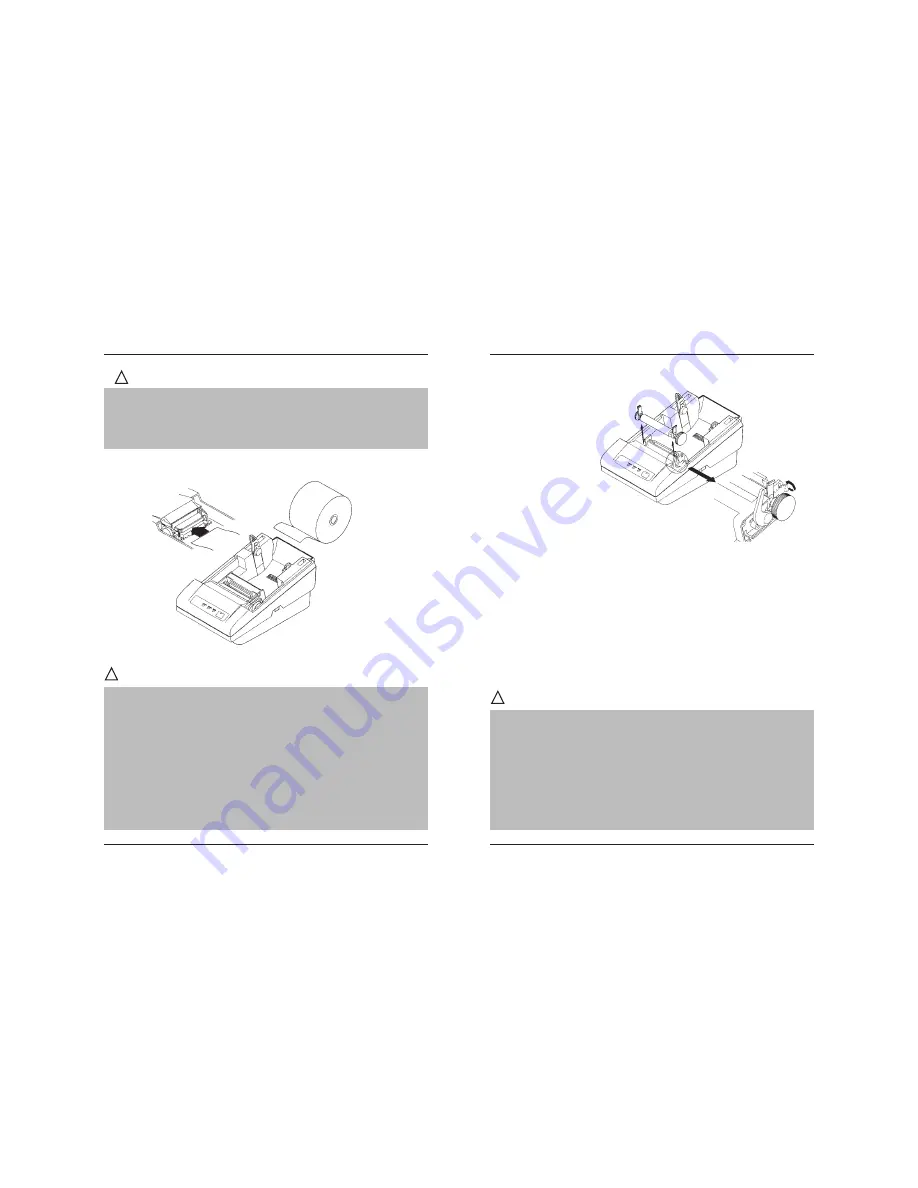
4.4 Eliminating the Paper Jam

y

Do not carry out this work just after printing because the printing head is very hot.

y

Be sure to turn off the power when detaching the platen roller unit.

y

When eliminating remaining paper, do not touch the heating surface of the
head with a bare hand or metal piece.

y

Do not detach the platen roller unit unless necessary, such as for a paper jam.

y

When putting back the platen roller unit, be sure to confirm that it is correctly
reattached.

y

Never detach or reattach the platen roller unit with the head-up lever lowered.

!

CAUTION

1

Turn off the power.

2

Detach the printer cover.

3

Cut the paper roll near the paper insertion slot.

4

Raise the head-up lever.

5

Raise the blue levers located on both sides of the platen roller unit, to gently
detach the unit. The platen roller unit can be detached by manually raising
the blue levers.

6

Remove the remaining paper roll completely from the paper passage.

7

Confirming the direction of the platen roller unit, reattach it to the mechanism.
Shift down the blue levers on both sides, to fix the unit.

8

Lower the head-up lever.

Содержание DEP-50

Страница 1: ...User s Manual LINETHERMALPRINTER MODEL DEP 50 VERSION 1 06 september 2005 ...

Страница 2: ...1 4 3 Inserting the Paper 21 4 4 Eliminating the Paper Jam 23 4 5 LEDs 24 4 6 FEED Switch Function 24 4 7 Paper End Function 24 4 8 How to Remove Remaining Paper Roll 24 5 DIP SWITCH SETTING 25 5 1 Location of DIP Switch 25 5 2 DIP Switch Function 25 6 SERIAL INTERFACE CABLE ATTACHMENT 27 6 1 Serial Interface 27 6 2 Input output Signals 27 6 3 Signal Description 27 6 4 Dataflow Control 27 7 POWER ...

Страница 3: ...local power company y Do not allow anything to rest on the power cord Do not place this product where the cord will be walked on y If an extension cord is used with this product make sure that the total of the ampere ratings of the products plugged into the extension cord does not exceed the extension cord ampere rating Also make sure that the total of all products plugged into the wall outlet doe...

Страница 4: ...ndling or an improper operating environment y Operate the equipment only as described in this User s Manual otherwise accidents or problems may result y Dataarebasicallytemporaty theycannotbestoredorsavedpermanentlyor for a long time Please note that we will not be responsible for damages or sses of profit resulting from losses of the data attributable to accidents repairs tests and so on y If you...

Страница 5: ...le itself could cause it to snap or become damaged y Connect a power cable or a connector cable securely If a reverse polarity connection is a made internal elements may be broken or a mating device may be ad versely affected WARNING y Neverhandletheequipmentinthefollowingmanners asitmaybreak becomeoutof order oroverheatcausingsmokeandresultinginfireorelectricshock Iftheequip mentisusedinanabnorma...

Страница 6: ...lpartsor movingparts suchasthemechanism motor internaldear etc Theymaybe very hot and can burn your hand finger y Be careful to avoid bodily injure or damaging other objects with an edge of sheetmetal y Should any error occur while operating the equipment stop it immediately and disconnect the power plug from the plug socket y Only a qualified serviceman is allowed to disassemble or repair the pri...

Страница 7: ...ng head with it 3 Reattach the platen roller unit The printing head and motor are very hot Be careful not to touch them immediately after printing Do not touch the heating surface of the head with a bare hand or metal When detaching or reat taching the platen roller unit be sure to raise up the printing head otherwise they could be damaged Handle the detached platen roller unit carefully so as not...

Страница 8: ...ts mm Width Length Paper feed pitch 0 125 mm Printing speed up to 50 mm s Character size 12 24 9 16 24 24 only for asian versions Character types Alphanumerals symbols international characters Choose from 20 countries Barcode type UPC A E JAN EAN 13 8 column ITF CODE 39 CODE 93 CODE 128 CODABAR PDF417 Paper Thermal paper roll 58 0 1 mm φ83 max mm 60 75 µmthick Thermal label paper 58 0 1 mm φ 83 ma...

Страница 9: ...t y Core φ12 mm Inner dia φ18 mm Outer dia CAUTION y Use of non specified paper may cause irregularity of print density y Do not paste the paper to the core y Ifthepapercomesincontactwithachemicaloroil itmaydiscolor orlosea record y Donotrubthepapersurfacestronglywithanailorhardmetal Itmaydiscolor y Discoloring starts at about 700 C Watch out for effects of heat humidity light and so on y Do not u...

Страница 10: ...nning out 8 DIP switch Initially sets the printer at power on and sets the functions 9 Platen roller unit Detach this unit when the paper is jamming or when you clean the head 10 Head up lever Used when replacing the paper or detaching reattaching the platen roller unit 11 Paper cutter Cuts the printed paper 12 Power connector Connects to the accessory AC adapter 13 Interface connector Connects to...

Страница 11: ...nterface Cable 1 Turn off the power Mating side included 2 Check the top and bottom of cable terminals and connect to the interface connector 3 Connect the cable to the host computer 4 3 Inserting the Paper CAUTION 1 Hold the convexity on the rear of the printer cover and raise it upward 2 Cut the front end of the paper roll almost at a right angle 3 Make sure that the power is turned on 4 Pull th...

Страница 12: ...sensor 4 4 Eliminating the Paper Jam y Donotcarryoutthisworkjustafterprintingbecausetheprintingheadisveryhot y Be sure to turn off the power when detaching the platen roller unit y When eliminating remaining paper do not touch the heating surface of the head with a bare hand or metal piece y Do not detach the platen roller unit unless necessary such as for a paper jam y When putting back the plate...

Страница 13: ...the head up lever 3 Gently pull out the paper to the near side If the paper roll is still remaining cut it just before the paper insertion slot before pulling it out CAUTION y Do not pull out the paper roll in the opposite direction y Never take out paper with the head up lever lowered because it could damage the printing head y The printer mechanism may be very hot just after printing so be duly ...

Страница 14: ...l bit Indicates the beginning of data byte 2 Data bits Eight consequent bits First is the least significant bit 3 Stop bit One Mark level bit Indicates the end of the byte 6 4 Dataflow Control Ifahardwareprotocolisselectedthecomputercouldsenddataonlyat Space level on the DTR line Data reception is disabled when the buffer is close to its upper limit Reception is re enabled when the number of bytes...

Страница 15: ... ESC Define user characters 1BH 26H m n1 n2 10 ESC Collective specifying printing mode 1BH 21H n 11 ESC Specifying the bit image mode 1BH 2AH m n1n2 d k 12 ESC Specifying cancelling underline 1BH 2DH n 13 ESC Self test demo 1BH 2EH 14 ESC Printing diagnostic information 1BH 54H 15 ESC 2 Specifying 1 6 inch line feed rate 1BH 32H 16 ESC 3 Setting line feed rate of minimum pitch 1BH 33H n 17 ESC Dat...

Страница 16: ...bit image 1DH 2FH m 57 GS Starting ending macro definition 1DH 3AH 58 GS Executing the macro 1DH 5EH n1 n2 n3 59 FS p Printing the downloaded NV bit image 1CH 70H n m 60 FS q Defining the downloaded bit image 1CH 71H nH Note n n1 n2 n3 n4 n5 n6 m a s p d N1 N2 N3 N4 andN5inthetableareparametersforeach command Note k in the table denotes k times of repeat 9 DETAILED DESCRIPTION XXXX ALL Function Co...

Страница 17: ...ext print starting position SeeAlso ESC2 ESC3 SampleProgram LPRINT AAA CHR HA LPRINT BBB CHR HA LPRINTCHR HA LPRINT CCC CHR HA CR Print Command Code 0Dh This command is ignored Print Results ESC RS Sounds the beeper Code 1Bh 1Eh Outline Sounds the beeper ESC SP n Setting the right space amount of the character Code 1Bh 20h n Range 0 n 20 Outline The rightward space amount is set in dot unit 1 203 ...

Страница 18: ... Value 0 Selected Value 1 Not selected See also ESC ESC s n1 n2 a d s x a k ESC m n1 n2 d k Define user characters There are two different types of this command selected by switch 5 s position If switch 5 is OFF Code 1Bh 26h s n m a1 D1 am n 1 Dm n 1 Range s 3 20h n FFh n m FFh 0 a 12 0 Di FFh Outline Defines a group of downloaded characters where s is the number of bytes in vertical direction alw...

Страница 19: ...t is the starting Every horizontal line of Font B symbol consists of one byte as the ninth point is always white The most significant bit is the starting The user defined characters are kept after printer off SeeAlso ESC Caution With double height and double width being specified simultaneously double wide and double high characters are consisted An underline is attached to the full character widt...

Страница 20: ...x203 DPI When bit image data have been input in excess of dot position of one line 384 dots the excess data are discarded d is bit image data the bits subject to printing are taken as 1 and those not as 0 Caution When the values set in m bit image mode are out of the above range the data following after n is processed as normal printing data After completion of bit image printing printer returns t...

Страница 21: ... with different attributes and diagnostic information See also ESC ESC Printing diagnostic information Code 1Bh 2Ch Outline Printingcurrentintensitylevel temperature codetables communication mode protocolandserialportspeedifa serial communication board s installed See also ESC ESC 2 Specifying 1 6 inch line feed rate Code 1Bh 32h Outline The line feed rate per line is specified by 1 6 inch SampleP...

Страница 22: ...0 is defined Value 0 Selected Value 1 Not selected When the printer has not been selected this printer abandons all the received data until it is selected by this command Caution Even when the printer has not been selected it can become BUSY state through printer operation When the printer is deselected this printer discards all the data until it is selected with this command Default The initial v...

Страница 23: ...ual to or smaller than its preceding data n k 1 it is assumed that tab setting is finished If this is the case the next data onward will be processed as normal data When the data n k exceeds a 1 line print area set the horizontal tab position assuming Setdigitposition Maximumprintdigits 1 Thehorizontal tab position does not change even if the character width is altered after setting the horizontal...

Страница 24: ...A Print Results ESC I n Specifying cancelling italic printing ESC I n Code 1Bh 49h n Range 0 n FFh Outline Specifying canceling the double printing n is valid only for the lowest bit n0 Control by n is shown as follows 0 Canceling italic printing 1 Specifying italic printing SampleProgram LPRINTCHR H1B I CHR 0 LPRINT BBBBB LPRINTCHR H1B I CHR 1 LPRINT BBBBB Print Results BBBBBBBBBB ESC J n Printin...

Страница 25: ... U K 4 Denmark I Æ Ø Å æ ø å 5 Sweden É Ä Ö Å Ü é ä ö å ü 6 Italy º é ù à ò è ì 7 Spain I P t Ñ ñ 8 Japan 9 Norway É Æ Ø Å Ü é æ ø å ü 1 0 Denmark II É Æ Ø Å Ü é æ ø å ü ESC R n Selecting international character set Code 1Bh 52h n Range 0 n 10 Outline Depending on the value of n one of the following character sets is selected ESC V n Specifying Canceling 90º right turned Characters Code 1Bh 56h n ...

Страница 26: ...are described as follows ESC Y n Selecting the intensity level Code 1Bh 59h n Range 0 n 5 Outline Set the intensity level n means the followings 0 Set intensity 70 1 Set intensity 80 2 Set intensity 90 3 Set intensity 100 4 Set intensity 120 5 Set intensity 150 Caution Higher intensities can cause a lower speed Default The initial value of n is 3 SampleProgram LPRINTCHR H1B Y CHR 0 LPRINT AAAAA LP...

Страница 27: ...n1 There are 384 dots per line positions from 0 to 383 Caution Specifying exceeding the beginning of the line or the end of the line ignored Default The initial value is not specified SeeAlso ESC ESC _ Restore factory defaults and save them to nonvolatile RAM Code 1Bh 5Fh Outline Select fontA no bold no underline etc Restore tab defaults The parameters are read from the flash memory Downloaded fon...

Страница 28: ...CHR 1 LPRINT AAAAA CHR HA LPRINTCHR H1B a CHR 2 LPRINT AAAAA CHR HA Print Results ESC c5 n Enabling Disabling Panel Switches Code 1Bh 63h 35h n Range 0 n FFh Outline Selecting the LF switch valid invalid n is valid only in the lowest bit n0 n bit means the followings 0 LFSW valid 1 LFSW invalid Caution When the panel switch is disabled with this command the LF switch is disabled Therefore the pape...

Страница 29: ... 2 n2 milliseconds long rest after the pulse n2 must be at least four times greater than n1 or the command will be dis carded SampleProgram LPRINTCHR H1B p LPRINTCHR 0 LPRINTCHR 5 SetsONtimeto10ms LPRINTCHR 50 SetsOFFtimeto100ms END ESC m Cutting the paper Code 1Bh 6Dh Outline The command is exactly the same as ESC i n Code Table 0 USA CP437 1 Litva 2 West Europe Latin I CP850 3 Brasil CP860 4 Pol...

Страница 30: ... the printer when the code page is set by the DIP switches the command is disabled and a code page other than this one cannot be set In the Chinese version of the printer the code table can be changed regardless of the DIP switch setting If the code page is set by the DIP switches the command ESC wil store this code page into the flash for further use Default The default value is 0 USA CP437 code ...

Страница 31: ...SC m 3 printing diagnostic information short test ESC GS B n Specifying canceling the black white inverted printing Code 1Dh 62h n Range 0 n 255 Outline According to the least significant bit of n n0 the following modes are possible n0 0 Black white inverted printing is canceled n0 1 Black white inverted printing is specified The space skipped by tab command or by positioning commands ESC ESC is n...

Страница 32: ...sition so the last printed line remains after the cutter s edge This means at in case 2 the paper is fed by cut position n 8 millimeterstotal 1 GS k m d k NUL 2 GS k m n d k 3 GS k m a d k NUL 4 GS k m a xL xH d k Printing the barcode Code 1 1Dh 6Bh m Di 00h 2 1Dh 6Bh m n Di 3 1Dh 6Bh m a Di 00h 4 1Dh 6Bh m a xL xH Di Range 1 0 m 6 2 65 m 73 3 m 9 a 0 1 4 m 74 256 xH xL 3000 a 0 1 Outline Specifyi...

Страница 33: ...s sent from the host the entire bar code will be printed as it is CODE39 This bar code consisting of uppercase alphabets and numerals has a variable length of column Astart stop code is automatcally added by the printer Available characters include a space and 0 1 2 3 4 5 6 7 8 9 and uppercase alphabets ITF This bar code consisting of numerals only has a variable length of evencolumn Ifanodd colum...

Страница 34: ...he barcode must start with one of the symbols CODEA CODEB or CODEC that determines which table will be used If it is necessary the current table could be changed ater by inserting one of these symbols in to the barcode The symbol following SHIFT character is considered to be from table B if table A is current or from table A if table B is current If a symbol that is not valid for the current table...

Страница 35: ...s to be encoded while using the second variant all range from 0h to FFh can be encoded SampleProgram LPRINTCHR H1D k LPRINTCHR 9 CHR 0 LPRINT ABCDEF0123456789abcdef LPRINTCHR 0 Print Results Type PrintSample Outline of Symbol UPC A 12 column fixed length barcode consisting of numerals only UPC E 8 column fixed length barcode consisting of numerals only Abbreviated version of UPC A JAN 13 13 column...

Страница 36: ...ight 30 Magnification 2 Height 50 Magnifikacion 3 GS H n Selecting of Printing Position of HRI Code Code 1Dh 48h n Range 0 n 3 Outline Selecting printing position of HRI code in printing barcodes n means the followings 0 No printing 1 Above the barcode 2 Below the barcode 3 Both above and below the barcode The HRI code refers to the barcode turned characters so that you can read them Caution The H...

Страница 37: ...s Code 1Dh 70h n1 n2 n3 Range 0 n1 255 0 n2 30 n3 0 3 n3 90 Outline n1 selects PDF 417 security level Setting a security level higher than eight forces the printer to automatically adjusts the security level according the following table EC level EC Codewords Auto Select Level 0 2 1 4 0 31 2 8 32 63 3 16 64 127 4 32 128 255 5 64 256 511 6 128 512 928 7 256 8 512 Only real data codewords in the sec...

Страница 38: ...tmost dot The data that exceeds the printing width of the line is discarded The raster bit image could be positioned using the commands ESC ESC and GS L The raster bit image could be justified using the ESC a command If this command is executed during a macro definition the macro definition is finished and the command is executed GS Defining the Download Bit Image There are two variants of this co...

Страница 39: ...de Name Dots in Vertical Dots in Horizontal Direction Direction 0 Normalmode 203DPI 203DPI 1 Double wide mode 203DPI 101DPI 2 Doublehighmode 101DPI 203DPI 3 DW DHmode 101DPI 101DPI Caution When data exist inside the print buffer this command is ignored When a download bit image has not been defined this command is ignored Aportion of a download bit image exceeding one line length is not printed De...

Страница 40: ...ified NV non volatile bit image The bit image is stored into the flash n is ignored the printer supports only one bit image xL and xH denote the horizontal size of the NV bit image as xL xH 256 8 dots Print Results GS n1 n2 n3 Executing the Macro Code 1Dh 5Eh n1 n2 n3 Range 0 n1 FFh 0 n2 FFh 0 3 1 Outline Executing contents defined in macro n1 n3 indicate as follows n1 The number of times of macro...

Страница 41: ...n FFh 0 xL FFh 0 xH FFh 0 yL FFh 0 yH FFh 0 D FFh Outline This command defines the specified NV non volatile bit image The bit image is stored into the flash n is ignored the printer supports only one bit image xL and xH denote the horizontal size of the NV bit image as xL xH 256 8 dots yL and yH denote the vertical size of the NV bit image as yL yH 256 dots Total amount of data defining the bit i...

Отзывы: