background image

G

36

Advanced performance setup

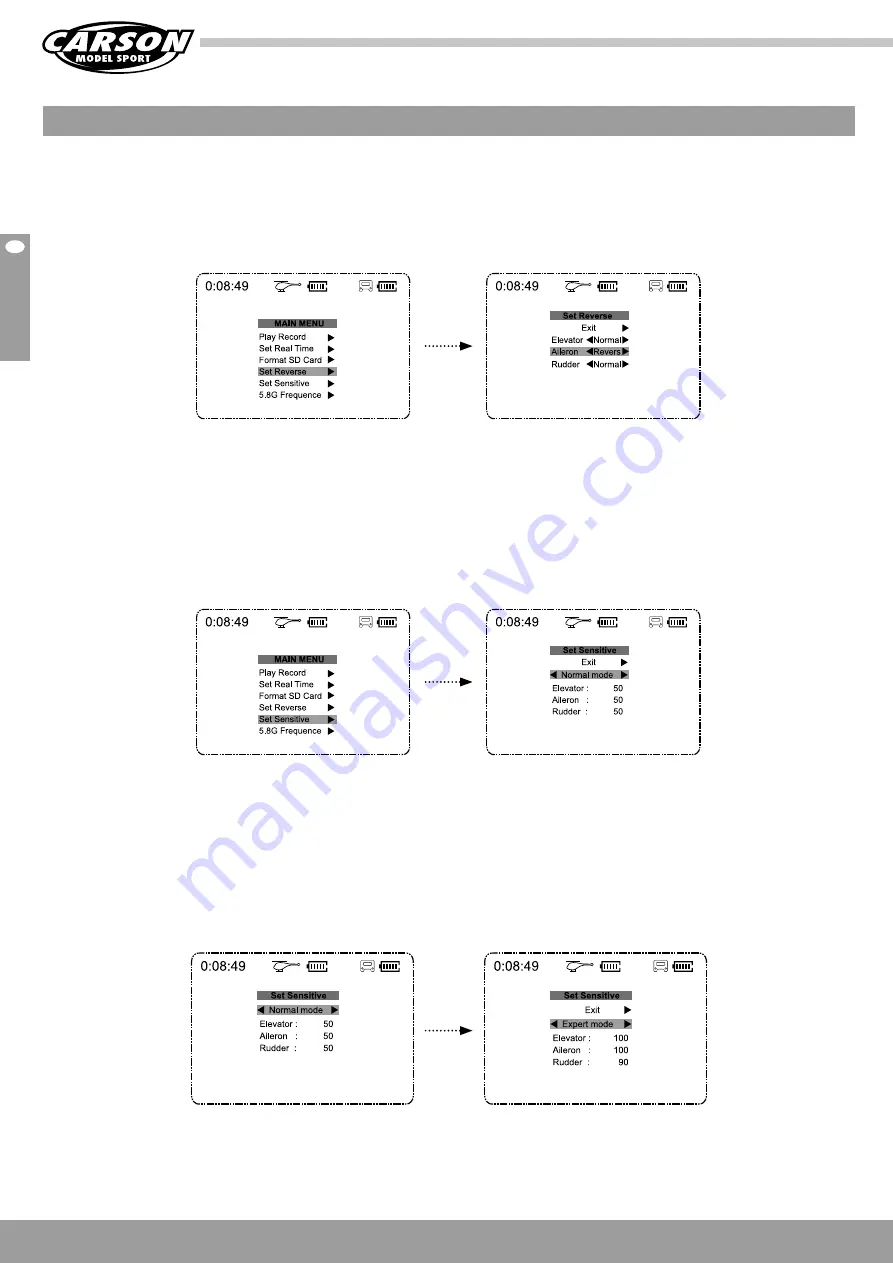
Reversing channel setup

Sensitivity set up

Expert mode

If you would like to reverse any of the stick functions due to personal 

preference then follow the instructions below. Be aware that this will 

change the controls back to front. Press down the ELEVATOR stick for 

1 second to enter setting status, move the stick up/down to choose 

SET REVERSE, push the ELEVATOR stick to the right, move it up/down 

to choose and push right to conrm or exit. Hold down the ELEVATOR 

stick for 2 seconds to exit.

If you would like to change the sensitivity of any of the stick functions 

then follow instructions below. A higher sensitivity value will enable 

larger/faster movement of the aircraft,while a lower sensitivity value 

will enable smaller/slower movement. Press down the ELEVATOR 

stick for 1 second to enter setting status, move the stick up/down to 

choose SET SENSITIVE, push the ELEVATOR stick to the right, press the 

elevator/ aileron/ rudder trim to set the sensitivity. Push the elevator 

stick to the right to exit. Hold down the ELEVATOR stick for 2 seconds 

to exit the setup menu.

In expert mode, the sensitivity can be adjusted even further (up to 

100) to give the user even more ability to manoeuvre the aircraft. 

Follow instructions below to switch this on/off.
Press down the ELEVATOR stick for 1 second to enter setting status, 

move the stick up/down to choose SET SENSITIVE, push the ELEVATOR 

stick to the right, choose NORMAL MODE, push the ELEVATOR stick to 

the right to enter into the expert mode, press the elevator/ aileron/ 

rudder trim to set the sensitivity. Push the ELEVATOR stick to the right 

to exit this set. Hold down the ELEVATOR stick for 2 seconds to exit.

Содержание X4 Quadrocopter Micro FPV

Страница 1: ...500507065 Stand Juli 2015 Radio Controlled Quadcopter RTF D Betriebsanleitung Seite 2 21 G Instruction Manual Page 22 41 F Avertissement de sécurité Page 42 44 I Avvertenze di sicurezza Pagina 45 47 ...

Страница 2: ...rodukt leistet CARSON eine Garantie von 24 Monaten betreffend Fehler bei der Herstellung in Bezug auf Material und Fertigung bei normalem Gebrauch ab dem Kauf beim autorisier ten Fachhändler Im Falle eines Defekts während der Garantiezeit bringen Sie das Produkt zusammen mit dem Kaufbeleg zu Ihrem Fachhändler CARSON wird nach eigener Entscheidung falls nicht anders im Gesetz vorgesehen a Den Defek...

Страница 3: ...nahmen wiedergeben 11 Uhrzeit einstellen 11 Mikro SD Speicherkarte formatieren 12 Laden des Flugakkus 12 Videoaufnahme 13 Fertig zum Abheben 13 Einstellungen für fortgeschrittene Piloten 16 Montage des Propellerschutzes 19 Fehlersuche 20 Ersatzteile 48 Flugfertig aufgebautes Modell 4 Kanal Sender 2 4 GHz inkl Bildschirm 5 8 GHz FPV System Schutzring für Propeller LiPo Akku 3 7 V 380 mAh USB LiPo L...

Страница 4: ...ind Bewahren Sie das Modell außerhalb der Reichweite von Kleinkindern auf Diese könnten das Modell unabsichtlich in Betrieb setzen und sich so Verletzungen zufügen oder Akkus und Kleinteile in den Mund nehmen und verschlucken Vorbereitungen Fliegen Sie niemals ohne die folgenden Punkte geprüft zu haben Achten Sie auf sichtbare Beschädigungen an Modell Fernsteue rung Ladegerät und Lithium Akku Prüf...

Страница 5: ...uf öffentlichen Verkehrsflächen Rotor Beschädigte Rotorblätter müssen ausgetauscht werden Unter lassen Sie Reparaturversuche Halten Sie sich von den Propellern fern sobald der Akku ange schlossen ist Vermeiden Sie den Aufenthalt in der Rotationsebene der Roto ren Betreiben Sie das Modell nicht im Sitzen um bei Bedarf schnell aus dem Gefahrenbereich gelangen zu können Verwenden Sie ausschließlich d...

Страница 6: ...rschriften Aus Sicherheits und Zulassungsgründen CE ist das eigenmächtige Umbauen und oder Verändern des Ladegerätes nicht gestattet Lithium Polymer Akku Verwenden Sie den beigefügten Akku ausschließlich für dieses Modell Verwenden Sie auch als Ersatzakku nur ein Originalteil Akku nicht überladen oder tiefentladen Beides kann zum Aus treten von Elektrolyten und zur Selbstentzündung führen Mischen ...

Страница 7: ...us in der Nähe von offenen Feuerstellen 18 Setzen Sie den Akku keiner direkten Sonneneinstrahlung aus oder verwenden ihn unter dieser oder im erhitzten Auto 19 Verwenden Sie den Akku nicht in Umgebungen in denen sich statische Elektrizität bildet oder bilden kann da dadurch der Schutzkreislauf beschädigt werden kann 20 Der Akku kann innerhalb einer Temperaturspanne von 0 C bis 45 C geladen werden ...

Страница 8: ...g Steuere Deinen Quadcopter über alle 4 Funktionen Features Stabile Flugeigenschaften Komplett flugfertig aufgebaut Mit professioneller 4 Kanal 2 4 GHz Fernsteueranlage Inkl Gyro Stabilisations Funktion Inkl LiPo Akku 3 7 V 380 mAh und LiPo Ladegerät 5 8 GHz FPV System inkl Videos am Sender abspielen Vorderer Propeller Hinterer Propeller Elektromotor Rumpf LED s FPV Kamera ...

Страница 9: ...Nick Trimmung Roll Video Ausgang Audio Ausgang Aufnahmeknopf Trimmung Nick ON OFF Trimmung Roll Steuerknüppel Nick Roll Trimmung Drehen Micro SD Karte USB Anschluss LCD Programm Knopf Trimmung Gas Steuerknüppel Gas Drehen Trimmung Drehen Trimmung Gaskanal Einschaltzeit LC Display Erklärung Sender ...

Страница 10: ...sgang Ohne Funktion Achtung Hinweis Mischen Sie niemals verbrauchte mit neuen Batterien Niemals Batterien verschiedenen Typs miteinander verwenden Verwenden Sie nur Batterien vom Typ AA Andere Batterietypen führen zur Beschädigung des Senders Batteriedeckel abnehmen Drücken Drücken 4 Mignon Batterien AA einlegen Auf richtige Polung achten Batteriedeckel wieder korrekt montieren 1 Die Videoaufnahme...

Страница 11: ...hebel 2 Sekunden lang nach unten gedrückt halten Sie können mit Ihrem Sender gespeicherte Video Aufnahmen auf dem Bildschirm abspielen lassen Drücken Sie den Steuerknüppel 1 Sekunde lang um in das Einstellungsmenü zu gelangen Bewegen Sie den Steuerknüppel auf und ab um PLAY RECORD AUFNAHME ABSPIELEN auszuwählen Drücken Sie anschließend den Steuerknüp pel nach rechts links um NEXT STOP NÄCHSTE STOP...

Страница 12: ... Sekunden lang nach unten gedrückt halten 1 Der X4 Quadcopter Micro FPV wird mit einem 3 7V 380mAh Lipo Flugakku betrieben 1 1 Ziehen Sie den Flugakku an der Unterseite des Rumpfes nach hinten aus dem Modell 1 2 Stecken Sie das beiliegende Ladegerät an einem USB Steckdosen adapter oder an einer beliebigen USB Buchse an Nun schließen Sie den Flugakku am Ladegerät an Die rote LED leuchtet auf und er...

Страница 13: ...folgen Das Fliegen lernen ist schon ein Teil des Vergnügens Quadcopter startklar machen Failsafe Ihr Quadcopter ist mit einem 4 in 1 Gyro Empfänger ausgestattet Inkl Failsafe welches sich nach dem Einschalten aktiviert Dieses ist dazu da dass die Motoren erst starten wenn ein entsprechendes Funksignal empfängt nachdem der LiPo Akku angeschlossen wurde Die richtige Startreihenfolge ist folgende SD ...

Страница 14: ...tung Erklärung Steuerung des X4 Quadcopters Nach einem kurzen Tonsignal leuchtet die grüne LED am Sender und die 6 LED s am Modell Dies bestätigt die erfolgreiche Durchführung des Bindevorgangs Zum Ein oder ausschalten der LED s drücken Sie die Gashebeltrimmung für ca 1 Sekunde lang nach unten HINWEIS Wenn die Akkuspannung einen gewissen Wert unterschrit ten hat blinken die LED s am Modell auf Dan...

Страница 15: ...uadcopter vorwärts rückwärts Der Steuerhebel für Roll bewegt Ihren Quadcopter seitlich nach links rechts Vorsicht Die Steuerhebel verhalten sich umgekehrt wenn das Modell auf Sie zu fliegt Der Steuerhebel für Roll bewegt Ihren Quadcopter seitwärts nach links rechts Rechts drehen Rückwärts Rechts Links drehen Vorwärts Links ...

Страница 16: ...ll und Drehen die gewünschte Empfindlichkeit ein Drücken Sie den rechten Steuerhebel anschließend nach links um diese Option zu verlassen Drücken Sie den rechten Steuerhebel 2 Sekunden lang gedrückt um das Menü zu verlassen Eine höhere Empfindlichkeit ermöglicht eine größere schnellere Bewegung des Modellfluggerätes während eine geringere Empfindlichkeit zu einer kleineren langsameren Bewegung füh...

Страница 17: ...rre drücken Sie kurz den linken Steuer hebel Anti Flip Keine Loopingfunktion ein Piepton Flip Looping Funktion aktiv zwei Pieptöne Um einen Flip nach links zu fliegen bewegen Sie den rechten Steuer hebel schnell nach rechts und wieder nach links Nach dem Looping Steuerhebel wieder in Mittelposition bringen Um einen Flip nach rechts zu fliegen bewegen Sie den rechten Steu erhebel schnell nach links...

Страница 18: ...ooping Steuerhebel wieder in Mittelposition bringen Ist der EXPERT MODUS aktiviert kann der X4 auch sehr schnell geflo gen werden und es können auch Flips geflogen werden Wenn keine Loopings durchgeführt werden sollen so können Sie diese Funktion deaktivieren Drücken Sie den linken Steuerhebel 1x um ANTI FLIP zu aktivieren oder zu deaktivieren OFF ein Piepton vom Sender keine Flips ON zwei Pieptön...

Страница 19: ...ch oben weg Montage des Propellerschutz Positionieren Sie den Propellerschutz mit den Löchern über den vier Motoren Drücken Sie jeden Propellerschutz auf die Motoren Anschließend müssen die Propeller wieder angebracht werden Achten Sie bei der Montage besonders auf die korrekte Position der Propeller Bitte überprüfen Sie nach jedem Absturz den korrekten Sitz des Propellerschutzes und stellen Sie s...

Страница 20: ...n Uhrzeigersinn gekennzeichnet Siehe nachstehende Abbildung mit der richtigen Montagerichtung Motoren wurden falsch eingebaut Stellen Sie sicher dass die Motorn in der richtigen Position montiert wurden Siehe nachstehende Abbildung 1 mit der richtigen Einbaurichtung Die Motoren lassen sich nach einem Absturz nicht mehr frei drehen Drücken Sie die Motorwelle vorsichtig nach unten Falls sich das Pro...

Страница 21: ...nung der Senderbatterien zu schwach ist müssen Sie die Batterien durch neue austauschen Partitionen der SD Karte Die Speicherkarte wird durch die Fernsteuerung automatisch partitioniert Partitionsgrößen ca 225 MB Wenn Sie die auf der SD Karte gespeicherten Videos von einem Windows Computer abru fen dann werden Sie nur die erste Partition sehen Möglicherweise wird auch der verfügbare Speicherplatz ...

Страница 22: ...materials and workmanship under normal use for 24 months from the date of purchase from authorised franchisees and dealers In the event of a product defect during the warranty period return the product along with your receipt as proof of purchase to any CARSON store CARSON will at its option unless otherwise provided by law a Correct the defect by repairing the product without charging for parts a...

Страница 23: ...electable 5 8Ghz 31 Play Record 31 Set Real Time 31 Format SD Card 32 LiPo Battery Charging 32 Video Recording 33 Start to fly 33 Advanced performance setup 36 Mounting the Cage 39 Trouble Shooting 40 Spare Parts 48 Model built ready to fly 4 channel remote control transmitter 2 4 GHz 5 8 GHz FPV System Prop saferring LiPo battery 3 7 V 380 mAh USB LiPo Balance charger Operating manual Batteries f...

Страница 24: ... your first flight attempts Flying a radio controlled model aircraft a fascinating hobby Howe ver it has to be practised with the necessary caution and considera tion A radio controlled model aircraft can cause damage and injury in an uncontrolled flying mode and the user is liable for any such incident As a manufacturer and distributor of the model we have no influ ence on the correct handling an...

Страница 25: ...ch as buildings furniture persons and ani mals On public roads Propeller Damaged propeller blades must be replaced Do not try to repair Keep away from the propellers as soon as the battery is connec ted Avoid presence in the plane of rotation of the propellers Do not operate the model while seated so that you can rapidly get out of the hazardous area if necessary Employ exclusively the enclosed ba...

Страница 26: ...sible damage The device no longer works and After longer storage under unfavourable conditions or After severe transportation stress it must be switched off without delay and secured against unintentional operation Dispose of the unusable irreparable battery charger according to the applicable statutory regulations For safety and registration reasons CE the unauthorised conversion and or modificat...

Страница 27: ...ntainer 17 Do not use a leaked battery near fire 18 Do not expose the rechargeable battery to direct sunlight or use it in it or in the heated car 19 Do not use the rechargeable battery in any areas where static electricity is present or may form since this may damage the safety circuit 20 The rechargeable battery may be charged at temperatures from 0 C to 45 C Do not charge the rechargeable batte...

Страница 28: ... the box Control your quadcopter using all four functions Features Stable flight behaviour Completely assembled Ready To Fly Including professional 4 channel 2 4 GHz radio control Gyro stabilizing function With LiPo battery 3 7 V 380 mAh and LiPo balance charger 5 8 GHz FPV System Playing Videos via transmitter Front Propeller Back Propeller Electric motor Body LED s FPV Kamera ...

Страница 29: ...ording Elevator trim Aileron trim Video glasses socket Earphone socket Recording Elevator trim Power SW Aileron trim Elevator Aileron Stick Rudder trim SD Card USB socket LCD No use now Throttle trim Throttle Rudder Stick Rudder trim Throttle trim On time LC display Explanation transmitter ...

Страница 30: ...hes it off 8 Recording Start Stop the recording 9 USB Socket without function 10 Video glasses socket Video Output 11 Earphone socket without function Caution Notice Do not mix old and new batteries rechargeable batteries Do not mix different types of batteries Do not charge non rechargeable batteries Take out the cover push push Install 4 x AA battery according to the correct polarities Return th...

Страница 31: ... the displayed arrows show Or hold down the ELEVATOR stick for 2 seconds to exit Your transmitter can play the video recording that you saved Press down the ELEVATOR stick for 1 second to enter setting status move the stick up down to choose PLAY RECORD push the ELEVATOR stick to the right push right left to choose NEXT STOP Hold down the ELEVATOR stick for 2 seconds to exit Your transmitter can s...

Страница 32: ...econds to exit WARNING ALWAYS FORMAT AND ACTIVATE CAMERA RECOR DING BEFORE FLIGHT 1 The quadcopter is equipped with a LiPo battery 3 7 V 1 cell 380 mAh LiPo battery 1 1 The LiPo battery supplied is in the fuselage of the Quadcopter Remove the LiPo battery from the model 2 Connect the flight battery to the USB charger connection The indicator lamp on the USB plug glows and goes out when the chargin...

Страница 33: ...ed See the picture Start Stop recording using the remote WARNING First activate the camera before flight in order to make sure the SD card is formatted Formatting while in flight will result in loss of control 1 2 3 Press the but ton to switch ON OFF video recording Make sure the throttle stick is in the full down position Power on the transmitter and the red LED will be blinking Please do not mov...

Страница 34: ...green the 6 lights on the X4 will be on solid indicating that the bind code is mat ched The LEDs will be on and night ying is possible Press the lower throttle trim for about 1 second to turn the LEDs on or o Even if you select the LEDs o they will blink when the lipo power is low NOTE The LEDs will blink when the quadcopter runs out of power or the X4 code does not bind with the TX CAUTION To avo...

Страница 35: ...ht Elevator Cyclic Pitch moves your quadcopter Forwards Backwards Aileron Cyclic Roll moves your quadcopter sideways Left Right Caution Controls will appear reversed when the model is flying towards you Right rotation Backwards Right movement Left rotation Forwards Left movement ...

Страница 36: ...ll enable smaller slower movement Press down the ELEVATOR stick for 1 second to enter setting status move the stick up down to choose SET SENSITIVE push the ELEVATOR stick to the right press the elevator aileron rudder trim to set the sensitivity Push the elevator stick to the right to exit Hold down the ELEVATOR stick for 2 seconds to exit the setup menu In expert mode the sensitivity can be adju...

Страница 37: ...do 360 flips by pushing the joysticks as described below For proper ip execution make certain that the X4 is close to level within a 30 angle with the ground and add some climb throttle before you move the pitch and roll sticks Push the joystick to the right side and then quickly push the joystick to the left and then release the stick to the center position after the flip Push the joystick to the...

Страница 38: ...d then quickly pull the joystick to the back and release the stick to the center after the flip In Expert Mode the X4 can fly at high speeds and do flips if you don t need it to flip you can select anti flip mode Press the throttle stick to select or deselect anti flip OFF one TX beep it can t flip ON two TX beeps It can do flips Note that when the X4 runs out of lipo power it also can t flip ...

Страница 39: ...e Remove the props Position the cover s four holes with the motors Press each of them on the motors then re install the props in their correct positions on the X4 When removing the protection cover please remove the props rst as in the above steps and pinch o the protection cover from each motor After any crash landing please check to make sure the protection cover is still on tight and make sure ...

Страница 40: ... CW and B CCW Please check the pictures below for the correct order Wrong installation of motors Please check to make sure that each motor is installed in its correct position There are two dierent types of motors with dierent motor wire colors Please check the pictures below for the correct order The motors are a little gritty and do not spin as freely after crashes You can hear grinding and see ...

Страница 41: ...ard only recorded videos of 75MB total but the file size when read on the compu ter remains only 175MB When the SD card is properly formatted in the TX it will use special formatting that splits the continuous space in order to speedup recording and to have smooth playback Therefore it shows a smaller file size when its properties are viewed on a computer The SD card is full when the the LCD on th...

Страница 42: ... âge Ceux ci pourraient mettre non intentionnellement le modèle en marche se blesser ou mettre des accus ou de petites pièces dans leur bouche et les avaler Ce produit n est pas un jouet Préparatifs Ne volez jamais sans avoir contrôlé les points suivants faites attention aux dommages visibles sur le modèle la télécom mande le chargeur et l accumulateur au lithium Contrôlez le serrage exact et soli...

Страница 43: ... modèle à des conditions ambiantes défavora bles Ce sont en particulier l humidité l humidité atmosphérique trop forte 75 rel condensant Ne saisissez pas non plus le chargeur avec les mains mouillées Ne commandez jamais le modèle immédiatement après qu il a été transféré d un environnement froid à un environnement chaud L eau de condensation alors générée peut détruire l appareil Laissez l apparei...

Страница 44: ...rgez pas l accu à proximité du feu ou sous une insolation directe 5 Utilisez uniquement le chargeur spécifié et suivez les consignes de chargement 6 Ne percez pas l accu ne le maltraitez pas avec un marteau et ne marchez pas dessus 7 N exposez pas l accu à une pression extérieure et ne le jetez pas 8 N utilisez pas les accus endommagés ou déformés 9 Ne brasez pas directement sur l accu 10 Ne pas i...

Страница 45: ...re in bocca e ingerire batterie o piccole parti Questo prodotto non è un giocattolo Attività preliminari Non utilizzare mai l aeromodello senza avere rispettato prima i punti descritti di seguito Controllare modello telecomando caricabatterie e accumulatore al litio per escludere la presenza di danni visibili Accertarsi che tutti i collegamenti a vite e a spina siano ben saldi e in posizione corre...

Страница 46: ...il trasmettitore gli accumulatori e il modello a condizioni ambientali sfavorevoli Esempi di tali condizioni sono riportati di seguito Pioggia eccessiva umidità dell aria 75 rel condensante Non toccare il caricabatterie con le mani bagnate Non azionare mai il modello immediatamente dopo averlo spo stato da un ambiente freddo a un ambiente caldo La condensa che ne deriva può danneggiare irrimediabi...

Страница 47: ...fiamme né sotto ai raggi solari diretti 5 Utilizzare solo il caricabatterie specificato e attenersi alle indicazi oni per la carica 6 Non piantare chiodi nell accumulatore non colpirlo con un mar tello e non aprirlo in modo violento 7 Non esporre l accumulatore ad alcuna pressione esterna e non gettarlo 8 Non usare l accumulatore se presenta danni o deformazioni evidenti 9 Non effettuare alcuna sa...

Страница 48: ...re Parts 500608131 LiPo Akkupack 3 7V 380mAh LiPo battery 3 7V 380mAh 500508612 Propellerset 4 Propeller set 4 500508618 Motorset 4 Motorset 4 500508621 Propeller Schutzring Prop saferring 2x schwarz black 2x weiß white ...

Страница 49: ...49 Notizen Notes ...

Страница 50: ...50 Notizen Notes ...

Страница 51: ...51 ...

Страница 52: ...ermany Service Hotline Mo Do 8 00 17 00 Uhr Fr 8 00 14 30 Uhr 01805 73 33 00 14 ct min aus dem deutschen Festnetz CARSON Model Sport Abt Service Mittlere Motsch 9 96515 Sonneberg CARSON Model Sport Werkstraße 1 D 90765 Fürth Germany ...

Отзывы: