5
Adjusting the Belt Tension
Use the following steps to adjust the V--belt tension. See
Fig. 4 .
1. Loosen the four motor mounting nuts that attach the
motor to the blower rail.
2. Loosen the two jackbolt locking nuts beneath the
motor mounting plate. Turn the jackbolt locking nut
counterclockwise to loosen.
3. Turn the jack bolts counterclockwise to loosen and
clockwise to tighten.
4. Adjust the V--belt for proper tension.
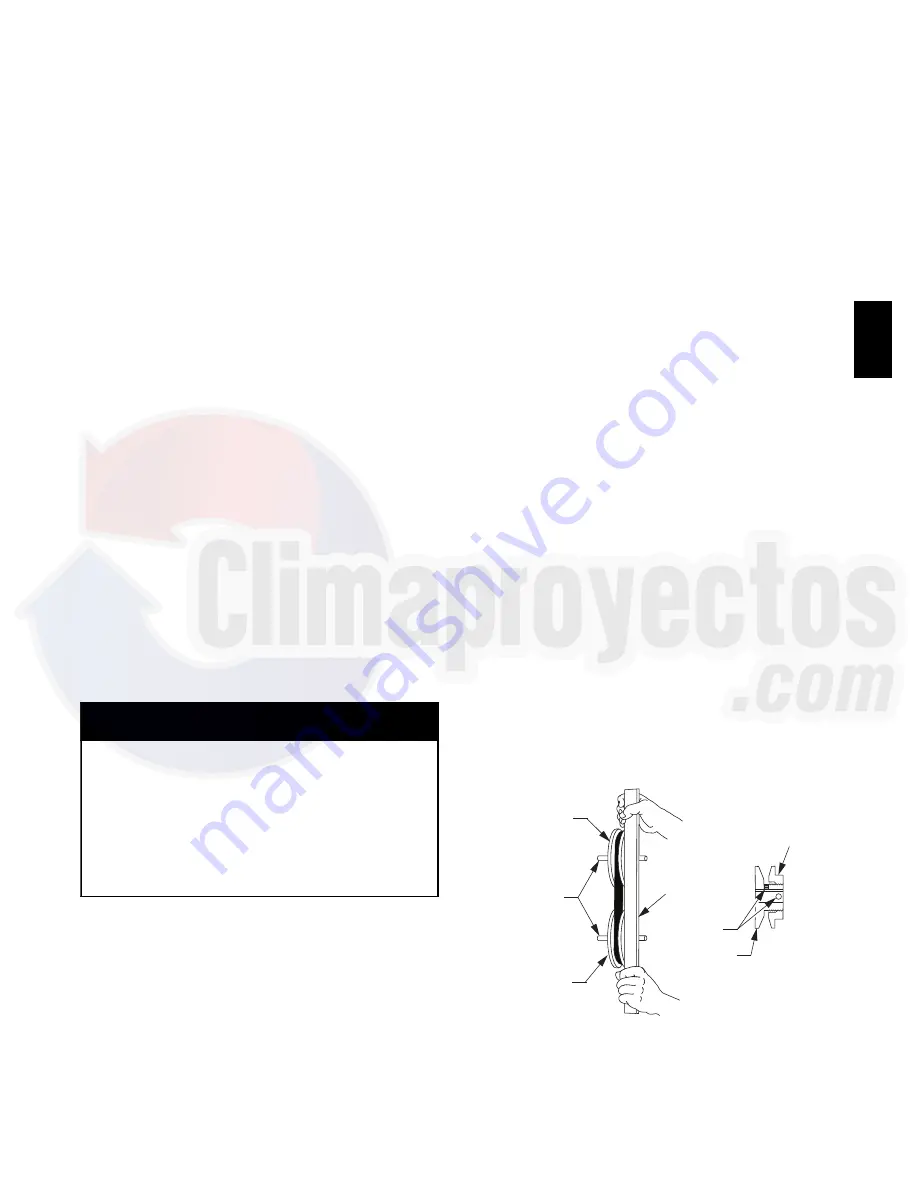
5. Ensure the fan shaft and the motor shaft are parallel
prior to tightening motor mounting nuts. See Fig. 6.
6. Make adjustments as necessary.
7. Tighten the four motor mounting nuts.
8. Check the V--belt tension. Make adjustments as
necessary.
9. Re--tighten the four motor mounting nuts.
10. Tighten both jackbolt locking nuts securely.
Replacing the V--belt:
1. Use a belt with same section type or similar size. Do
not substitute a “FHP” or “notched” type V--belt.
2. Loosen (turn counterclockwise) the motor mounting
plate front bolts and rear bolts. See Fig. 4.
3. Loosen (turn counterclockwise) the jack bolt lock
nuts. Loosen (turn counterclockwise) the jack bolts
relieving the belt tension allowing easy removal of
the belt by hand.
4. Remove the belt by gently lifting the old belt over
one of the pulleys.
5. Install the new belt by gently sliding the belt over
both pulleys, then tighten (turn clockwise) the jack
bolts sliding the motor plate away from the fan hous-
ing until proper belt tension is achieved.
EQUIPMENT DAMAGE HAZARD
Failure to follow this CAUTION can result in
premature wear and damage to equipment.
Do not use a screwdriver or a pry bar to place the new
V--belt in the pulley groove. This can cause stress on
the V--belt and the pulley resulting in premature wear
on the V--belt and damage to the pulley.
CAUTION
6. Check the alignment of the pulleys and adjust if
necessary. See Fig 6.
7. Tighten all bolts attaching the motor to the motor
plate.
8. Tighten all jack bolt jam nuts by turning clockwise.
9. Check the tension after a few hours of runtime and
re--adjust as required. See Fig. 5.
Adjustable--Pitch Pulley on Motor
The motor pulley is an adjustable--pitch type that allows a
servicer to implement changes in the fan wheel speed to
match as--installed ductwork systems. The pulley consists
of a fixed flange side that faces the motor (secured to the
motor shaft) and a movable flange side that can be rotated
around the fixed flange side that increases or reduces the
pitch diameter of this driver pulley. See Fig. 6.
As the pitch diameter is changed by adjusting the position
of the movable flange, the centerline on this pulley shifts
laterally, along the motor shaft. This creates a requirement
for a realignment of the pulleys after any adjustment of
the movable flange. Also reset the belt tension after each
realignment. The factory setting of the adjustable pulley
is five turns open from full closed.
Check the condition of the motor pulley for signs of wear.
Glazing of the belt contact surfaces and erosion on these
surfaces are signs of improper belt tension and/or belt
slippage. Pulley replacement can be necessary.
Changing Fan Speed:
1. Shut off unit power supply and apply approved Lock--
out/Tagout procedures.
2. Loosen belt by loosening the motor adjustment bolts
as described in the Belt Adjustment section above.
See Fig. 4.
3. Loosen movable pulley flange setscrew. See Fig. 6.
4. Screw movable flange toward fixed flange to increase
speed and away from fixed flange to decrease speed.
Increasing fan speed increases load on motor. Do not
exceed maximum fan speed in the Product Data or
motor amperage as listed on the unit rating plate.
5. Set movable flange at nearest keyway or flat of pulley
hub and tighten setscrew to torque specifications.
Torque pulley set screw to 72
5 in--lbs (8.14
0.56
Nm).
Aligning the Fan and Motor Pulleys:
1. Loosen fan pulley setscrews.
2. Slide fan pulley along fan shaft. Make angular align-
ment by loosening motor from mounting. See Fig. 6.
3. Tighten fan pulley setscrews and motor mounting
bolts to torque specifications.
4. Recheck belt tension. See Fig. 5.
STRAIGHT EDGE
MUST BE PARALLEL
WITH BELT
SETSCREWS
MOTOR AND
FANSHAFTS
MUST BE
PARALLEL
FIXED FLANGE
MOVABLE
FLANGE
SINGLE - GROOVE
FAN PULLEY
MOTOR PULLEY
C07075
Fig. 6 -- Supply--Fan Pulley Adjustment
Bearings
This fan system uses bearings featuring concentric split
locking collars. The collars are tightened through a cap
48H
C
Содержание 48HC D17 Series
Страница 76: ...76 APPENDIX IV WIRING DIAGRAMS C12615 Fig 76 48HC D17 D28 Control Diagram 208 230 3060 460 575 3 60 48HC...
Страница 77: ...77 APPENDIX IV WIRING DIAGRAMS C12616 Fig 77 48HC D17 D28 Power Diagram 208 230 3 60 48HC...
Страница 78: ...78 APPENDIX IV WIRING DIAGRAMS C12617 Fig 78 48HC D17 D28 Power Diagram 460 3 60 48HC...
Страница 79: ...79 APPENDIX IV WIRING DIAGRAMS C12618 Fig 79 48HC D17 D28 Power Diagram 575 3 60 48HC...
Страница 80: ...80 APPENDIX IV WIRING DIAGRAMS C14061 Fig 80 48HC D17 D28 Control Diagram with Humidi MiZer 48HC...
Страница 81: ...81 APPENDIX IV WIRING DIAGRAMS C12620 Fig 81 48HC D17 D28 Power Diagram 208 230 3 60 with Humidi MiZer 48HC...
Страница 82: ...82 APPENDIX IV WIRING DIAGRAMS C12621 Fig 82 48HC D17 D28 Power Diagram 460 3 60 with Humidi MiZer 48HC...
Страница 83: ...83 APPENDIX IV WIRING DIAGRAMS C12622 Fig 83 48HC D17 D28 Power Diagram 575 3 60 with Humidi MiZer 48HC...
Страница 85: ...85 APPENDIX IV WIRING DIAGRAMS C13766 Fig 85 PremierLinkt System Control Wiring Diagram with Humidi MiZer 48HC...
Страница 86: ...86 APPENDIX IV WIRING DIAGRAMS C13767 Fig 86 RTU OPEN Wiring Diagram 48HC...
Страница 87: ...87 APPENDIX IV WIRING DIAGRAMS C13768 Fig 87 RTU OPEN Wiring Diagram with Humidi MiZer 48HC...


