Carrier 39LA25 Скачать руководство пользователя страница 45

45

Electric Heaters

Electric heaters may be factory installed or drop shipped to the 

jobsite and field installed. The heater can only be installed in the 

preheat-electric section.
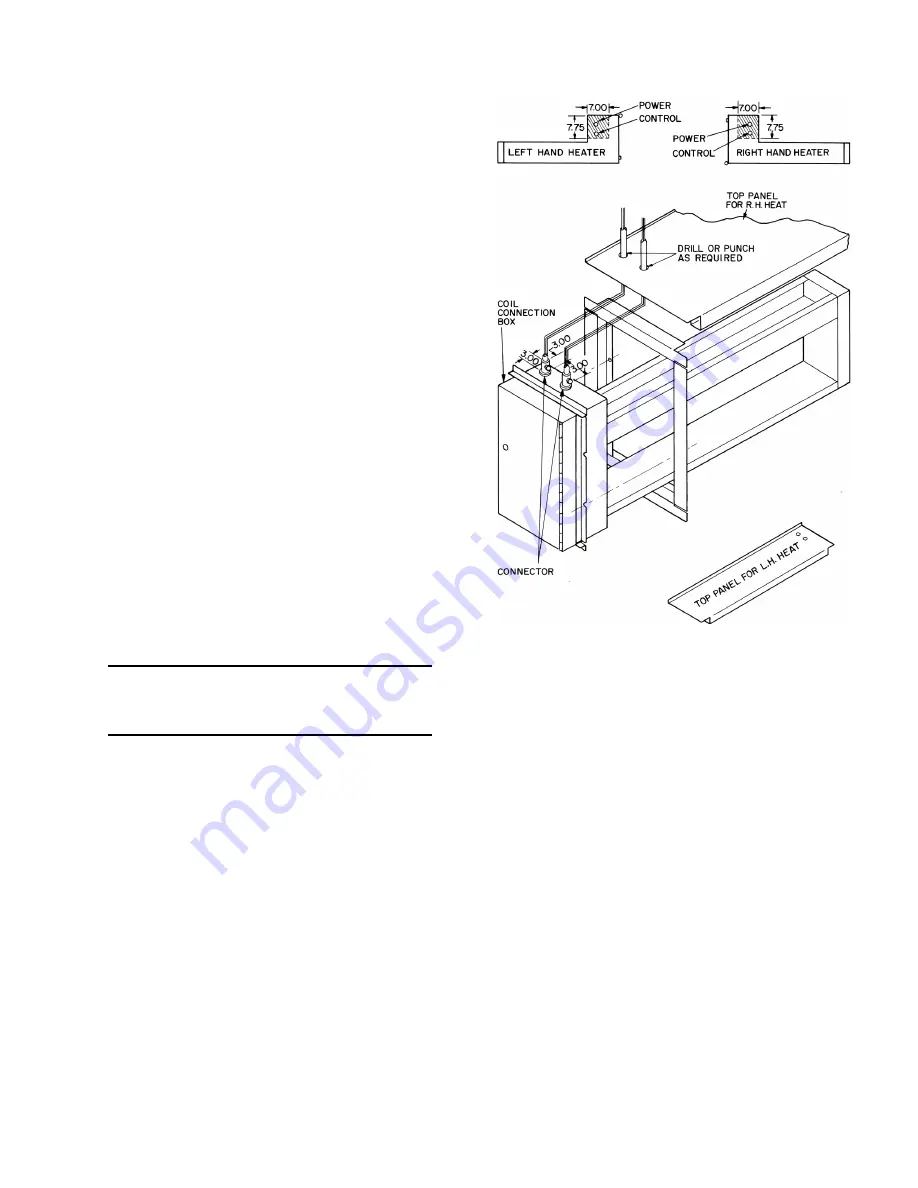
To install electric heater, refer to Fig. 47 and proceed as follows:
1. Locate preheat-electric section already mounted on unit and 

remove protective shipping cover.

2. Locate crate containing electric heater and verify heater 

matches the unit. Unit hand and heater hands must agree.

3. Remove both knockout slugs (power and signal). Install con-

duit connectors in top of coil connection box.

4. Remove top panel of the preheat-electric section and drill or 

punch 2 holes are specified in Fig. 47.

5. Insert the electric heater into unit. It must slide between two 

angles located on the bottom of the section.

6. Secure heater to the preheat-electric section using 4 screws.
7. Locate top panel of section. Run conduit through top panel 

and tighten conduit connectors. Lower top panel and replace 

panel on unit.

8. Complete wiring per wiring diagram and job requirements. 

Follow all applicable local codes.

CONNECT POWER AND CONTROL WIRES
Heater wiring schematic is located on control box panel. 

(Figure 48 shows typical wiring details.) Electrical data for each 

standard heater arrangement is shown in Table 12. Verify that min-

imum airflow requirement (minimum coil face velocity, fpm) will 

be met, especially on applications where variable air volume is 

supplied.
Use copper power supply wires rated for 75°C minimum. On 

250-v or greater applications, use 600-v rated wiring. Size wires 

to carry 125% of current load on each set of terminals 

(Table 12). Use the following formulas as required:
Single-phase line current

Three-phase line current

(kW per set of terminals) (1000) = (voltage) (1.73)

Note that if the heater is rated at 50 kW (or more) and is con-

trolled by a cycling device such as a multi-stage thermostat, or 

a step  controller, conductors may be sized at 100% of load am-

peres (as in Tables 12 and 13) per National Electrical Code 

(NEC) Section 424-22. Heater construction and application in-

formation (Tables 16 and 17) are based upon Underwriters’ 

Laboratories (UL) Space Heating Standard No. 1096 and the 

requirements of the NEC.  Installer is responsible for observing 

local code requirements.
Install a disconnect switch or main circuit breaker in accordance 

with NEC and other applicable codes. Locate so that it is easily ac-

cessible and within sight of heater control box (per NEC Article 

424-19 and 424-65).
Weatherproof junction boxes have no knockouts for wire entrance. 

Drill or punch holes for conduit as required and make all junctions 

watertight.
Where field-supplied thermostats are used, isolate circuits to pre-

vent possible interconnection of control circuit wiring.
Where field-supplied step controller is used, connect steps to ter-

minals as marked on wiring schematic. When connecting 

multistage heaters, wire stage no. 1 so that it is first stage on, last 

stage off. Connect thermostats as required.

Fig. 47 — Electric Heater Installation

Provide sufficient clearance for convection cooling of heaters with 

solid-state controllers. Provide at least 5-in. of free air space above 

and below cooling fins extending from heater terminal box. Be 

sure to connect interlock terminals F1 and F2 to auxiliary contacts 

on fan starter.
Each heater has 2 different types of factory-installed thermal cut-

outs for over-temperature protection; an automatic reset  thermal 

cutout for primary protection and a manual reset thermal cutout to 

protect against failure of the primary system. Also  provided is an 

airflow pressure differential switch to prevent the heater from op-

erating when the fan is not in operation or airflow is restricted or 

insufficient. The primary automatic reset cutout is a bi-metal disk-

type cutout. It is wired into the control circuit which operates the 

magnetic disconnecting contactors (the same contactors which 

also switch on and off the various steps of the coil). The secondary 

manual reset cutout is a bi-metal disk-type cut-out. This secondary 

thermal cutout is load carrying and is installed in each heater sub-

circuit. The primary and secondary over-temperature protection 

systems are independent of each other. The secondary system is 

designed to protect against possible  failure of the primary system


to deenergize the heater.
Subcircuits in the heaters are designed in compliance with para-

graph 424-22 of the NEC. The coil is subdivided into circuits that 

draw no more than 48 amps each and is fused for at least 125% of 

the circuit rating.
Pilot tube is to be positioned so that the airflow switch is actuated 

by a minimum negative pressure of 0.07 in. wg.

=

1 (kW per set of terminals) (1000)

voltage

=

(kW per set of terminals) (1000)

(voltage) (1.73)

Содержание 39LA25

Страница 1: ...tall Sheaves on Motor and Fan Shafts 28 ALIGNMENT Install V Belts 30 TENSION MEASUREMENT PROCEDURE Water and Steam Coil Piping Recommendations 33 GENERAL WATER COILS STEAM COILS Coil Freeze Up Protect...

Страница 2: ...it b Recover refrigerant to relieve all pressure from system using both high pressure and low pressure ports c Traces of vapor should be displaced with nitrogen and the work area should be well ventil...

Страница 3: ...fication Fig 2 39L Model Number Nomenclature 39LA 39LB 39LC 39LD 39LF 39LG 39LH HORIZONTAL DRAW THRU VERTICAL DRAW THRU 39L C 03 HB CA 1 39L 39L Air Handler Special Order Draw Thru Options Base Unit C...

Страница 4: ...Tube Size Copper A 0 016 Std H Pin B 0 025 Std H Pin 066 Nominal Length Between Tube Sheets cm 166 096 136 066 086 116 X Non ferrous X R Hand Right Hand Left Hand R L 28N 28N Coil Model Number Coil T...

Страница 5: ...Pin B 0 025 Std H Pin 086 Nominal Length Between Tube Sheets cm 166 096 136 066 086 116 Z Standard varies with coil Z L Hand Right Hand Left Hand R L S Slant 8 22 24 32 38 C Face Split Full Circuit D...

Страница 6: ...9 10 11 12 13 1 2 hp 3 4 hp 1 hp 1 1 2 hp 2 hp 3 hp 5 hp 7 1 2 hp 10 hp 15 hp 20 hp 25 hp 30 hp Motor rpm 60 Hz 1200 A B C 1800 3600 50 Hz 1000 D E F 1500 3000 Motor Type XL Across the Line Open Drip...

Страница 7: ...7 Fig 8 Position 4 Unit Configuration Model Component Sequence Also Shown PRE HEAT WATER OR PRE HEAT STEAM PHW LEGEND COMB Combination PH Preheat POS Position Factory installed option components...

Страница 8: ...E AREA 5 A B C 39LG FAN ONLY 6 A B C 39LH VERTICAL HEATING SMALL FACE AREA A B C 7 ACCESSORY SECTIONS MIXING BOX 8 10 FILTER MIXING BOX 9 FILTER MIXING BOX FLAT FILTER 11 ANGLE FILTER 12 PLENUM 13 HOT...

Страница 9: ...472 540 621 713 799 851 943 6 39LG 21 3 25 2 29 1 29 1 29 1 37 0 40 9 40 9 48 8 120 168 246 282 324 372 417 444 492 7 39LH 21 3 25 2 29 1 29 1 29 1 37 0 40 9 40 9 48 8 220 308 452 517 594 682 764 814...

Страница 10: ...hich fits inside the larger one This allows the channel to be adjusted to the required length for installation Channels are shipped on top of the unit The 2 sections of each channel are shipped one in...

Страница 11: ...7 8 1 3 3 4 2 3 9 16 15 5 5 1 16 5 5 5 16 3 1 2 11 9 16 0 7 7 8 1 3 3 4 2 3 9 16 18 5 5 1 16 5 5 5 16 3 4 15 16 3 3 3 8 0 7 7 8 1 3 3 4 2 11 7 16 21 6 5 1 4 6 5 1 8 3 4 15 16 3 3 3 8 0 7 7 8 1 3 3 4 2...

Страница 12: ...2 3 3 5 5 6 5 7 7 9 10 12 12 14 13 19 16 24 COIL VOLUME gal water Chilled Water 1 2 in OD Tube Large Face Area 4 Row 2 5 3 5 4 5 5 2 5 6 7 3 8 5 10 4 12 0 6 Row 3 2 4 7 6 0 6 8 7 7 10 1 11 7 14 2 16 3...

Страница 13: ...11 06 13 28 16 2 18 9 Number Tubes Face 4 6 8 8 8 10 12 12 14 Finned Tube Length in 25 5 33 4 37 3 45 2 53 1 53 1 53 1 53 1 64 9 Table 2 Additional Component Weights cont UNIT SIZE 03 06 08 10 12 15...

Страница 14: ...Unscrew the flanges top and sides around the coil fan section and the accessory section See Fig 15 NOTE If the section to section gasket installed at the factory is damaged while splitting the unit o...

Страница 15: ...er sections actuator must be connected to the 1 in hollow jackshaft that drives the interconnecting linkage bar Connection to any other shaft is not recommended DUCTWORK ATTACHMENT Ductwork should be...

Страница 16: ...es multiple activators may be used 5 Part No HF27BB033 and 034 are designed for inlet guide vane and face and bypass applications but may be used for external relief dampers if spring return is not re...

Страница 17: ...7 1 4 1 7 1 4 12 2 3 9 16 5 5 7 16 2 8 1 8 3 11 1 5 0 6 1 16 0 6 1 16 0 9 1 4 2 0 5 8 4 1 1 4 1 7 1 4 15 2 3 9 16 5 5 7 16 3 4 3 11 1 9 0 8 0 4 1 16 0 9 1 4 2 8 1 2 4 1 1 4 1 11 1 4 18 2 11 7 16 5 5 7...

Страница 18: ...that motor holddown bolts are tight on field installed motor See Table 5 for electrical data for premium effi ciency EISA compliant motors JUNCTION BOX CONDENSATE PREVENTION When air handlers are inst...

Страница 19: ...184T 7 5 20 8 18 8 9 4 7 5 91 0 213T 10 0 27 3 24 7 12 4 9 9 91 7 215T 15 0 39 8 36 0 18 0 14 4 93 0 254T 20 0 53 1 48 0 24 0 19 2 93 0 256T 25 0 65 5 59 3 29 6 23 7 93 6 284T 30 0 77 8 70 4 35 2 28...

Страница 20: ...remove any loose items inside the fan section 3 Close and secure the fan access door or panel and the starter door cover 4 Apply power to the starter 5 Set the HOA switch in the HAND position and ver...

Страница 21: ...grammed with the correct values for parameters 2002 and 2008 to maximum fan speed and maximum VFD output fre quency to limit motor speed to the fan maximum 4 Verify max fan rpm from label on fan sled...

Страница 22: ...RATE AT 460 VOLTS 1 2 03A3 4 3 3 10 15 0 9 1 0 1 5 1 2 3 4 03A3 4 3 3 10 15 1 3 1 2 1 7 1 5 1 03A3 4 3 3 10 15 1 6 1 5 1 9 1 7 1 1 2 03A3 4 3 3 10 15 2 2 2 0 2 8 2 3 2 03A3 4 3 3 10 15 2 7 2 7 3 0 3 0...

Страница 23: ...14 1401 Relay Output 1 Started 1402 Relay Output 2 Run 1403 Relay Output 3 Fault inverted 16 1601 Run Enable DI 2 1601 1608 Start Enable 1 safety 1 DI 4 1608 1609 Start Enable 2 safety 2 DI 5 1609 20...

Страница 24: ...00 40 4001 Gain 0 7 4002 Integration Time 30 sec 4005 Error Value Invert no 4006 Units volts 4007 Display Format x xxx 4010 Setpoint Select Internal 4011 Internal Setpoint Field Program 0 0v 10 0v 401...

Страница 25: ...tatic Pressure Signal 0 10 v dc AI 2 Cable Shield Ground From a Field Supplied 4 Wire Static Pressure Transducer DI 6 Internal PID Enable Jumper Acceptable transducer output voltage ranges are 0 10 vd...

Страница 26: ...Use the UP or DOWN keys to highlight ASSISTANTS on the display screen and press ENTER SOFT KEY 2 3 Use the UP or DOWN keys to highlight Commission Drive and press SEL SOFT KEY 2 4 The Start Up Assist...

Страница 27: ...Pressing the HAND button switches the drive to hand control while keeping the drive running Pressing theAUTO button switches the drive to remote input control The OFF button stops the drive To return...

Страница 28: ...s to change the parameter setting Press OK SOFT KEY 2 to save the configuration and return to the Clock Set menu 4 Use the UP or DOWN keys to highlight SET TIME and press SEL SOFT KEY 2 Use the UP or...

Страница 29: ...indicated by the arrows in Fig 29 Adjustable sheave To check the location of adjustable sheave on shaft make sure that the centerlines of both sheaves are in line and parallel with the bearing suppor...

Страница 30: ...ace the tension checker squarely on one belt at the center of the belt span Apply a force on the plunger and perpendicular to the belt span until the bottom of the large O ring is even with the top of...

Страница 31: ...4 8 9 8 5 7 3 12 6 10 9 C CX 7 0 9 0 500 1740 1741 3000 11 5 9 4 17 0 13 8 14 7 11 9 21 8 17 5 9 5 16 0 500 1740 1741 3000 14 1 12 5 21 0 18 5 15 9 14 6 23 5 21 6 D 12 0 16 0 200 850 851 1500 24 9 21...

Страница 32: ...600 957 X X 10 215T 9 1 7 4 4 3 3 4 1600 1061 X 12 1 1 2 145T 1 3 16 11 25 9 4 5 7 5 7 1061 668 X X 2 145T 11 25 9 4 5 7 5 7 1238 668 X X 3 182T 9 8 8 3 5 7 5 7 1444 740 X X 5 184T 9 8 8 3 5 7 5 7 160...

Страница 33: ...Lifting Points Note the horizontal location of the 15 degree check valve and the orientation of the gate pivot This valve is intended to relieve any vacuum forming in the condensate outlet of a conde...

Страница 34: ...steam supply line upstream from the control valve Provide air vents for the coils to eliminate non condensible gases Select a control valve according to the steam load not the coils supply connection...

Страница 35: ...7 2 1 2 57 2 1 2 66 2 1 2 D Double Circuit F Full Circuit H Half Circuit Q Quarter Circuit SMALL FACE AREA 39LB 39LC 39LF COIL TYPE CIRCUITING UNIT SIZE 03 06 08 10 12 Face Area sq ft 2 72 4 72 6 58 7...

Страница 36: ...t the trap 2 Use float and thermostatic traps only for condensate removal Trap size selection should be based on the difference in pres sure between the steam supply main and the condensate return mai...

Страница 37: ...e Steam Supply to Unit Dirt Leg Globe Valve Plug Type Drip Line Condensate Return From Unit Gate Valve Condensate Return Main Open Air Relief to Atmosphere Close to Unit Required on Low Pressure Gravi...

Страница 38: ...Valve Steam Supply 15 Check Valve for Breaking Vacuum Thermostatic Trap 1 2 in Dirt Leg 6 in 15 Check Valve Float or Bucket Trap Note 4 Note 1 Gate Valve Condensate Return 12 Min Open Air Relief to A...

Страница 39: ...ve b Hot gas bypass is required See Hot Gas Bypass section below 3 Solder expansion valve equalizer line to suction line and locate control bulb on suction line as in Fig 39 or 40 4 Insulate expansion...

Страница 40: ...3 15 Row Split 13 15 16 18 18 18 18 18 18 Distributor Nozzle Size 2 2 3 4 4 5 5 6 6 6 ROW COIL Circuit Equivalent Length ft 39 20 47 24 51 26 59 30 67 34 Distributor Tube Length in Face Split 11 11 11...

Страница 41: ...1 2 11 1 2 11 1 2 11 1 2 13 11 1 2 13 11 1 2 13 Row Split 11 1 2 13 15 16 16 18 1 2 16 18 1 2 16 18 1 2 Distributor Nozzle Size 1 1 2 1 1 2 2 1 2 3 4 4 5 5 5 5 8 ROW COIL Circuit Equivalent Length ft...

Страница 42: ...7HC012 12 1117 13 1 4 EA07HC013 13 1126 14 1 4 EA07TC290 14 1126 15 1 4 EA07HC015 15 1126 16 1 4 EA07TC207 16 1126 17 1 4 EA07HC017 17 SPORLAN TYPE CARRIER PART NO CONNECTION SIZES in USED WITH DISTRI...

Страница 43: ...COIL Manifolding for 2 Face Splits Refer to Fig 45 and externally manifold as follows 1 Connect the 4 expansion valves to the 4 distributors on each coil and connect the 4 suction lines to the 15 diam...

Страница 44: ...44 Fig 45 Face Split Coil Manifolding Typical Fig 46 Row Split Coil Manifolding Typical TXV Thermostatic Expansion Valve TXV Thermostatic Expansion Valve...

Страница 45: ...nnect switch or main circuit breaker in accordance with NEC and other applicable codes Locate so that it is easily ac cessible and within sight of heater control box per NEC Article 424 19 and 424 65...

Страница 46: ...46 Fig 48 Typical Electric Heater Wiring Schematic NOTE All wiring must be copper and must conform to the NEC National Electrical Code...

Страница 47: ...5 114 142 3 150 57 71 2 80 72 90 2 90 51 8 500 53 144 180 3 200 125 156 3 175 62 78 2 80 79 98 2 100 59 8 500 62 72 90 2 100 91 114 2 125 12 7 3 6 19 9 500 17 55 69 2 70 48 60 1 60 24 30 1 30 30 38 1...

Страница 48: ...rt must be removed To change from upblast to horizontal discharge or from horizontal to upblast discharge the bearings must be relocated to keep the wheel centered in the housing To change from upblas...

Страница 49: ...1 Also check tightness of setscrews on fan wheels and sheaves 3 Check tightness of fan shaft bearing mounting 4 Recheck sheave alignment and belt tension Refer to Fig 28 and 29 5 Hand turn fan to make...

Страница 50: ...nsioning bolts to adjust the motor position so V belts can be removed without stretching over grooves 4 Mark belt as to position Remove and set aside belts 5 Remove motor to motor bracket holddown bol...

Страница 51: ...le side hairpin baffle side header baffle top coil baffle These parts should be field installed onto the coil before placing the coil into the unit Once the baffles are installed install the coil with...

Страница 52: ...LE SIDE HEADER BAFLE SIDE HAIRPIN BAFFLE BOTTOM COIL BAFFLE SEE TOP FLANGE DETAIL BOTTOM MOUNTING FLANGE TOP FLANGE DETAIL TOP COIL BAFFLE SIDE HEADER BAFLE SIDE HAIRPIN BAFFLE LEGEND 1 Accessory Side...

Страница 53: ...er 6 Remove screws from inside baffle Item 14 Leave baffle attached to left side panel Item 16 7 Remove left side panel Item 16 Support of fan section may be required after removal of side panels Item...

Страница 54: ...affle to coil 4 Remove side panel s Item 6 NOTE Vertical units may require support of fan section after removal of side panels 5 If accessory is present remove accessory side panel Item 1 on left side...

Страница 55: ...ign This will ensure cold air contact with cold water and warm air with hot water Coil repositioning for opposite hand application will compromise one or more of these characteristics However there wi...

Страница 56: ...coil falls below 35 F These conditions occur when IDT coils are used for pre heat and or face and bypass applications Freeze up protection 1 Use a strainer in the supply line and the dirt leg ahead of...

Страница 57: ...tighten holddown bolts and then tighten bearing locking collar and setscrews 12 Make certain fan wheel does not rub sides of fan housing after installing new bearings 13 Recoat fan shaft with a rust i...

Страница 58: ...58 Fig 59 Filter Arrangement 2 in and 4 in Flat 16 20 25 16 20 25 25 25 16 20 20 SIZE 21 SIZE 25...

Страница 59: ...or or with manufacturer s recommendations included with motor BEARINGS Fan Bearings Lubricate fan bearings every 3 months with suitable bearing grease Typical lubricants are given in Table 19 Inlet Va...

Страница 60: ...ing the screws from the discharge of the fan housing Remove the fan discharge panel Fig 63 2 Remove all of the panels from the fan section Fig 64 3 Remove the fan by removing the 4 screws on the corne...

Отзывы: