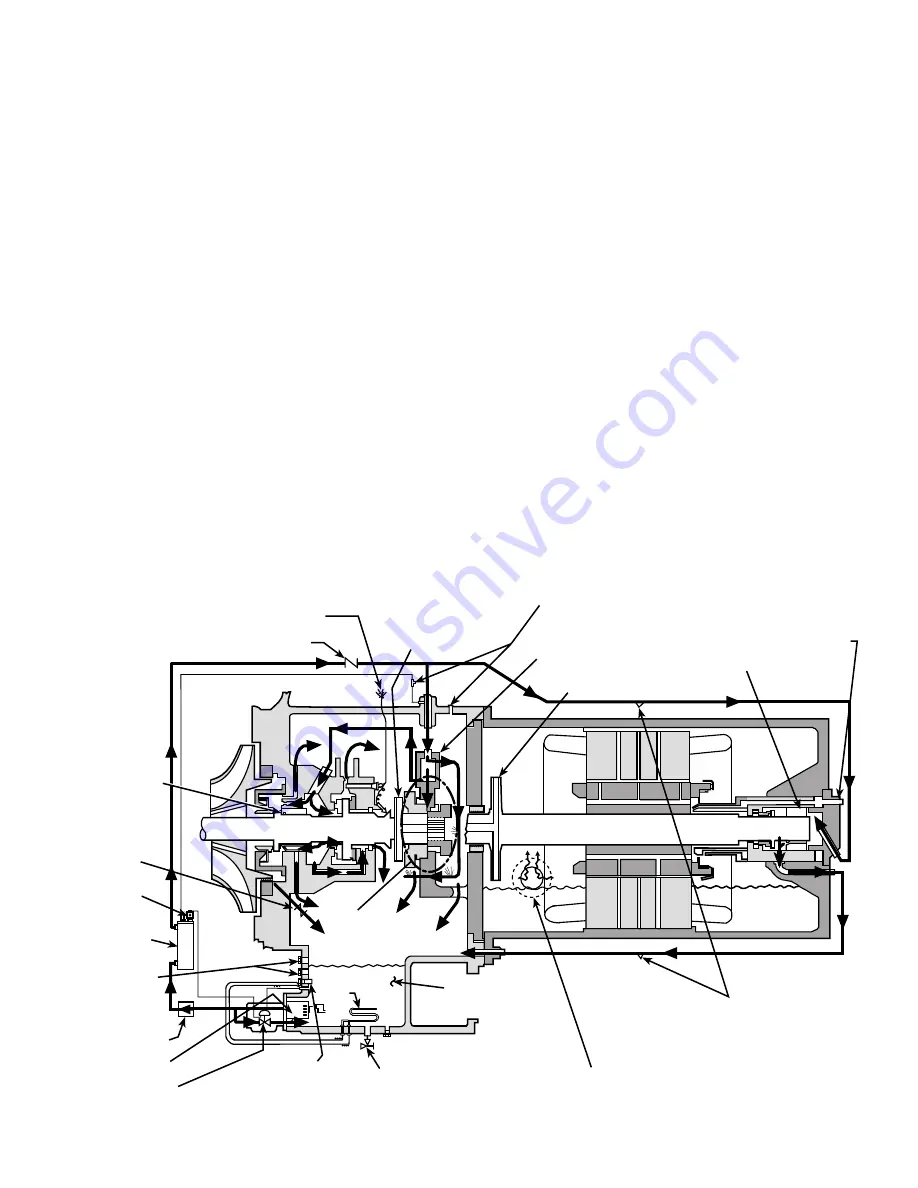
LUBRICATION CYCLE
Summary —
The compressor oil pump and oil reservoir
are located in the compressor base. Oil is pumped through
an oil cooler and a filter to remove heat and foreign par-
ticles. Part of the oil flow is directed to the compressor motor-
end bearings and seal. The remaining flow lubricates the
compressor transmission, thrust and journal bearings and seal.
Oil is then returned to the reservoir to complete the cycle
(Fig. 4; specific items called out below).
Details —
Oil is charged into reservoir (1) through a hand
valve (2) which also functions as an oil drain. If there is re-
frigerant in the machine, a pump is required for charging.
Sight glasses (5) on reservoir wall permit observation of oil
level.
The motor-driven oil pump (6) discharges oil to an oil cooler
(7) at a rate and pressure controlled by an oil regulator (8).
The differential pressure (supply versus return) is registered
at the machine control center. Oil differential pressure is main-
tained between 18 to 25 psi (124 to 172 kPa). The oil pump
discharges oil to the oil filter assembly (Item 21). The oil is
then piped to the oil cooler (Item 7).
Water flow through the oil cooler is manually adjusted by
a ball valve (9) to maintain the oil at an operating tempera-
ture, at the reservoir, of approximately 145 F (63 C). During
machine shutdown, the oil temperature is also maintained at
140 to 150 F (60 to 66 C) by an immersion heater
(10) so that absorption of refrigerant by the oil is minimized.
After it leaves the oil cooler, the oil is filtered (21) and a
portion flows to the motor-end bearing (12) and seal. The
remainder lubricates the compressor transmission (14) and
the thrust and journal bearings (15). Thrust bearing temper-
ature is indicated at the Local Interface Device (LID). Oil
from each circuit returns by gravity to the reservoir.
A demister (17) and (18), by centrifugal action, draws re-
frigerant gas from the transmission area to the motor shell.
The resulting pressure difference prevents oil in the trans-
mission cavity from leaking into the motor shell.
Several safety devices monitor the lubrication system:
• In the event of a power failure, a small oil reservoir (1)
supplies sufficient oil reserve to ensure continued lubri-
cation until all compressor parts have come to a complete
stop.
• Sensor (20) monitors thrust bearing temperatures and shuts
off machine if temperature rises above a selected point.
• Oil low-pressure cutout shuts down machine or prevents
start if oil pressure is not adequate.
The PIC (Product Integrated Control) measures the tem-
perature of the oil in the sump and maintains the tempera-
ture during shutdown (see Controls, Oil Sump Temperature
Control section, page 27). This temperature is read on the
LID default screen.
During the machine start-up, the PIC will energize the oil
pump and provide 15 seconds of prelubrication to the bear-
ings after pressure is verified before starting the compressor.
During shutdown, the oil pump will run for 60 seconds after
the compressor actually shuts down for the purpose of post-
lubrication. The oil pump can also be energized for testing
purposes in control test.
Ramp loading can slow the rate of guide vane opening to
minimize oil foaming at start-up. If the guide vanes open
quickly, the sudden drop in suction pressure can cause any
refrigerant in the oil to flash. The resulting oil foam cannot
be pumped efficiently; oil pressure falls off, and lubrication
is poor. If oil pressure falls below 13 psi (90 kPa) differen-
tial, the PIC will shut down the compressor.
CHECK VALVE 11
SHAFT DISPLACEMENT BEARING
TEMPERATURE SENSOR CONNECTIONS 20
17 DEMISTER
INLET
19 RESERVOIR
(COAST DOWN)
13 PRESSURE CONNECTIONS
TO CONTROL CENTER
18 DEMISTER OUTLET
MOTOR END
BEARING 12
MOTOR COOLING
SUPPLY FROM
CONDENSER
JOURNAL
BEARING 15
CHECK
VALVE 4
BALL
VALVE 9
OIL
COOLER 7
SIGHT
GLASSES 5
OIL PUMP/ 6
PRESSURE
REGULATOR 8
OIL FILTER 21
OIL 3
TEMPERATURE
SENSOR
2 DRAIN AND
CHARGING VALVE
OIL HEATER
10
1
OIL RESERVOIR
REFRIGERANT RETURN
TO COOLER
16
LOW OIL PRESSURE
SWITCH CONNECTIONS
14
TRANSMISSION
Fig. 4 — 19EF Lubrication Cycle
7
Содержание 19EF Series
Страница 10: ...Fig 5 19EF Controls and Sensor Locations cont 10...
Страница 13: ...Fig 12 19EF Menu Structure 13...
Страница 14: ...Fig 13 19EF Service Menu Structure 14...
Страница 38: ...Fig 24 19EF Leak Test Procedures 38...
Страница 69: ...Fig 36 Electronic PIC Controls Wiring Schematic 69...
Страница 70: ...Fig 36 Electronic PIC Controls Wiring Schematic cont 70...
Страница 71: ...Fig 37 Machine Power Panel Starter Assembly and Motor Wiring Schematic 71...


