background image

62-11646

14

S

WITCHING

 O

PERATING

 S

TATE

 - C

ONTINUED

ELECTRIC TO ENGINE

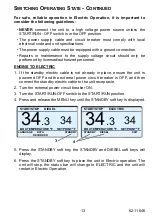
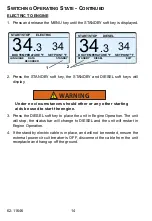
1. Press and release the MENU key until the STANDBY soft key is displayed.

2. Press the STANDBY soft key, the STANDBY and DIESEL soft keys will

display.

WARNING

!

Under no circumstances should ether or any other starting
aids be used to start the engine.

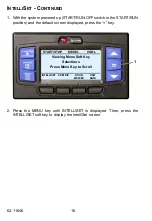
3. Press the DIESEL soft key to place the unit in Engine Operation. The unit

will stop, the status bar will change to DIESEL and the unit will restart in
Engine Operation.

4. If the standby electric cable is in place, and will not be needed, ensure the

external power circuit breaker is OFF, disconnect the cable from the unit
receptacle and hang up off the ground.

START/STOP

ELECTRIC

BOX TEMPERATURE 

o

F

SETPOINT 

o

F

LANGUAGE

DATA

RECORDER

34

.3 34

STANDBY

1

START/STOP

DIESEL

BOX TEMPERATURE 

o

F

SETPOINT 

o

F

STANDBY

DIESEL

34

.3 34

EXIT

2

Содержание Vector 8500

Страница 1: ...Operator s Manual Vector 8500 Trailer and Rail Refrigeration Units 62 11646 00 Rev D TM ...

Страница 2: ......

Страница 3: ...OPERATOR S MANUAL For The VECTOR 8500 Single Temp Trailer and Rail Refrigeration Units 2015 Carrier Corporation Printed in U S A November 2015 TM ...

Страница 4: ......

Страница 5: ...nging Setpoint 23 Start Stop Continuous Operation 24 Data Recorder Trip Start 26 Manual Defrost 28 Language Selection 30 Unit Data 31 Alarm List 34 View Hour Meters 35 Stopping Unit 36 Emergency Bypass Mode 37 Pretrip Inspection 38 Product Loading 40 Recommended Transport Temperatures 41 General Troubleshooting 42 Fuses 44 Maintenance Schedule 46 Maintenance 48 Priming Fuel System 49 Emergency Roa...

Страница 6: ......

Страница 7: ...intained The checks outlined in this guide will help to minimize over the road problems In addition a comprehensive maintenance program will help to insure that the unit continues to operate reliably Such a maintenance program will also help to control operating costs increase the unit s working life and improve performance This guide is intended as an introduction to this unit and to provide gene...

Страница 8: ...he model and serial number before calling for assistance This information will be needed when you contact an authorized Carrier Transicold Dealer so that they may properly assist you Nameplate Model Name Serial No Model No Warranty ID Refrigerant Standby Max Op Press VECTOR 8500 PAJ NDK537 R404A 14 Lbs LP 100psig HP 465psig Athens Ga YEAR 4 5 6 7 8 9 10 11 12 1 2 3 2011 2012 2013 2014 DAY Made in ...

Страница 9: ...START RUN OFF switch is in the OFF position lockout tagout the high voltage receptacle and lockout tagout the negative battery connection This Carrier Transicold refrigeration unit has been designed with the safety of the operator in mind During normal operation all moving parts are fully enclosed to help prevent injury During any inspection or servicing with the doors open you may be exposed to m...

Страница 10: ...ontact with hot coolant can cause severe burns Do not remove the cap from a hot coolant system if cap must be removed cover it with a rag and remove very slowly in order to release the pressure without spray Refrigerant The refrigerant contained in the refrigeration system of this unit can cause frostbite severe burns or blindness when in direct contact with the skin or eyes For this reason and be...

Страница 11: ...off power is present from the plug to the inside of the control box Disconnect the high voltage source when performing service or maintenance procedures and lockout tagout the receptacle in accordance with your company procedures The recommended lockout device Carrier P N 07 60129 00 is shown in the following illustration ...

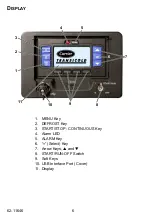
Страница 12: ...DISPLAY 1 MENU Key 2 DEFROST Key 3 START STOP CONTINUOUS Key 4 Alarm LED 5 ALARM Key 6 Select Key 7 Arrow Keys and 8 START RUN OFF Switch 9 Soft Keys 10 USB Interface Port Cover 11 Display 3 2 1 10 9 8 7 6 5 4 11 ...

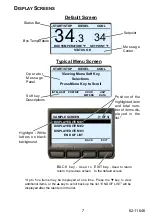
Страница 13: ...oft Key INTELLISET PRETRIP HOUR METERS UNIT DATA Selections Press Menu Key to Scroll SAMPLE SCREEN 1 OF 3 DISPLAYED ITEM 1 DISPLAYED ITEM 2 DISPLAYED ITEM 3 END OF LIST BACK EXIT Default Screen Typical Menu Screen Status Bar Box Temperature Setpoint Message Center Operator Message Panel Softkey Descriptions Highlight White letters on black background BACK key Used to return to previous screen EXIT...

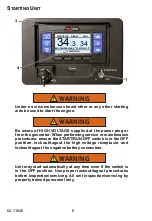
Страница 14: ...res ensure the START RUN OFF switch is in the OFF position lockout tagout the high voltage receptacle and lockout tagout the negative battery connection WARNING Unit may start automatically at any time even if the switch is in the OFF position Use proper lockout tagout procedures before inspection servicing All unit inspection servicing by properly trained personnel only 4 3 1 START STOP DIESEL CO...

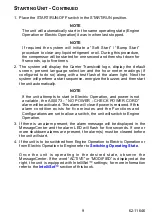
Страница 15: ...ly NOTE If the unit attempts to start in Electric Operation and power is not available the A00073 NO POWER CHECK POWER CORD alarm will be activated This alarm will clear if power is restored If this alarm condition exists for five minutes and the Functions and Configurations are set to allow a switch the unit will switch to Engine Operation 3 If there is an alarm present the alarm message will be ...

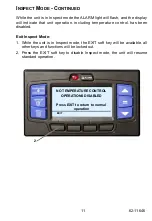
Страница 16: ...t inspection Inspect mode must be manually disabled at which point the unit will resume standard operation Inspect mode is not a substitute for proper Lockout Tagout procedures which are always required when servicing the unit Enter Inspect Mode 1 With the system powered up START RUN OFF switch in the START RUN position press the MENU key until INSPECT MODE is displayed 2 Press the INSPECT MODE so...

Страница 17: ... temperature control has been disabled Exit Inspect Mode 1 While the unit is in Inspect mode the EXIT soft key will be available all other keys and functions will be locked out 2 Press the EXIT soft key to disable Inspect mode the unit will resume standard operation 2 NO TEMPERATURE CONTROL EXIT OPERATIONS DISABLED Press EXIT to return to normal operation ...

Страница 18: ...he unit WARNING Ensure the power plug is clean and dry before connecting to any electrical outlet receptacle STANDBY ELECTRIC GUIDELINES NOTE The unit is equipped with automatic phase reversal which ensures that electric motors will run in the correct direction 4 If DIESEL is displayed the unit is in Engine Operation START STOP DIESEL COOL BOX TEMPERATURE o F SETPOINT o F STATUS OK 34 3 34 ...

Страница 19: ...ectric cable is not already in place ensure the unit is powered OFF and the external power circuit breaker is OFF and then connect the standby electric cable to the unit receptacle 2 Turn the external power circuit breaker ON 3 Turn the START RUN OFF switch to the START RUN position 4 Press and release the MENU key until the STANDBY soft key is displayed 5 Press the STANDBY soft key the STANDBY an...

Страница 20: ...the DIESEL soft key to place the unit in Engine Operation The unit will stop the status bar will change to DIESEL and the unit will restart in Engine Operation 4 If the standby electric cable is in place and will not be needed ensure the external power circuit breaker is OFF disconnect the cable from the unit receptacle and hang up off the ground START STOP ELECTRIC BOX TEMPERATURE o F SETPOINT o ...

Страница 21: ... system and locked so that they cannot be changed and they can be given an appropriate name In the case of cheese the range of setpoints may be locked leaving the operator the ability to change the setpoint within the locked range When a load of apples is going to be picked up the operator simply selects APPLES from the IntelliSet menu for cheese CHEESE is selected and the setpoint reset as requir...

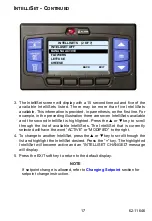
Страница 22: ...N position and the default screen displayed press the key 2 Press the MENU key until INTELLISET is displayed Then press the INTELLISET soft key to display the IntelliSet screen START STOP DIESEL COOL Viewing Menu Soft Key INTELLISET PRETRIP HOUR METERS UNIT DATA Selections Press Menu Key to Scroll 1 ...

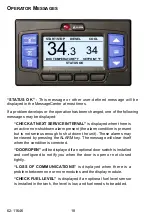
Страница 23: ...l through the list of available IntelliSets The IntelliSet that is currently selected will have the word ACTIVE or MODIFIED to the right 4 To change to another IntelliSet press the or key to scroll through the list and highlight the IntelliSet desired Press the key The highlighted IntelliSet will become active and an INTELLISET CHANGED message will display 5 Press the EXIT soft key to return to th...

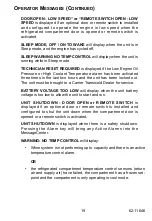
Страница 24: ...o shut down the unit These alarms may be viewed by pressing the ALARM key The message will clear itself when the condition is corrected DOOR OPEN will be displayed if an optional door switch is installed and configured to notify you when the door is open or not closed tightly LOSS OF COMMUNICATIONS is displayed when there is a problem between one or more modules and the display module CHECK FUEL L...

Страница 25: ...locked out The unit must be brought to a Carrier Transicold Dealer for service BATTERY VOLTAGE TOO LOW will display when the unit battery voltage is too low to allow the unit to start and run UNIT SHUTDOWN DOOR OPEN or REMOTE SWITCH is displayed if an optional door or remote switch is installed and configured to shut the unit down when the compartment door is opened or a remote switch is activated...

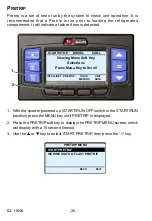
Страница 26: ...TART RUN OFF switch in the START RUN position press the MENU key until PRETRIP is displayed 2 Press the PRETRIP soft key to display the PRETRIP MENU screen which will display with a 15 second timeout 3 Use the or key to select START PRETRIP then press the key 1 2 START STOP DIESEL COOL Viewing Menu Soft Key INTELLISET PRETRIP HOUR METERS UNIT DATA Selections Press Menu Key to Scroll PRETRIP MENU S...

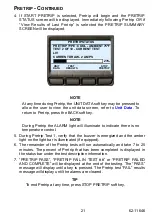
Страница 27: ...Test 1 verify that the buzzer is energized and the amber light on the light bar is illuminated if equipped 6 The remainder of the Pretrip tests will run automatically and take 7 to 25 minutes The percent of Pretrip that has been completed is displayed in the status bar under the test description information 7 PRETRIP PASS PRETRIP FAIL IN TEST or PRETRIP FAILED AND COMPLETE will be displayed at the...

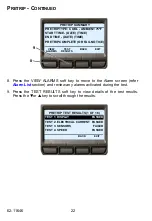
Страница 28: ...S soft key to view details of the test results Press the or key to scroll through the results PRETRIP SUMMARY PRETRIP TYPE COOL AMBIENT 75o F START TIME DATE TIME TEST EXIT VIEW RESULTS ALARMS END TIME DATE TIME PRETRIP COMPLETE OR FAIL NOTICE BACK 9 8 PRETRIP TEST RESULTS 1 OF 16 TEST 1 DISPLAY BACK EXIT PASSED TEST 2 ELECTRICAL CURRENT PASSED TEST 3 SENSORS FAILED TEST 4 SPEED PASSED ...

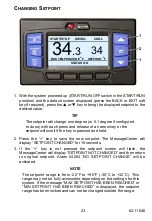
Страница 29: ...e new setpoint The MessageCenter will display SETPOINT CHANGED for 10 seconds 3 If the key is not pressed the setpoint screen will flash the MessageCenter will display SETPOINT NOT CHANGED and then return to original setpoint Alarm 04004 NO SETPOINT CHANGE will be activated NOTE The setpoint range is from 22 F to 90 F 30 C to 32 C This range may not be fully accessible depending on the settings fo...

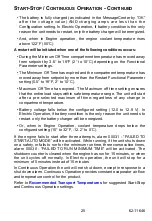
Страница 30: ...n press the START STOP CONTINUOUS key until the desired operation Start Stop or Continuous is highlighted 2 START STOP MODE SELECTED or CONTINUOUS RUN MODE SELECTED will be displayed in the MessageCenter for 10 seconds 3 The operation indication in the status bar will no longer be highlighted The unit is now running in the displayed mode NOTE If CONTINUOUS LOCKED or START STOP LOCKED is displayed ...

Страница 31: ...fter a pre selected maximum off time regardless of any change in compartment temperature Battery voltage falls below the configured setting 12 0 to 12 8 V In Electric Operation if battery condition is the only reason the unit needs to restart only the battery charger will be energized Or when in Engine Operation coolant temperature drops below the configured setting 10 to 32 F 12 2 to 0 C If the e...

Страница 32: ...ilable sub menus With the desired sub menu highlighted press the key to enter the menu MARK TRIP START Trip Start places the present time and date as a stamp in the data recorder memory to allow easy review of the data from the last trip and to allow downloading data from a specific trip A trip begins at a Trip Start and ends at the next Trip Start 1 2 START STOP DIESEL COOL Viewing Menu Soft Key ...

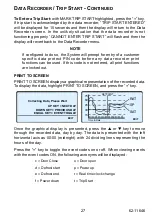
Страница 33: ... is not entered all print functions are locked out PRINT TO SCREEN PRINT TO SCREEN displays a graphical representation of the recorded data To display the data highlight PRINT TO SCREEN and press the key Once the graphical display is presented press the or key to move through the recorded data day by day The data is presented with the left horizontal axis as 00 00 midnight with 24 dividing lines r...

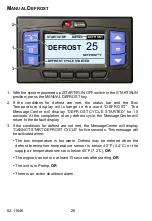
Страница 34: ...er will return to the default display 3 If the conditions for defrost are not met the MessageCenter will display CANNOT START DEFROST CYCLE for five seconds This message will be activated when The box temperature is too warm Defrost may be entered when the defrost termination temperature sensor is below 40 F 4 4 C or the supply air temperature sensor is below 45 F 7 2 C OR The engine has not run a...

Страница 35: ...ture sensor both rise higher than 55 F 12 8 C If the defrost cycle does not end after a maximum of 45 minutes the defrost cycle is terminated automatically DEFROST NOT COMPLETE will be displayed in the MessageCenter If defrost terminates on the 45 minute termination timer the system will wait 1 5 hours of compressor running time before attempting another automatic defrost cycle Pressing the manual...

Страница 36: ...key to display the LANGUAGE screen 3 The LANGUAGE screen will display with a 10 second timeout Press the or key to scroll through the available selections 4 With the desired language highlighted press the key The highlighted language will become active and LANGUAGE CHANGED will be displayed 1 2 START STOP DIESEL COOL Viewing Menu Soft Key LANGUAGE DATA EXIT Selections Press Menu Key to Scroll RECO...

Страница 37: ...creen will display with a 15 second timeout Press the or key to scroll through the available unit data sub menus With the desired sub menu highlighted press the key to view the data 1 2 START STOP DIESEL COOL Viewing Menu Soft Key INTELLISET PRETRIP HOUR METERS UNIT DATA Selections Press Menu Key to Scroll UNIT DATA BACK EXIT UNIT DATA LISTING END OF LIST ENGINE REFRIGERATION SENSORS REMOTE SENSOR...

Страница 38: ...y to unlock the screen and scroll through the sub menu data selections Press the BACK soft key to return to the sub menu selection screen or the EXIT soft key to return to the default screen UNIT DATA LIST ENGINE Fuel level Battery Amp Draw Engine Coolant Temperature Unit AC Current 1 REFRIGERATION SENSORS Ambient Air Temp Return Air Temp Supply Air Temp Delta T Defrost Term Temp REMOTE SENSORS Op...

Страница 39: ...temperature AMBIENT AIR TEMP Ambient air entering condenser air temperature RETURN AIR TEMP Return air entering evaporator temperature SUPPLY AIR TEMP Supply air leaving evaporator temperature DELTA T Supply air temperature minus return air temperature a negative value indicates cooling and a positive value indicates heating DEFROST TERM TEMP Defrost termination temperature REMOTE SENSOR 1 or 2 or...

Страница 40: ...tal number of alarms and the position in the list of the highlighted alarm is provided In the illustration above there are three alarms the second alarm is highlighted 4 Press the or key to scroll through the list of alarms 5 To clear the alarms press the CLEAR ALARMS soft key The display will provide an ACTIVE ALARMS CLEARED message and then return to the default display after 10 seconds 6 If the...

Страница 41: ... meters screen 3 The hour meters screen will display with a 15 second timeout Press the EXIT soft key to return to the default screen 1 2 START STOP DIESEL COOL Viewing Menu Soft Key INTELLISET PRETRIP HOUR METERS UNIT DATA Selections Press Menu Key to Scroll STANDARD HOUR METERS 3 OF 4 STANDBY HOURS BACK EXIT ENGINE HOURS 438 HOURS 1050 HOURS SWITCH ON HOURS 1400 HOURS TOTAL RUN HOURS 1488 HOURS ...

Страница 42: ...r expansion valve EVXV before turning off Due to internal processing turning the START RUN OFF switch OFF then back to the START RUN position will result in a 4 to 50 second delay between the display going off and coming back on again WARNING Unit may start automatically at any time even if the switch is in the OFF position Use proper lockout tagout procedures before inspection servicing All unit ...

Страница 43: ...n state due to the display module alarm press the MENU key until BYPASS MODE is displayed 2 Press the BYPASS MODE soft key the unit will resume operation until Emergency Bypass mode is disabled or after 24 hours of unit operation in Emergency Bypass mode Exit Emergency Bypass Mode 1 Press the MENU key until the EXIT BYPASS soft key is displayed 2 Press the EXIT BYPASS soft key the unit will shut d...

Страница 44: ...nect starter solenoid connector Drain water from bottom of fuel tank Drain water from water separator on fuel filter if applicable Check radiator coolant level Check air cleaner indicator Check engine oil level Visually check condition of belt Check door latches and hinges Check battery cables for rubbing or chafing Check battery terminals for cleanliness Check Engine Wiring Harness for chafing ru...

Страница 45: ...ondenser fan Place a small rag in front of the condenser coil the rag should hold If the rag blows away it means that the fan is rotating in reverse AFTER 15 MINUTES OF OPERATION Initiate defrost and allow to terminate automatically refer to Manual Defrost Check defrost drain line for blockage and proper water flow PRETRIP Initiate Pretrip refer to Pretrip section List any Pretrip alarms FINAL Ent...

Страница 46: ...late completely around the load hot spots or top freeze can occur The use of pallets is highly recommended Pallets help protect the product from heat passing through the floor of the trailer when loaded so air can flow freely through them to return to the evaporator When using pallets it is important to refrain from stacking extra boxes on the floor at the rear of the compartment as this will cut ...

Страница 47: ...ntinuous Operation to help insure product quality If it is possible the unit should be turned off during the time the trailer doors are open to help conserve the product temperature 2 Variations may be necessary for very high or very low ambient temperatures Product Setpoint Range Operation1 F C Bananas 56 to 58 13 to 14 Continuous Fresh fruits and vegetables 33 to 38 0 5 to 3 Continuous Fresh mea...

Страница 48: ...e generator When performing service or maintenance procedures ensure the START RUN OFF switch is in the OFF position lockout tagout the high voltage receptacle and lockout tagout the negative battery connection Everything possible has been done to ensure that this unit is the most reliable trouble free equipment available today If however you are having an issue the following section may be of ass...

Страница 49: ... Unit not cooling heating properly Check alarm list Initiate Manual Defrost refer to Manual Defrost Check for proper air circulation in the refrigerated compartment Check condenser for airflow restriction Check refrigerated compartment for damage or air leaks Electric Operation Unit won t run Check all fuses Check power cable connections Check power supply circuit breaker Visually check battery co...

Страница 50: ... Module PCM curbside of the unit and in the Control Box roadside of the unit F6 located at the AutoFresh Air Exchange e solenoid harness connector F 33 F 34 F 35 F 36 F 37 F 38 F 39 F 40 F 41 CONTROL BOX POWER CONTROL MODULE F1 F3 F5 F7 F8 F9 F10 F11 F12 F14 ...

Страница 51: ...Enable Relay Contact Power 30A 12VDC F6 AutoFresh Air Exchange Solenoid Power 10A 12VDC F7 Main Power 80A 12VDC F8 Fuel Level Sensor Power 5A 12VDC F9 Contactor Control Board Component Actuation Power 5A 12VDC F10 Main Microprocessor Module Component Actuation Power 20A 12VDC F11 Light Bar Power 5A 12VDC F12 Satellite Communications Power 5A 12VDC F14 Fuel Heater Power 15A 12VDC F33 34 35 Battery ...

Страница 52: ...ing see Pretrip 3 Check Engine Hours b Every Service Interval or Yearly Engine 1 Check engine oil and filter change interval 2 Check low oil pressure switch 3 Clean crankcase breather 4 Check fuel injectors every 1 500 hours 5 Check injection pump every 3 000 hours 6 Check and adjust engine valves every 4 000 hours Fuel System 1 Clean mechanical and electric if equipped fuel pump screens 2 Change ...

Страница 53: ... defrost air switch and calibrate as necessary 2 Remove bulkhead if equipped check and clean the evaporator coil and all defrost drain hoses 3 Install manifold gauge set and check refrigerant pressure 4 Check calibration of suction pressure transducer 5 Run APX Control System Pretrip see Pretrip 6 Check manual defrost operation Electrical System 1 Check unit switches and electrical connections 2 C...

Страница 54: ... to be used in various climates To check the engine oil level Run the unit to bring the engine up to operating temperature shut the unit off and remove the cap dipstick Wipe the dipstick clean and insert it into the oil fill tube without threading it all the way back into the tube Remove the dipstick again and check oil level DO NOT add oil if the level is in the safe range If needed add oil as in...

Страница 55: ...econd pump the manual plunger until positive pressure resistance is felt This may take up to 200 strokes Positive pressure indicates fuel flow 3 Continue to pump S L O W L Y up down once per second approximately 100 more strokes to fill the filter and bleed the air out of the lines 4 Start engine It may be necessary to continue to pump until the engine starts NOTE Running the engine for an extende...

Страница 56: ...r Transicold dealer You can also download the Carrier Transicold North America Truck Trailer Dealer Locator App to your smart phone The Dealer Locator App provides Location information for every Carrier Transicold dealer in North America The nearest dealer from your present location Dealer look up capability Dealer services Trailer Truck APU Mobile Support etc Addresses Maps to easily find dealers...

Страница 57: ......
Страница 58: ... A Piso 5 Colonia Anahuac 11320 Mexico D F WARNING Breathing diesel engine exhaust exposes you to chemicals known to the State of California to cause cancer and birth defects or other reproductive harm Always start and operate engine in a well ventilated area If in an enclosed area vent the exhaust to the outside Do not modify or tamper with the exhaust system Do not idle the engine except as nece...

Отзывы: