This document contains confidential and proprietary information that remains the property of Carlson Software Inc.
Page 4 of 5
Updated 6/18/2015
Carlson Software Inc.
Carlson Software Inc.
Carlson Software Inc.
Carlson Software Inc.
102 West 2
nd
Street
Maysville, KY 41056
www.carlsonsw.com
www.carlsonsw.com
www.carlsonsw.com
www.carlsonsw.com
Phone: (606) 564-5028
Fax: (606) 564-6422
5)
Tap “Find Device” and tap on “HGPS S320 xxxxxxx” (xxxxxxx is the serial number of the BRx5 and
can be found on the bottom on the receiver if you need to verify it) to highlight it and then tap
Green Check.
6)
Tap the Green Check again to use “
Any Available Port
”
7)
Tap the Bluetooth icon in the top Right to bond to the Rover Bluetooth. If this is the first time
you have paired the data collector with the BRx5 base, you will be asked if you want to add this
receiver to your device list. Tap “Yes” to add this receiver to your device list. Enter “0000” (four
zero’s) for the pass code, if prompted (only prompted the first time you pair the data collector
with the BRx5). Tap Next. Tap Done if notified that the BRx5 was successfully added to the
device list.
8)
Tap the Receiver tab and type in
your Slant Base antenna height
and tap next to “
Slant
”
9)
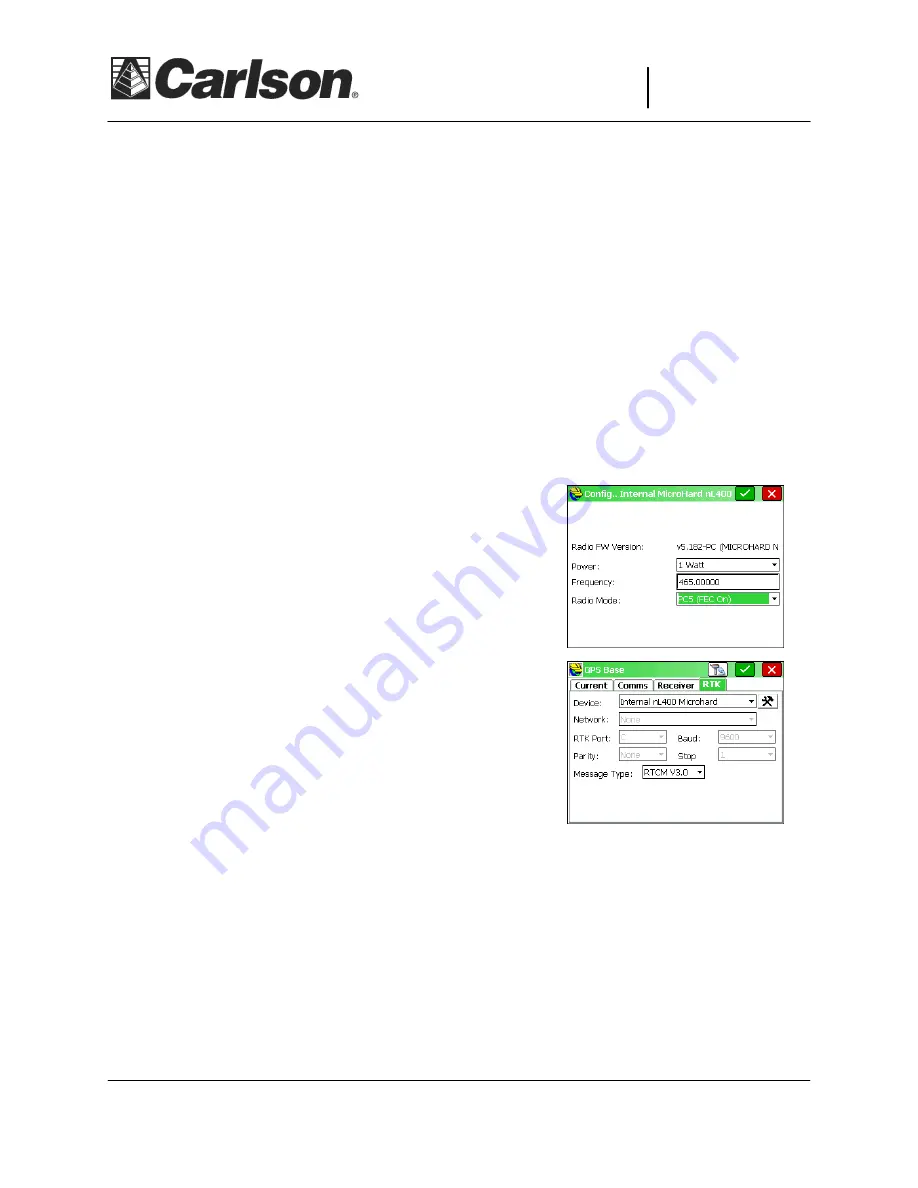
Tap the RTK tab and set Device: to “
Internal nL400 Microhard
” then tap the “
wrenches
” icon to
the right
10)
The default settings are: Power - 1 watt,
Frequency -
465.00 and Radio Mode –
PC5 (FEC On)
. Configure the
radio settings as desired, setting the Frequency to your
licensed Frequency.
The radio settings should be the
same as previously set for the Rover. Tap the Green
Check
11)
Set the Message Type: to “
RTCM V3.0
”. The other
message types are “CMR” and “ROX”. ROX can only be
used with the BRx5 or Hemisphere S320 receivers.
12)
Tap the
Green Check
to initialize your Base then tap
“Read from GPS” to take 10 readings, which will be
averaged to establish your Base position. Continue with the SurvCE prompts to finish
configuring the Base.
13)
Power on your GPS Rover
. In SurvCE tap GPS Rover in the Equip tab, and then tap the Green
Check to reconnect to and initialize your Rover. Your BRx5 receiver is now receiving RTK
corrections from your BRx5 base.
The BRx5 GNSS receivers are now configured as a Base/Rover pair and ready to collect points using
SurvCE. SurvCE provides many additional options for configuring the BRx5 units, details of which can be
found in the BRx5 User Guide and the SurvCE manuals. Experienced SurvCE


