background image

13

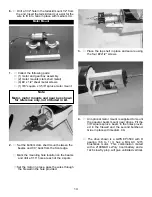
Landing Gear Installation

1.  

Collect the following items:

(1) Landing gear

(2) Wheels

(2) plastic wheel retainers

(1) tail skid wire

(1) Landing gear cover

Gear slot

2.  

Remove the covering from the landing gear slot

at the leading edge of the wing.

3.  

Flex the landing gear legs together slightly and

slide in the opening. Push all the way in.

4.  

Take the landing gear cover plate and press

into the slot on top of the gear. It is not neces-

sary to glue in place.

5. 

Slide the wheel on the axle and retain with the

plastic press on keeper.

Repeat for the other wheel.

Содержание SHOCK 3D

Страница 1: ... to use only those radio frequencies specified for Model Aircraft LIMITED WARRANTY Carl Goldberg Products Ltd has inspected and certified the components of this aircraft The company urges the buyer to perform his own inspection prior to assembly and to immediately request a replacement of any parts he believes to be defective for their intended use The company warrants replacement of any such comp...

Страница 2: ...arts together before gluing Also never use watery THIN type CA glue for gluing plywood and hardwood parts Thin CA s do not adequately bond these areas CAUTION Some people may experience an allergic reaction when exposed to fumes from CA glue or epoxy As with paints thinners and solvents it is always important to use glues only where there is adequate ventilation to carry fumes away A fan is recomm...

Страница 3: ...0 x 6 TRIANGLE SOFT PENCIL A FEW STRAIGHT OR T PINS WIRE CUTTER DYKES OPTIONAL HEAT GUN COVERING IRON ACID BRUSH 5 FT LENGTH OF STRING Caution Before starting care fully go over all high stress areas with an epoxy or wood glue to confirm all areas are well glued Important Information Covering coming loose is not COVERED UNDER WARRANTY Due to tem perature changes the plane may develop some wrinkles...

Страница 4: ... control horns 2 nylon swing in keepers 2 1 32 x 5 1 2 pushrods 1 4 40 x 3 4 socket head bolt 1 4 flat washer 2 Pushrod connectors Stab and Rudder 2 laser cut control horns 1 elevator joiner wire 7 CA hinges 2 nylon swing in keepers 2 pushrod connectors 2 1 32 x 24 pushrods Landing Gear 1 Main landing gear 2 wheels 2 plastic wheel retainers 1 tail skid wire 1 landing gear cover plate Motor Mount 1...

Страница 5: ...1 6 y connector not supplied 1 piece of string soft wire or cable tie not sup plied 2 laser cut control horns 2 1 32 x 5 1 2 wire pushrods 2 mini pushrod connectors aileron servo cutout control horn slot 2 Locate the control horn slot by laying a straight edge along the outside edge on the servo opening The slot is pre cut in the aileron but is covered over with the film 3 Use an X acto knife or r...

Страница 6: ...pply one drop on each side of the control horn 6 Flip the wing over and glue the aileron horn from the top side of the wing using thin CA 7 Repeat for the other aileron 8 Locate the string soft wire or a cable tie Push it into the aileron servo cut out and fish it out the hole in the middle of the wing on the top side 9 Tape one leg of the servo y connector to the cable tie string or soft wire ...

Страница 7: ...e plastic push on nut will retain it 15 Make a 90 degree bend 1 4 long in the end of one of the 1 32 x 5 1 2 wires and install in the control horn Use the nylon swing in keep er to retain the wire 16 Insert the other end of the pushrod in the pushrod connector you installed on the servo arm Install the arm on the servo Center the servo with the radio and center the aileron Tighten the screw on the...

Страница 8: ...e sure it is centered this dimension same on both sides equal both sides Caution install the elevator joiner wire first 2 Slide the elevator joiner wire into the slot for the stab You cannot install it after the stab is in place without cutting the fuselage 4 Use a ruler and measure from the tip of the stab to the front of the turtle deck and make sure the dimension is the same on both sides When ...

Страница 9: ...rial from the stab sad dle to make the stab align with the wing 5 Bolt the wing in place using the 4 40 x 3 4 socket head screw 8 Take one elevator half and install two CA hinges in the pre cut slots Locate the hole for the elevator joiner wire Hole for elevator wire 9 Put epoxy or white glue in the hole for the ele vator joiner wire and fit the elevator to the stab Use pins in the middle of the h...

Страница 10: ... the joiner wire If necessary bend joiner wire till both elevators are level with one another Fin And Rudder Installation 12 Locate the slot for the elevator control horn on the right elevator half The slot is pre cut in the wood but covered over by the covering Remove the covering with an x acto knife or razor blade Install the control horn making sure the holes for the pushrod are aligned over t...

Страница 11: ...side of the plane Glue the control horn in place using thin CA glue on both sides 4 Install the rudder on the plane using straight pins to make sure the hinges stay centered just as we did with the elevators Deflect the rudder in one direction to its full travel and put one drop of thin CA on each hinge Move the rudder to full deflection in the other direction and glue each hinge Repeat the gluing...

Страница 12: ...r and bend and install the rudder pushrod 4 Use the nylon swing in keepers to retain the pushrod on the control horns 6 Put the pushrod in the hole in the pushrod con nector and install arm on servo Center the servos with the radio and make sure the rud der and elevator are centered Tighten the screw firmly Cut the excess pushrod off leav ing about 1 2 past the connector Don t forget to put the sc...

Страница 13: ...ering from the landing gear slot at the leading edge of the wing 3 Flex the landing gear legs together slightly and slide in the opening Push all the way in 4 Take the landing gear cover plate and press into the slot on top of the gear It is not neces sary to glue in place 5 Slide the wheel on the axle and retain with the plastic press on keeper Repeat for the other wheel ...

Страница 14: ... hole at each of the 4 spots Set the motor in place pass the wires through the firewall in the hole provided 3 Place the top shell in place and secure using the four 2x1 2 screws 4 An optional motor mount is supplied to mount the popular beam mount gear drives Fit the 3 8 square spruce beam in the holes provid ed in the firewall and the second bulkhead Glue in place with medium CA The drive shown ...

Страница 15: ... trim line are lined up When everything is lined up properly drill four mounting holes for the mounting screws The holes should be 1 32 with one in the lower corner on each side and one just above the black at the top on each side plated mounting screw Black mounting screw Canopy Mounting 1 Collect the following items 1 Black canopy 1 Hatch 2 The hatch is held on with a wire clip already installed...

Страница 16: ...ed tape this is how we did it You can also glue velcro not included to the top of the wing or you can glue a small piece of wood over the top CG and Control Throws The CG should be 3 1 2 to 4 behind the leading edge at the fuselage Our model balanced and flew with no added weight set up as shown Notice The plane is very responsive with a high rate of roll so be ready for snap py performance Do not...

Отзывы: