background image

39

ENG

"humiFog direct" +0300073EN rel. 1.2 - 02.05.2019

11.3.2  Gasket and valve replacement

The gaskets and valves require replacement every each 3000 hours, 
as signalled on the display by the “3000 hour maintenance” alarm. 
Nonetheless, in specific conditions of stress replacement may be needed 
earlier. 
Carel recommends to check the pump operation every 1000 operating 
hours (signalled by notification). If the pump makes noise, or is not able 
to reach the required operating pressure (70 bars), the gaskets and valves 
may need to be replaced sooner.  
Valves and gaskets are consumables, and wear does not reflect a product 
malfunction.

To replace the gaskets, proceed as follows:

1. 

Disconnect the wiring from the high pressure switch, solenoid valve 
BYP and the NTC probe. 

2. 

Disconnect the pump outlet hose (at the top right). 

3. 

Unscrew the eight hex screws that hold the pump head to the guard.

4. 

Remove the gaskets and replace them with new ones (P/N 
UAKVGO1501).

5. 

Tighten the eight hex screws so as to secure the pump head to the 
guard.

6. 

Connect the outlet hose to the pump. 

7. 

Reconnect the pressure switch, solenoid valve and NTC probe   

To replace the valves, proceed as follows:

1. 

Unscrew the three hexagonal caps on the front of the brass pump 
head.  

2. 

Unscrew the three hexagonal caps on the top of the brass pump 
head.

3. 

Replace the six valves with new ones (P/N UAKVGO1501). 

4. 

Tighten the six caps removed previously. 

11.4  50 hour oil change warning

The first “oil change required” maintenance warning is shown after 
50 operating hours: this indicates that the oil needs to be changed 
immediately. This warning is typically displayed a few days after the 
systems is first started. Therefore when starting the system, make sure a 
spare can of oil is available for the first oil change, in accordance with the 
procedure described in paragraph “11.3.1 Oil change”.    
The warning can be easily reset by pressing the “Alarm” button on the 
user interface (button at the top left). 

For practical reasons, the warning can also be reset after 40 operating 
hours, entering the “control menu > screen Da10”. The warning cannot be 
reset before 40 operating hours.
 

11.5  Notification, maintenance warning, 

reset hour counter

After 1000 hours of operation, humiFog direct generates a "1000 hour 
maintenance" notification, signal only. This is a warning that tells the 
user to check correct operation of the system. If the pump can reach the 
nominal operating pressure of 70 bars, no action needs to be taken. 
The notification can be easily reset by pressing the "alarm" button on the 
user interface (top left button). 
The same occurs after 2000 hours of operation. 
After 3000 hours, on the other hand, humiFog direct generates a "3000 
hour maintenance" alarm, which shuts the unit down. In this case, action 
needs to be taken on the unit, changing the oil and replacing the pump 
gaskets and valves (as described in paragraphs 11.3.1 and 11.3.2).   
Will be necessary subsequently reset the alarm in the menu “Control > 
screen Da09” and press subsequently the “Alarm” button  of the display.

If for some reason the gaskets and valves need to be replaced before 
3000 operating hours, the hour counter needs to be reset on screen 
Da09. It is recommended, whenever replacing the gaskets and valves, to 
also change the oil before resetting the hour counter.

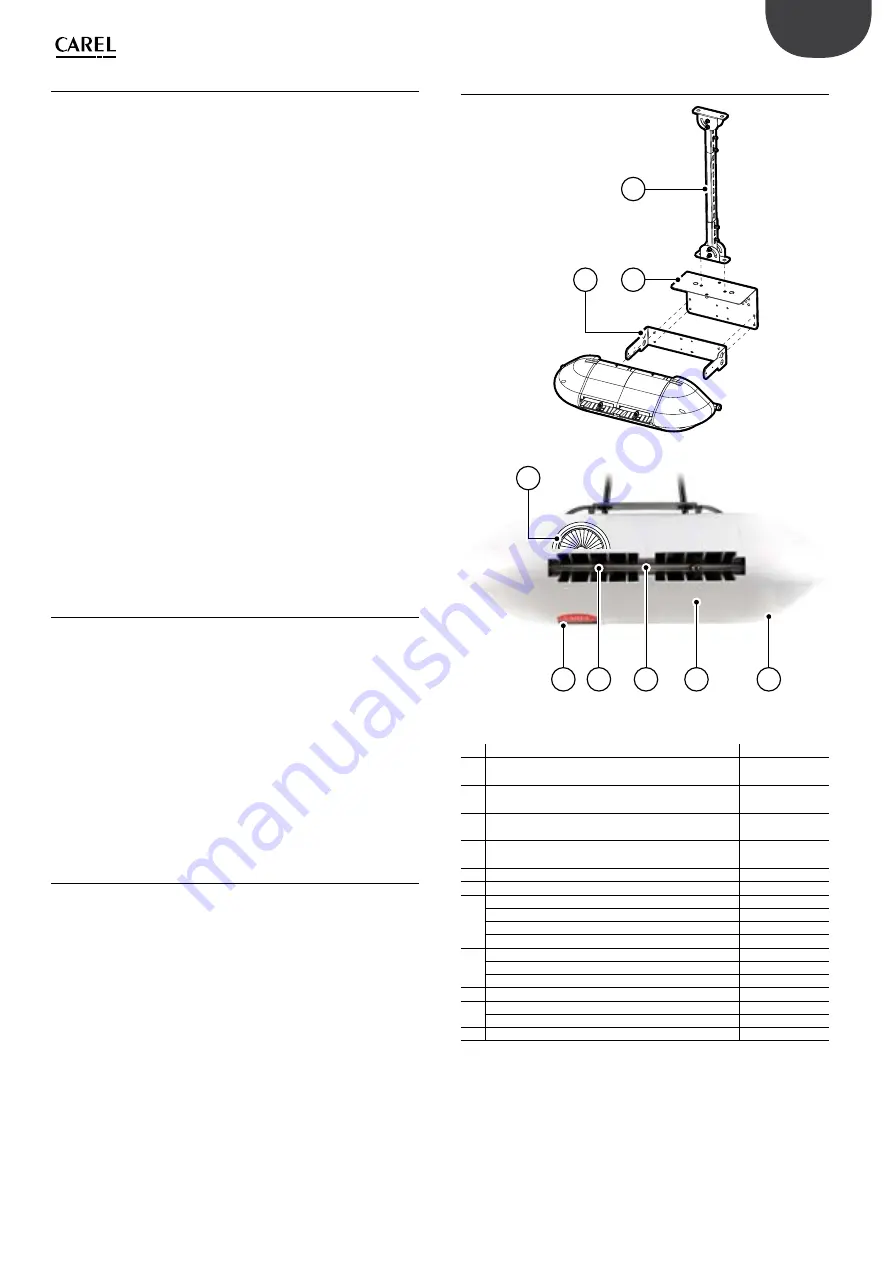
11.6  Blower spare parts

6

5

4

8

8

7

1

2

3

6

5

4

8

8

7

1

2

3

Fig. 11.b 

No. Description

Code

1 Wall mounting bracket, single blower, 2 nozzles 

(DLA02*F*00)

UAKHW20000

Wall mounting bracket, single blower, 4 nozzles 
(DLA04*F*00)

UAKHW40000

2 Ceiling mounting adapter, single blower, 2 nozzles 

(DLA02*F*00)

UAKHC20000

Ceiling mounting adapter, single blower, 4 nozzles 
(DLA04*F*00)

UAKHC40000

3 Ceiling mounting bracket, L = 0.5 m

UAKVC00500

Ceiling mounting bracket, L = 1.0 m

UAKVC01000

4 2 nozzle water manifold, single blower

Contact CAREL

4 nozzle water manifold, single blower

Contact CAREL

4 nozzle water manifold, double blower

Contact CAREL

8 nozzle water manifold, double blower

Contact CAREL

5 Individual nozzle, flow-rate 1.45 l/h @ 70 bars

UAKMTP0000

Individual nozzle, flow-rate 2.8 l/h @ 70 bars

UAKMTP1000

Individual nozzle, flow-rate 4.0 l/h @ 70 bars

UAKMTP2000

6 Power LED

Contact CAREL

7 CE fan – 230 V 50 Hz

Contact CAREL

UL fan – 120 V 60 Hz

Contact CAREL

8 Plastic cover

Contact CAREL

Tab. 11.b 

Содержание humiFog direct DLA02DF000

Страница 1: ...I n t e g r a t e d C o n t r o l S o l u t i o n s E n e r g y S a v i n g s NO POWER SIGNAL CABLES TOGETHER READ CAREFULLY IN THE TEXT humiFog direct User manual...

Страница 2: ......

Страница 3: ...install and use the product near objects that may be damaged when in contact with water or condensate CAREL Industries declines all liability for direct or indirect damage following water leaks from t...

Страница 4: ...4 ENG humiFog direct 0300073EN rel 1 2 02 05 2019...

Страница 5: ...communication 17 4 7 Alarm relay output 17 4 8 Unit status digital output 17 4 9 Production percentage analogue outputs 18 5 START UP AND USER INTERFACE 19 5 1 Graphic terminal 19 5 2 Start up 19 5 3...

Страница 6: ...6 ENG humiFog direct 0300073EN rel 1 2 02 05 2019...

Страница 7: ...request signal from a probe temperature or humidity or external controller When operation is enabled remote on off and at the same time there is a humidification or cooling request signal the system...

Страница 8: ...lower units differ based on the number of nozzles the type of nozzles the nozzles are already pre assembled in the factory power supply voltage frequency and the direction of spray front or two direct...

Страница 9: ...uge 8 High pressure sensor 9 Temperature controlled safety valve 10 High pressure sensor 11 Temperature sensor 12 Overflow valve 13 Drain solenoid valve 14 Bypass solenoid valve 15 NC fill solenoid va...

Страница 10: ...elivered already assembled in cardboard boxes The user is responsible for removing the blower from the packaging removing the side plastic covers so as to make the water and electrical connections and...

Страница 11: ...tening the brackets Fig 2 b 2 1 2 Floor standing installation For floor standing installation the unit needs to rest on a raised platform so as to allow connection of the drain hose located on the bot...

Страница 12: ...er on the line Contact CAREL for longer water lines 2 3 Cabinet electrical installation The cabinet must be connected to the mains by the user 230 V 50 Hz for cabinet CE version UA DD 01 120 V 60 Hz f...

Страница 13: ...er units must be suitably positioned so as to allow complete absorption of the sprayed water Consequently it is recommended to install the blowers a due distance apart at a sufficient height from the...

Страница 14: ...e plastic covers Remove the blower unit from the steel bracket on the rear Rest the bracket against the wall in the position where the blower will be installed and then drill four holes in the wall us...

Страница 15: ...lower units to the cabinet make sure that the cable glands supplied with the cabinet and the blower units are available All connections to be made by the user cabinet power supply blower unit power su...

Страница 16: ...e optional is used for the auxiliary function to reduce humiFog Direct humidification or cooling capacity when approaching a set humidity or temperature threshold on the display or external controller...

Страница 17: ...eters and sends commands To connect a supervisor the RS485 serial port terminal M12 inputs 1 Tx Rx 2 Tx Rx 3 GND or Ethernet port is used The choice of which port to use depends on the supervisor Modb...

Страница 18: ...by multiplying the number of atomising nozzles in the zone by the flow rate delivered by each nozzle Step 3 10 Select zone 1 control mode from the options ON OFF contact e g humidistat External signal...

Страница 19: ...ue and press the confirm button Title Message Values Default Zone 1 set Zone 2 set Main probe set point 0 100 rH 0 40 C 50 rH 25 C Main probe band 0 10 rH 0 10 C 5 rH 2 C Limit probe set point 0 100 r...

Страница 20: ...centre To view the details of an individual notification press the notification To return to the previous display press To return to the home menu press the HOME icon Fig 5 m 5 3 8 System date and ti...

Страница 21: ...quick menu 5 3 14 Graphs Press the icon to access the function The graphs function is used to view the values of some system analogue and digital variables over a certain time frame Press the zone to...

Страница 22: ...n to change the unit of measure Press the icon to update the display application from a USB pendrive Press the icon to access the configuration wizard or factory data reset Press the icon to access th...

Страница 23: ...e type of signal for the temperature limit probe in zone 1 minimum maximum probe reading probe offset enable disconnected probe alarm and set the alarm delay Dc07 Set the type of signal for the main h...

Страница 24: ...to the request signal if not at the maximum When atomisation stops the pump remains active and the water is recirculated through an internal bypass circuit in the pumping unit rather than being delive...

Страница 25: ...ulated as follows Weighted average S1 p1 S2 p2 p1 p2 where Si is the probe reading and pi the relative weight To calculate the arithmetic average equal weights should be set for example p1 p2 100 6 3...

Страница 26: ...ed for longer than the value of the Delay parameter seconds the main probe broken or disconnected alarm will be activated 6 4 3 External signal setting The type of external signal can be configured on...

Страница 27: ...ean the anti dripping time also needs to be adjusted for two zone systems Always check correct operation of the atomisation on and off phases in PWM modulation mode Ref Display Description Range Def U...

Страница 28: ...markets a switch P N KITSE08000 that can connect a maximum of eight units 8 Ethernet ports If necessary use several KITSE08000 switches with a cascaded arrangement Main technical specifications of the...

Страница 29: ...he maximum capacity go to menu Dd03 The Capacity parameter identifies the maximum production request for the Master Slave system and can therefore be set by the user The Maximum capacity parameter rea...

Страница 30: ...buttons to display the details of all the units 7 4 5 Software backup function in the Master Slave system Master Slave mode can also be used to manage the software backup function if one or more units...

Страница 31: ...server and humiFog Direct communicate directly and there is no need to configure the network parameters subnet mask and gateway The disadvantage is that if adding other devices to the same network wi...

Страница 32: ...s 2 Circuit breaker intervention Al_CircBreaker Active 1 3 High pressure switch intervention Al_HiPSwitch Active 1 4 High pressure Al_HiP Active 1 5 Low pressure Al_LoP Active 1 6 High pressure on byp...

Страница 33: ...l_LimPrb_2 Active R 19 Low pressure trasducer error Al_PressByPass Active R 20 Bypass temperature probe error Al_TempByPass Active R 21 High pressure transducer error Al_Press Active R 22 Missing mode...

Страница 34: ...t can be used P N Model Features Power supply WS01F01M00 SI Probe Temperature humidity for industrial use Battery WS01G01M00 SA probe Room tempera ture humidity Battery WS01AB2M20 Access Point Gateway...

Страница 35: ...d receives power from J3 1 that there are no leaks in the outlet line correct closing of the drain solenoid valve in zone DR1 DR2 and bypass drain valve BYP NO valves 24 Vac to close that filling is e...

Страница 36: ...connected from c pHC or wired incorrectly The c pCOe expansion that controls zone 2 is offline Check that the unit model is exact the alarm goes off if the cabinet is single zone but the c pHC control...

Страница 37: ...control in zone 2 Check probe connections probe access point binding access point power supply Automatic Active Signal Unit 1 alarm ALN01 Alarm on unit no 1 in network Only if network function is act...

Страница 38: ...ocal standards 4 Fill the pump body with SAE 15W40 mineral oil up to the level suggested by the circular marker on the side of the pump the required oil content is around 350 ml 5 Finally close the ye...

Страница 39: ...rs entering the control menu screen Da10 The warning cannot be reset before 40 operating hours 11 5 Notification maintenance warning reset hour counter After 1000 hours of operation humiFog direct gen...

Страница 40: ...ent oil 5024646AXX 7 High pressure gauge scale 0 100 bars radial fitting 1 4 GAS UAKMWHP001 8 Pump high pressure switch calibration 90 bars UAKPSHP000 9 Temperature controlled safety valve 1309549AXX...

Страница 41: ...ODICE DISEGNO DESIGNED MODIFIED BY COLOUR COLORE OTHER MATERIALS ALTRI MATERIALI MATERIAL SPECIFICATION SPECIFICHE MATERIALE DIMENSIONI VEDI TABELLA WEIGHT and EXTERNAL SPACE SIZE INDICATIVE INFORMATI...

Страница 42: ...5A GT 5x20 250V F2 1A T 5x20 250V 2 5A GT 5x20 250V F3 1A T 5x20 250V 2 5A GT 5x20 250V F4 1A T 5x20 250V 2 5A GT 5x20 250V F5 4A T 5x20 250V 4A T 5x20 250V F6 4A T 5x20 250V 4A T 5x20 250V INDICATIVE...

Страница 43: ...CCR Short Circuit Current Rating 5 kA 5 kA Minimum cable size required for blower power supply AWG 14 AWG 14 Tab 12 b WATER CIRCUIT SPECIFICATIONS UA040DD 01 UA080DD 01 Required feedwater quality demi...

Страница 44: ...obe available available Webserver available available Serial communication via Ethernet and or via RS485 Modbus BACnet Modbus BACnet Tab 12 h 12 3 3 CE version blower datasheet Single blower units for...

Страница 45: ...050 AWG 14 with UA050 AWG 12 with UA090 AWG 12 with UA090 Maximum number of blower units connected to one cabinet 12 6 Tab 12 k Double blower units for mounting in centre of corridor UL version DLA04U...

Страница 46: ...46 ENG humiFog direct 0300073EN rel 1 2 02 05 2019 Note...

Страница 47: ......

Страница 48: ...INDUSTRIES Headquarters Via dell Industria 11 35020 Brugine Padova Italy Tel 39 049 9716611 Fax 39 049 9716600 e mail carel carel com www carel com Agenzia Agency humiFog direct 0300073EN rel 1 2 02 0...

Отзывы: