background image

13

ENG

+0300046IE - rel. 1.3 - 05.01.2022

Status

Switch 1

Switch 2

TOUCH

HOLD

TOUCH

HOLD

Warm-up

Enable Bluetooth® connection

-

Disable Bluetooth® connection

-

Normal

Start zero cal.

Start full-scale cal.

Low alarm

Mute buzzer

Acknowledge shut-down alarm

High alarm

Mute buzzer

Acknowledge shut-down alarm

Offl

  ine

-

-

Fault

Mute buzzer

Acknowledge shut-down alarm

Negative gas fault

Mute buzzer

Start zero cal.

Zero cal. fault

Acknowledge fault

-

Full-scale calibration fault

-

Acknowledge fault

Tab. 3.d

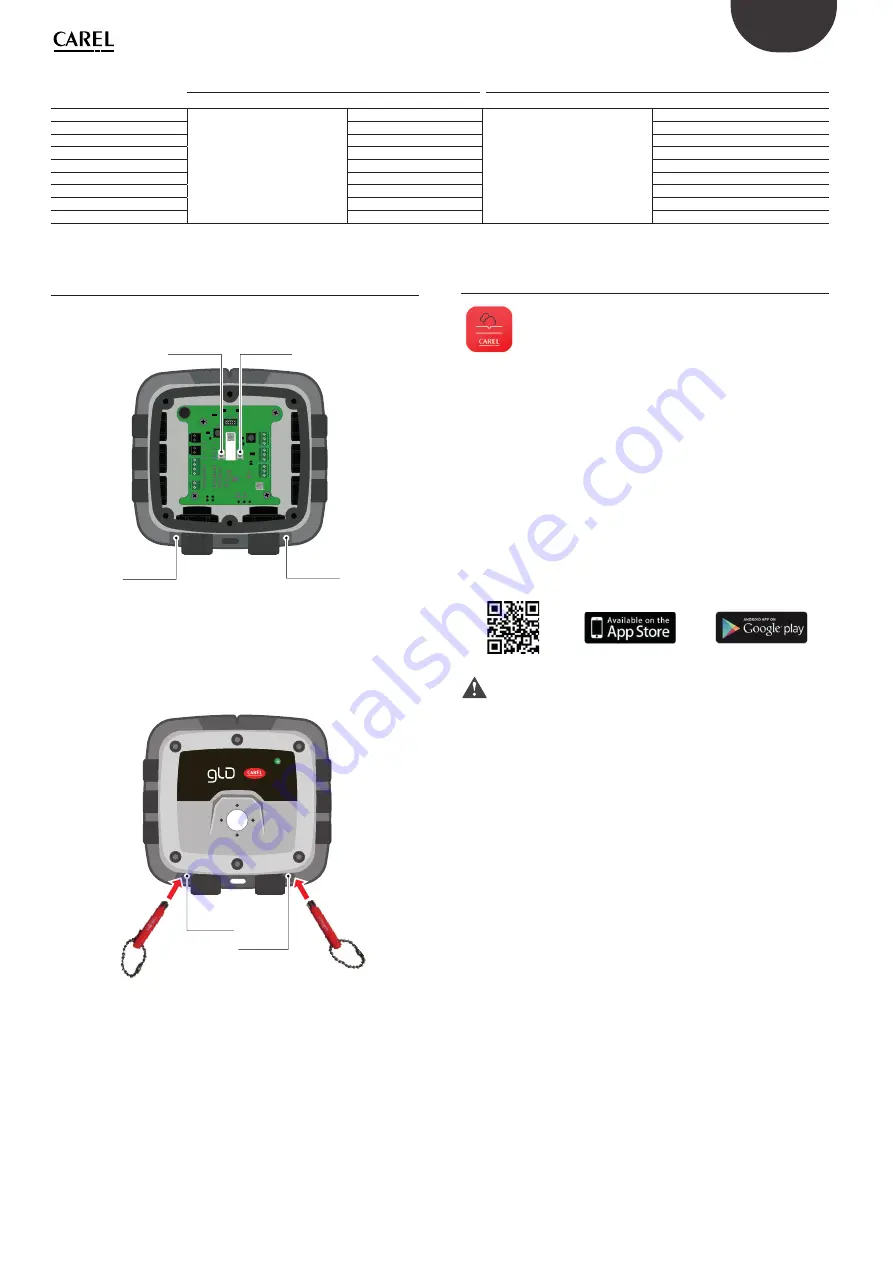
3.6  Switch position and activation

For the position of switches TACT#1, TACT#2 and MAG#1, MAG#2, see 
the fi gure below

MAG

 #2

MAG

 #1

T

AC

T #2

T

AC

T #1

Fig. 3.a

To activate physical switches TACT#1 and TACT#2, fi rst remove the cover 
from the plastic enclosure and then press manually. To activate mag-
netic switches MAG#1 and MAG#2, simply move the magnetic stylus 
(supplied with the gas detector) to the bottom of the plastic enclosure, 
placing the magnetic tip in the recess next to the M20 cable gland. See 
the image below.

MAG

 #2

MAG

 #1

Fig. 3.b

3.7  RILEVA app features 

The “RILEVA” app lets users fully exploit the potential of the 
new Carel GLD series gas detectors, allowing simple and 
intuitive interaction with the gas detector. Features include

RILEVA simplifi es confi guration, commissioning and maintenance; a 
smartphone can be used to interface with the CAREL GLD series gas 
leakage detectors for more practical and simpler confi guration.

• 

Confi guration (rename device, defi ne alarm thresholds, modify 
Modbus settings, confi gure relay behaviour and manage analogue 
output settings); 

• 

Maintenance (verify operation of the buzzer and LED, relays and 
analogue outputs) 

• 

Calibration (both zero and full-scale calibration, and execution of the 
bump test, generating a calibration report) 

• 

Intuitive interface (immediate display of current gas concentration 
measurement and indication of alarm/fault status) 

To download RILEVA, scan here or go to www.carel.com/apps

CAUTION:

 RILEVA is only compatible with smartphones (not 

tablets) with the following OS:

• 

Android 6.0 “Marshmallow” or higher

• 

Apple iOS 6.0 or higher

3.7.1 Activating the Bluetooth connection

To connect a smartphone to the device via the Bluetooth® interface, 
proceed as follows:

1. 

Start the Bluetooth scan for the device by activating physical switch 
TACT#1 or magnetic switch MAG#1 for 1 second (“TOUCH” function). 

2. 

After around 10 seconds, the device should emit a sequence of 
audible signals (double beep). The device is now ready to establish 
a connection with the smartphone. The gas detector terminates the 
procedure:

• 

if a Bluetooth connection is established correctly;

• 

if TACT#2 or MAG#2 is activated for 1 second (“TOUCH” function);

• 

after 2 minutes from starting the Bluetooth scan.

3. 

Open the RILEVA APP and click the Bluetooth icon at the bottom of 
the screen to start scanning. 

4. 

Select the device from the list of available Carel gas detectors. The 
default device name is “GLD”.

5. 

When prompted, enter the password. The default value is “123456”. 

The Bluetooth connection can be activated in any device status.
See the following screenshots.

Содержание GDWBI20A00

Страница 1: ...O POWER SIGNAL CABLES TOGETHER READ CAREFULLY IN THE TEXT Gas Leakage Detector Per applicazioni commerciali e industriali leggere Manuale d uso User manual For commercial and light industrial application ...

Страница 2: ......

Страница 3: ...io del portfolio prodotti CAREL CAREL adotta una politica di continuo sviluppo Pertanto CAREL si riserva il diritto di effettuare modifiche e miglioramenti a qualsiasi prodotto descritto nel presente documento senza previo preavviso I dati tecnici presenti nel manuale possono subire modifiche senza obbligo di preavviso La responsabilità di CAREL in relazione al proprio prodotto è regolata dalle co...

Страница 4: ...4 ITA 0300046IE rel 1 3 05 01 2022 ...

Страница 5: ...i interruttori 12 3 6 Posizione e attivazione interruttori 13 3 7 Funzionalità dell App RILEVA 13 4 MANUTENZIONE 17 4 1 Procedura di manutenzione 17 4 2 Calibrazione e Bump Test 17 4 3 Ricerca guasti 19 4 4 Sostituzione elemento sensibile 20 4 5 Pulizia dello strumento 20 5 CARATTERISTICHE TECNICHE 21 5 1 Specifiche elettriche 21 5 2 Specifiche meccaniche e ambientali 21 5 3 Elemento sensibile 21 ...

Страница 6: ......

Страница 7: ...traverso allarmi visivi e sonori per allertare il personale nel caso di perdita di refrigerante AVVERTENZA I sensori a semiconduttore rilevano il gas per cui è stato calibrato ma sono sensibili anche ad altri tipi di gas solventi alcol o sostanze che contengono ammoniaca come prodotti per la pulizia presenti nell ambiente Questo in certi ambiti ed appli cazioni può comportare falsi allarmi Tuttavi...

Страница 8: ...0 a 5 V da 0 a 10 V da 1 a 5 V da 2 a 10 V Uscita digitale Modbus RS485 2 8 16 15 1 1 15 15 2 8 MAG 2 REMOTE SENSOR MAG 1 6 10 7 9 5 13 14 12 11 3 4 IN OUT NO COM NC NO COM NC B A GND SH AN GND NO COM NC Fig 1 d N Descrizione componente 1 Pressacavi M16 6 2 Guarnizioni in gomma 2 3 Cicalino allarme interno 4 Connettori di alimentazione 2 5 Connettore seriale Modbus 6 Uscita analogica 7 Interruttor...

Страница 9: ...marsi delle sacche di stagnazione del gas Posizionare i Gas Detector presso i flussi di aria provenienti dai sistemi di ventilazione sia naturale che meccanica se presenti Non posizionare i Gas Detector troppo vicino a zone con gas ad alta pressione per permettere la distribuzione dello stesso nello spazio attorno al Gas Detector Il rischio infatti è quello di mancato rilevamento della perdita di ...

Страница 10: ...ve essere invertita Per installazioni in configurazione daisy chain il tipo di tensione restituita ai pin 24 V OUT è equivalente al tipo di tensione utilizzata per l alimentazione del dispositivo al pin 24 V IN IMPORTANTE Ilproduttorediquestoprodottorichiedel esecuzione di un bump test o di una calibrazione dopo l installazione per verificare la funzionalità dello strumento Vedere il paragrafo Cal...

Страница 11: ... e o distorsioni del segnale Evitare di utilizzare connessioni troppo lunghe quando si collegano gli strumenti al bus seriale La connessione strumento bus non deve superare la lunghezza massima di 1 metro Assicurarsi che gli strumenti alla terminale del bus abbiano la resistenza di terminazione di 120 Ω abilitata La resistenza di terminazione è attivabile tramite l App Rileva Assicurarsi che la po...

Страница 12: ...nomalia su interfaccia analogica 5 25 V 5 25 V 10 5 V 10 5 V 21 mA Tab 3 c 3 3 Segnale Modbus Il rivelatore di gas della serie GLD Carel fornisce un interfaccia digitale Modbus RTU Tutti i messaggi di stato e la maggior parte dei parametri accessibili e o configurabili tramite l interfaccia Bluetooth sono accessibili e o configurabili anche tramite il Controller Carel Modbus Per i registri Modbus ...

Страница 13: ...nare il dispositivo definire le soglie di allarme modificare le impostazioni Modbus configurare il comportamento dei relè e gestire le impostazioni delle uscite analogiche Manutenzione verifica del funzionamento di cicalino e LED relè e uscite analogiche Calibrazione sia calibrazione di zero che di fondo scala sia esecuzione del bump test con emissione del report di calibrazione Interfaccia intuit...

Страница 14: ...Informazioni Nelsotto menù Impostazioni èpossibileinserireleinformazioniutilizzate per la redazione dei Report di Calibrazione emessi automaticamente dall App in formato pdf al termine di ogni fase di Calibrazione In particolare possono essere inserite le informazioni relative al Cliente e all Operatore selezionare il logo ed indicare l indirizzo mail a cui inviare il report Nel sotto menù Visuali...

Страница 15: ...e Impostare l Alias del dispositivo Impostare Codice di Sblocco e Password Ripristinare le impostazioni di fabbrica attivabile anche attraverso i pulsanti fisici si veda relativo paragrafo Inoltre si può accedere a tre diverse sezioni Allarmi Modbus e Uscite Si vedano le seguenti immagini come riferimento Fig 3 h Fig 3 i Fig 3 j In particolare i parametri impostabili per ogni sezione sono i seguen...

Страница 16: ...regolare l uscita analogica applicando un offset fisso Questa funzione diventa essenziale in caso di uscita analogica in tensione in quanto consente di compensare la caduta di tensione dovuta alla resistenza del cavo Valori impostabili da 10 a 10 rispetto al valore di fondo scala Valore predefinito 0 Intervallo scostamento analogico questa funzione permette agendo sul cursore dedicato di adattare ...

Страница 17: ...Esecuzione del Bump Test I punti 1 e 2 possono essere eseguiti utilizzando la Scheda di Verifica disponibile nell App RILEVA Si veda paragrafo dedicato I punti 4 e 5 sono descritti nel paragrafo seguente 4 2 Calibrazione e Bump Test I punti 4 e 5 possono non essere eseguiti nel caso in cui l elemento sensibile venga sostituito Si veda il paragrafo dedicato 4 4 Sostituzione dell elemento sensibile ...

Страница 18: ...legare il tubo in plastica alla bombola del gas di calibrazione o aria ambiente secondo l avvertenza di cui sopra 2 Entrare nella sezione dedicata alla Calibrazione premendo il relativo pulsante dalla Scheda Home Scansionare quindi il codice a barre presente sulla bombola del gas di Calibrazione o inserire manualmente tutte le informazioni richieste 3 Applicare il gas di calibrazione o aria ambien...

Страница 19: ...rminale di tensione fuori intervallo Chiamare l assistenza 0x00000080 Errore di lettura della memoria flash di sistema Errore durante la lettura da memoria flash interna Ciclo di alimentazione Se si ripresenta chiamare l assistenza 0x00000100 Errore di scrittura della memoria flash del sistema Errore durante la scrittura nella memoria flash interna Ciclo di alimentazione Se si ripresenta chiamare ...

Страница 20: ... il cavo piatto dal modulo sensore 3 Rimuovere l elemento sensibile installato sul coperchio tenendo l alloggiamento e ruotando in senso antiorario di 90 Fare attenzione a non applicare una forza eccessiva sulla scheda del modulo sensore Quando la linguetta quadrata dell alloggiamento del sensore è allineata con l icona del lucchetto tirare saldamente il modulo per rimuoverlo dall alloggiamento 4 ...

Страница 21: ... 3 050 m di altitudine Indice di protezione del contenitore IP66 Tab 5 b 5 3 Elemento sensibile Vita operativa e requisiti di calibrazione Categoria Semiconduttore SC Infrarossi IR Elettrochimico EC Frequenza di manutenzione raccomandata 6 mesi dopo la messa in servizio successivamente 12 mesi 12 mesi 12 mesi Vita operativa tipica del sensore 4 6 anni 5 7 anni 2 anni Tab 5 c AVVERTENZA Gli element...

Страница 22: ... intervallo gas Setpoint allarme alto soglia in parti per milione impostato dal controller sovrascrivere i valori del sensore locale 201 Ritardo allarme 0 15 Ritardo cicalino allarme impo sta il tempo in minuti in cui il flag cicalino e il flag allarme vengono attivati dopo che la concentrazione di gas supera il setpoint di allarme 202 Ritardo cicalino mappato al registro 201 I valori impostati ne...

Страница 23: ...zzato e corretto in funzione di altri parametri di controllo e g la temperatura ambiente 6 1 4 Dispositivi e sensori di ricambi Carel C I dispositivi e sensori di ricambio con codice Carel dove la nona cifra è la lettera C hanno compreso nella confezione il certificato di calibrazione in aggiunta al foglio istruzioni 6 2 Smaltimento dello strumento 6 2 1 Smaltimento delle apparecchiature elettrich...

Страница 24: ...U Di prossima uscita Semiconduttore R 1233zd E xxxxx Di prossima uscita Semiconduttore R 1270 xxxxx GDWRS01A00 IP66 remota Semiconduttore R 32 02GE3 GDWRS02A00 IP66 remota Semiconduttore R 134a 02GEX GDWRS03A00 IP66 remota Semiconduttore R 290 02GEY GDWRS04A00 IP66 remota Semiconduttore R 404A 02GEZ GDWRS05A00 IP66 remota Semiconduttore R 407A 02GF0 GDWRS26A00 IP66 remota Semiconduttore R 407C 02K...

Страница 25: ...miconduttore R 452A 1000 02GO4 GDOPZS1200 Semiconduttore R 452B 1000 02GO5 GDOPZS1300 Semiconduttore R 454A 1000 02GO6 GDOPZS1400 Semiconduttore R 454B 1000 02GO7 GDOPZS1500 Semiconduttore R 455A 1000 02GO8 Di prossima uscita R 466A 1000 xxxxx GDOPZS1700 Semiconduttore R 507 A 1000 02GOA GDOPZS1800 Semiconduttore R 513A 1000 02GOB GDOPZI2000 Infrarossi R 744 CO2 10000 02GNU Di prossima uscita R 11...

Страница 26: ...26 ITA 0300046IE rel 1 3 05 01 2022 Notes ...

Страница 27: ...kewise apply to the controllers serial boards programming keys or any other accessory in the CAREL product portfolio CAREL adopts a policy of continual development Consequently CAREL reserves the right to make changes and improvements to any product described in this document without prior warning The technical specifications shown in the manual may be changed without prior warning TheliabilityofC...

Страница 28: ...4 ENG 0300046IE rel 1 3 05 01 2022 ...

Страница 29: ...s 12 3 6 Switch position and activation 13 3 7 RILEVA app features 13 4 CARE MAINTENANCE 17 4 1 Maintenance procedure 17 4 2 Calibration and bump test 17 4 3 Troubleshooting 19 4 4 Sensitive element replacement 20 4 5 Cleaning the device 20 5 TECHNICAL INFORMATION 21 5 1 Electrical specifications 21 5 2 Mechanical and environmental specifications 21 5 3 Sensitive element 21 5 4 Modbus registers 22...

Страница 30: ......

Страница 31: ...sonnel in the event of a refrigerant leak WARNING semiconductor sensors detect the gas they have been calibrated for but are also sensitive to other types of gases solven ts alcohol or substances containing ammonia such as cleaning products present in the environment In certain areas and applica tions this may lead to false alarms Nonetheless although they do not only detect the specific gas they ...

Страница 32: ...to 10 V 1 to 5 V 2 to 10 V Digital output Modbus RS485 2 8 16 15 1 1 15 15 2 8 MAG 2 REMOTE SENSOR MAG 1 6 10 7 9 5 13 14 12 11 3 4 IN OUT NO COM NC NO COM NC B A GND SH AN GND NO COM NC Fig 1 d Component Description 1 M16 Cable Glands 6 2 Rubber Gaskets 2 3 Internal Alarm Buzzer 4 Power Connections 2 5 Digital Connection Modbus 6 Analog Connection 7 Tactile Switch 1 8 Remote Sensor Connections 2 ...

Страница 33: ...areas stairwells pits enclosed corners etc where pockets of stagnant gas may form Position the gas detectors near ventilation air flows both natural and mechanical if present Do not place the gas detectors too close to areas with high pressure gas to allow this to spread in the space around the gas detector Otherwise the device may not detect the refrigerant leak if the flow of gas is too fast To ...

Страница 34: ...ation the type of voltage returned to the 24 V OUT pins is the same as the voltage used to power the device at the 24 V IN pin IMPORTANT the manufacturer requires a bump test or calibration to be performed after installation to verify that the device is functioning correctly See Calibration and bump test for more details Connection Description of the connection Label Description of the terminal Po...

Страница 35: ...binations of signal impedance reflections and or distortions Avoid using excessively long connections when connecting devices to the serial bus The device bus connection must not exceed a maximum length of 1 metre Make sure that the devices at the end of the bus have the 120 Ω termination enabled The termination resistance can be enabled using the Rileva app Make sure that the polarity of the A Tx...

Страница 36: ...5 V N A 1 9 V N A 3 8 mA Measurement range exceeded 5 12V 5 12V 10 25 V 10 25 V 20 5 mA Analogue interface fault 5 25 V 5 25 V 10 5 V 10 5 V 21 mA Tab 3 b 3 3 Modbus signal The Carel GLD series gas detectors feature a Modbus RTU digital interface All of the status messages and most of the parameters accessible and or configurable via the Bluetooth interface are also accessible and or configurable ...

Страница 37: ...ration rename device define alarm thresholds modify Modbus settings configure relay behaviour and manage analogue output settings Maintenance verify operation of the buzzer and LED relays and analogue outputs Calibration both zero and full scale calibration and execution of the bump test generating a calibration report Intuitive interface immediate display of current gas concentration measurement ...

Страница 38: ...pp in PDF format at the end of each calibration procedure The information that can be entered includes customer and operator details logo and email address to send the report to The View logs sub menu shows a list of previous calibrations and bump tests and corresponding reports The list can be cleared by pressing the Clear button The calibration reports can also be viewed in the Logs tab accessib...

Страница 39: ...le using the physical buttons see the corresponding paragraph Furthermore three specific sections are available Alarms Modbus and Outputs See the following images for reference Fig 3 h Fig 3 i Fig 3 j In particular the following parameters can be set in each section ALARMS Low Alarm Setpoint used to set the low alarm level This value cannot be higher than the value selected for the High Alarm Setp...

Страница 40: ...use the slider to adjust the analogue output by applying a fixed offset This is essential for voltage analogue outputs to compensate for the voltage drop due to cable resistance Possible values from 10 to 10 with reference to the full scale value Default value 0 Analog Span Range use the slider to adjust the analogue output range to a percentage of the concentration range in ppm that can be measur...

Страница 41: ... Steps 1 and 2 can be performed from the Test tab in the RILEVA app See the corresponding paragraph Steps 4 and 5 are described in paragraph 4 2 Calibration and bump test Steps 4 and 5 can be skipped when replacing the sensitive element See paragraph 4 4 Sensitive element replacement 4 2 Calibration and bump test 4 2 1 Bump test The bump test checks the effective response of the sensor to a real h...

Страница 42: ...t air as described in the warning above 2 Enter the Calibration section by selecting the corresponding button in the Home tab Then scan the barcode on the calibration gas cylinder or manually enter the required information 3 Open the supply of calibration gas or ambient air as described above 4 Select the Start Zero button to confirm the start of calibration 5 A countdown then begins until calibra...

Страница 43: ... service 0x00000040 Voltage out of specification VIN Terminal voltage out of range Contact service 0x00000080 System flash memory read error Error while reading the internal flash memory Power cycle If it occurs again contact service 0x00000100 System flash memory write error Error writing to the internal flash memory Power cycle If it occurs again contact service 0x00000200 System flash memory CR...

Страница 44: ...ver and disconnect the ribbon cable from the sensor module 3 Remove the sensitive element installed on the cover by holding the housing and turning it 90 anticlockwise Be careful not to apply excessive force to the sensor module board When the square tab on the sensor housing is aligned with the padlock icon pull the module firmly to remove it from the housing 4 Install the new sensitive element b...

Страница 45: ...00 to 1 100 mbars Altitude 3 050 m above sea level Enclosure protection rating IP66 Tab 5 b 5 3 Sensitive element Operating life and calibration requirements Category Semiconductor SC Infrared IR Electrochemical EC Recommended maintenance interval 6 months after commis sioning subsequently every 12 months 12 months 12 months Typical sensor operating life 4 6 years 5 7 years 2 years Tab 5 c WARNING...

Страница 46: ...nt ppm See the gas range table High alarm set point thresh old in parts per million set by controller overwrite local sensor values 201 Alarm delay 0 15 Buzzer alarm delay sets the time in minutes that the buzzer flag and alarm flag are activated after the gas con centration exceeds the alarm set point 202 Buzzer delay mapped to register 201 The values set for reg 201 and reg 202 are always the sa...

Страница 47: ... the current signal is amplified digitised and corrected based on other control parameters e g ambient temperature 6 1 4 Carel spare parts devices and sensors C Carel devices and sensors supplied as spare parts where the ninth digit in the part number is the letter C have a calibration certificate included in the packaging together with the technical leaflet 6 2 Disposing of the Instrument 6 2 1 D...

Страница 48: ...U Coming Soon Semiconductor R 1233zd E xxxxx Coming Soon Semiconductor R 1270 xxxxx GDWRS01A00 IP66 Remote Semiconductor R 32 02GE3 GDWRS02A00 IP66 Remote Semiconductor R 134a 02GEX GDWRS03A00 IP66 Remote Semiconductor R 290 02GEY GDWRS04A00 IP66 Remote Semiconductor R 404A 02GEZ GDWRS05A00 IP66 Remote Semiconductor R 407A 02GF0 GDWRS26A00 IP66 remote Semiconductor R 407C 02KQH GDWRS06A00 IP66 Rem...

Страница 49: ...2GO3 GDOPZS1100 Semiconductor R 452A 1000 02GO4 GDOPZS1200 Semiconductor R 452B 1000 02GO5 GDOPZS1300 Semiconductor R 454A 1000 02GO6 GDOPZS1400 Semiconductor R 454B 1000 02GO7 GDOPZS1500 Semiconductor R 455A 1000 02GO8 Coming Soon R 466A 1000 xxxxx GDOPZS1700 Semiconductor R 507A 1000 02GOA GDOPZS1800 Semiconductor R 513A 1000 02GOB GDOPZI2000 Infra red R 744 CO2 10000 02GNU Coming Soon R 1150 Et...

Страница 50: ...26 ENG 0300046IE rel 1 3 05 01 2022 Notes ...

Страница 51: ......

Страница 52: ...CAREL INDUSTRIES Headquarters Via dell Industria 11 35020 Brugine Padova Italy Tel 39 049 9716611 Fax 39 049 9716600 e mail carel carel com www carel com Agenzia Agency 0300046IE rel 1 3 05 01 2022 ...

Отзывы: