


S
LIDEOUT
C
OVER
Service
Manual
Carefree of Colorado
6
052559-301r2
I
NSTALLING THE
R
OLLER
T
UBE
A
SSEMBLY
If the new fabric is being installed with the replacement or modified roller tube, use the installation
instructions for "Installing the Fabric and Roller Tube" on page 2.
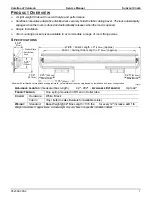
For the referenced Details, refer to Figure 1 "Replacing the Fabric" on page 2.
If the fabric was left on the coach:
1. Slide the roller tube onto the fabric. Make sure that the right end (spring end) of the roller tube is on the
RH side of the canopy.
2.
(Detail C)
After the fabric is centered, hold the polycord in the bottom of the fabric slot. Place one (1)
#10 x 2 PHSD screw through the fabric slot hole and polycord. The screw must be positioned to thread
into the metal of the roller tube slot and the edge of the polycord. The screw action will pull the
polycord further into the slot hole. D
O NOT OVERTIGHTEN
,
maximum torque 16 in-lbs.
NOTE: The attaching screws are offset from the center of the polyrods. Ensure that the polyrod is
positioned in the large diameter of the fabric slot. The screws thread into the extrusion and
the top of the polyrod.
Tip: Place a small wedge (such as a small flat blade screwdriver) between the top of the fabric and the slot to
hold the polyrod down to start the screw in the correct position. Use care to not damage the fabric.
3. After tightening the fabric in the slot from one end of the roller tube to the other end, repeat step 2 to
secure the fabric.
4. Roll the fabric onto the roller tube. Note the direction of the wrap as shown in Detail C. The view is of the RH
spindle.
NOTICE
Failure to roll up the slack before installing the roller tube will reduce the spring
tension. Reduced spring tension may cause the fabric to sag and not roll up correctly when the room
is closed.
5. Insert the roller tube spindle into the LH endcap. The flats on the roller tube spindle will align with the
flats in the endcap. Ensure that the spring locking pin is pointing out on the RH side of the roller tube.
6. Slide the RH endcap on the mounting bracket and over the RH spindle of the roller tube.
7.
(Detail A)
Attach the endcaps and roller tube together using the two 10-32 x 1/2 screws removed previously.
8. Secure the RH endcap assembly to the mounting bracket using the two (2) #10 x 1/2 screws removed
previously.
9. Confirm the fabric is centered in the slat.
CAUTION
When the pins are removed, the roller tube springs will quickly roll up any slack
material. Use care that hands and fingers are out of the way.
10.
(Detail B)
Remove the spring locking pin from the end of the roller tube assembly.
11. Open and close the room to ensure that the fabric is rolling up straight on the rollbar.
12. Secure the fabric to the awning rail using two #6 x 3/8 screws through the rail and fabric.


