


S
LIDEOUT
C
OVER
Service
Manual
Carefree of Colorado
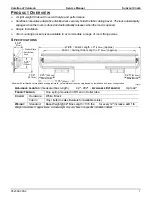
4
052559-301r2
S
PRING
/R
OLLER
T
UBE
R
EPLACEMENT
WARNING
These procedures deal directly with the pre-wound spring tension in the roller
tube. if the spring is prematurely released, the roller tube can spin out of control. Failure to
exercise care and/or failure to follow the instructions can result in personal injury and/or property
damage.
NOTES:
1. Replacement roller tube assemblies are complete and include the spindles and pre-wound spring
assembly.
2. The instructions in this section are for replacing only the roller tube assembly or spring assembly.
3. If replacing the fabric and roller tube assembly, follow the "Canopy Replacement" instructions on
page 2. Substitute the replacement roller tube for the existing roller tube.
4. If replacing the fabric and spring assembly, follow the "Canopy Replacement" instructions on page
2. Repair the roller tube assembly following the instructions for "Replacing the Spring Assembly"
on page 5 before installing the new fabric.
R
EMOVING THE
R
OLLER
T
UBE
A
SSEMBLY
If not replacing the fabric, it is not necessary to remove the fabric from the coach. The fabric can hang down on
the side of the coach.
Refer to Figure 1 "Replacing the Fabric" on page 2.
1. Close the room if open
CAUTION
The spring is pre-wound and under tension. The spring locking pin must be
inserted before continuing otherwise the roller tube can spin out of control and cause personal
injury and/or property damage.
2.
(Detail B)
On the right end of the roller tube, insert a spring locking pin through the bearing and spindle;
it may be necessary to twist the roller to align the holes. The locking pin is a 3/16 x 1 1/4 cotter pin or
equivalent. Place tape over the head of the pin to avoid the pin coming out.
3.
(Detail A)
Remove the 10-32 screws from the endcaps (one in each endcap)
4. On the right side, remove the two #10 x 1/2 screws from the mounting bracket.
5. Hold the roller tube and slide the right endcap assembly out and away from the roller tube. It is not
necessary to remove the endcap assembly from the bracket.
6. Pull the roller tube from the left endcap then unroll the fabric from the roller tube.
7.
(Detail C)
Remove the retaining screws from the roller tube spindles and save.
8. Slide the roller tube off the fabric.
If replacing the roller tube assembly, go to "Installing the Roller Tube Assembly" on page 6.
If replacing the spring assembly, go to "Replacing the Spring Assembly" on page 5.


