background image

34

EX

80 TOUCH

TROUBLESHOOTING, CARE AND MAINTENANCE

5.1 

General Instructions


WARNING


+

Do not make any improper changes to the equipment.


CAUTION


+

Damaged or worn components may affect your safety and the life of the equipment. 

Therefore, immediately replace damaged or worn components. In such a case, contact the 

contract partner. The equipment must not be used until it has been repaired. If necessary, 

use only original spare parts.


ATTENTION


+

In addition to the instructions and recommendations for maintenance and care given here, 

additional service and/or repair work may be necessary; this must only be carried out by 

authorised service technicians.

5.2 

Faults and Fault Diagnosis

The equipment undergoes regular quality controls during production. Nevertheless, faults or 

malfunctions may occur. Frequently, individual parts are responsible for these disturbances, an 

exchange is usually sufficient. Please refer to the following overview for the most common errors and 
how to correct them. If the equipment still does not function properly, contact your contract partner. 

Fault

Cause

Solution

Drive disks wobble/

make noises

Drive disk loose

Tighten nut (pay attention to left-hand / 

right-hand thread)

Display is blank/is not 

working

Loose cable connections

Check cable connections

Equipment wobbles

Equipment is not level

Align the feet

Creaking noises on 

the stepping area

Loose screws on stepping 

area

Tighten the screws on the stepping area

Creaking noises

Screw connections loosened 

or too tight

Check screw connections

Squeaking noises on 

the guide rails

Guide rails or rollers dirty or 

guide rails dry

Clean the guide rails and then lubricate 

them with a suitable lubricant

Stride length 

adjustment does not 

work

Batteries empty


+

Replace the batteries at the stride 

length adjustment


+

Contact your contract partner

Software problems

Software version not up to 

date


+

Check whether there is an update for 

the software (TFT) and carry it out.


+

If the problems persist, contact your 

contract partner.

Содержание CST-EX80-T-3

Страница 1: ...CSTEX80T 03 02 TF C M Crosstrainer EX80 TOUCH max 150 kg 90 Min 110 kg Assembly and Operating Instructions Art No CST EX80 T 3 L 159 W 85 H 163 ...

Страница 2: ...2 EX80 TOUCH ...

Страница 3: ...urg European VAT Number DE813211547 Disclaimer 2010 cardiostrong is a registered brand of the company Sport Tiedje GmbH All rights reserved Any use of this trademark without the explicit written permission of Sport Tiedje is prohibited Product and manual are subject to change Technical data can be changed without advance notice Intended Use The equipment may only be used for its intended purpose T...

Страница 4: ...y follow the instructions and that all parts are securely in place If required read through the instructions again to correct any mistakes Please pay close attention to the safety and maintenance instructions given here The contract partner cannot be held liable for damage to health accidents or damage to the equipment when it is not used in accordance with these instructions The following safety ...

Страница 5: ...rt Programme 26 3 4 2 Manual Programme 27 3 4 3 Pre Set Programmes 27 3 4 4 Watt Programme 28 3 4 5 Heart Rate Controlled Programmes 28 3 5 Recovery Function 29 3 6 Training Record 30 3 7 Multimedia and Software Updates 31 3 7 1 Retrieving Apps from the Main Menu 32 3 7 2 Access to Apps During Your Workout 32 4 STORAGE AND TRANSPORT 33 4 1 General Instructions 33 4 2 Transportation Wheels 33 5 TRO...

Страница 6: ...6 EX80 TOUCH 7 RECOMMENDED ACCESSORIES 37 8 ORDERING SPARE PARTS 38 8 1 Serial Number and Model Name 38 8 2 Parts List 39 8 3 Exploded Drawing 42 9 WARRANTY 44 10 CONTACT 46 ...

Страница 7: ...att at 100 RPM 158 734 W Load 1 to 16 User memory 4 Quick Start programmes 1 Manual programmes 3 Pre set programmes 60 Watt controlled programmes 1 Heart rate controlled programmes 4 Balance mass 12 kg Step width 11 cm Manually adjustable stride length 46 cm 51 cm 56 cm 61 cm 66 cm Weight and dimensions Article weight gross incl packaging approx 127 4 kg Article weight net without packaging approx...

Страница 8: ...is equipment may not be used by children under the age of 14 Children should not be allowed unsupervised access to the equipment Persons with disabilities must have a medical license and must be under strict observation when using the equipment The equipment is strictly for use by one person at a time Keep your hands feet and other body parts hair clothing jewellery and other objects well clear of...

Страница 9: ...ocket using the supplied mains cable Extension cables must conform toVDE guidelines Always completely unwind the mains cable The socket must be protected by a fuse with a minimum fuse rating of 16 A slow blow Do not make any changes to the mains cable or the mains plug Keep the mains cable away from water heat oil and sharp edges Do not route the mains cable underneath the equipment or under a car...

Страница 10: ...such that there is enough free space clearance to the front the rear and to the sides of the equipment The set up and mounting surface of the equipment should be flat loadable and solid ATTENTION The device may only be used in one building in sufficiently tempered and dry rooms ambient temperatures between 10 C and 35 C The equipment should not be used outdoors or in rooms with high humidity over ...

Страница 11: ...N Do not open the packaging when it is lying on its side Ensure to have sufficient room for movement in each direction during assembly The assembly of the equipment must be carried out by at least two adults If in doubt seek the help of a third technically skilled person ATTENTION To prevent damage to the equipment and the floor assemble the equipment on a mat or packaging board L NOTICE In order ...

Страница 12: ...check whether all parts and tools belonging to the device are included in the scope of delivery and whether damage has occurred In the event of complaints the contractual partner must be contacted directly CAUTION If parts of the scope of delivery are missing or damaged the assembly must not be carried out ...

Страница 13: ... of zooming in closer Please note that the Adobe Acrobat Reader programme must be installed on your end device in order to open the file Step 1 Unpacking 1 Place the box flat on the floor and remove the lid of the box L NOTICE If no box is existing continue with step 2 2 Remove the upper polysterene 1 and 2 3 Unpack handle bars E supporting tubes B and connection tubes C 4 Leave the main frame A a...

Страница 14: ...emove the two pre assembled screws F5 from the main frame A 2 Remove the two pre assembled screws F5 from the central supporting tube F1 3 Mount the central supporting tube F1 to the main frame A using the previously removed screws F5 4 Loosely tighten the screws ...

Страница 15: ...w A 2 Mount the right side connecting tube C2 along with the iron bracket F2 to the bottom of the main frame A using two screws J2 see view B L NOTICE Insert the polystyrene parts before setting up the fitness equipment if there was no box 3 Lift up the main frame A and set up the fitness equipment 4 Remove the polysterene see lower figure ...

Страница 16: ... screw P4 2 Mount the left connecting tube C1 to the iron bracket F2 on the bottom of the main frame A using two screws J2 3 Tighten all screws from the steps before 4 Remove the two pre assembled screws F6 from the central supporting tube F1 5 Mount the joint covers F3 F4 to the central supporting tube F1 using the previously removed screws F6 ...

Страница 17: ...g one screw J3 one washer J9 and one nut J4 see view C 2 Mount the right pedal supporting tube B2 to the bottom of the main frame A using one screw J5 one washer J9 and one nut J4 see view D 3 Completely tighten the screws and nuts one after the other see views C D and E 4 Repeat the steps for the left side View C View E View D ...

Страница 18: ...Handle Bars 1 Remove the three pre assembled screws J10 J11 from the left handle bar E1 see view F 2 Mount the left handle bar E1 to the main frame A using the previously removed screws J10 J11 3 Repeat the steps for the other side View F ...

Страница 19: ...e cable of the main frame A1 until you hear a click sound L NOTICE Do not remove the pre assembled screws 2 Loosen the two pre assembled screws J1 at the main frame A 3 Mount the console supporting tube D to the main frame A Hand tighten both pre assembled screws J1 and the other two screws J1 see view G 4 Mount the bottle holder H to the main frame A using two screws J6 5 Tighten all screws View ...

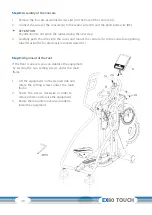
Страница 20: ...wires into the cover and mount the console G to the console supporting tube D using the for previously removed srews G1 Step 9 Alignment of the Feet If the floor is uneven you can stabilize the equipment by turning the two setting screws under the main frame 1 Lift the equipment on the desired side and rotate the setting screws under the main frame 2 Rotate the screws clockwise in order to remove ...

Страница 21: ...lied with sufficient power Technical errors can result 1 Plug the cable I into the socket on the main frame A 2 Plug the power plug into a wall outlet that complies with the instructions in the chapter on electrical safety L NOTICE The overload switch protects from short circuits The button jumps out in case of overload Turn the power switch off and then on again to restart the equipment ...

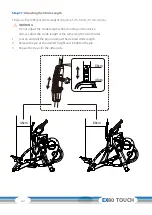
Страница 22: ...m 61 cm 56 cm 51 cm 46 cm WARNING Do not adjust the stride length while standing on the device Always adjust the stride length at the same length on both sides 1 Loosen and pull the pin and adjust the desired stride length 2 Release the pin at the desired height and retighten the pin 3 Repeat the steps for the other side ...

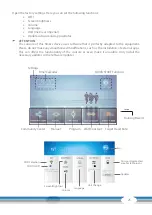
Страница 23: ...list 3 1 Console Display TIME Display range 0 00 99 59 Setting range 0 99 Minuten SPEED Display range 0 0 99 9 km ml RPM Display range 0 999 CALORIES Display range 0 999 Setting range 0 990 PULSE Display range 0 230 Setting range 0 230 WATT Display range 0 999 Setting range 10 400 LOAD Display range 1 16 Setting range 1 16 DISTANCE Anzeigebereich 0 99 9 Einstellbereich 0 99 0 USB Port 3 5 mm audio...

Страница 24: ...t the time in the row above Then set the current date in the second row 5 Now connect the device to your Wi Fi by returning to the settings and tapping Wi Fi to connect to your network L NOTICE If you receive the message Connected no Internet although you are successfully connected to the Internet this is no cause for concern This is a translation issue and you should still be connected to the Int...

Страница 25: ...en brightness Volume Language Unit metric or imperial Update software and app updates ATTENTION The console of this fitness device uses software that is perfectly adapted to the equipment Please do not make any unauthorised modifications such as the installation of external apps This can affect the functionality of the console or even make it unusable Only install the necessary updates in the Soft...

Страница 26: ...your data for age height weight and gender for each programme The memory function is only available with the user profiles U1 U4 With the user profiles U1 U4 the set data is saved and must not be re entered 3 4 1 Quick Start Programme 1 To start the quick start programme tap quick start in the main menu or press the quick start button The programme starts 2 To increase or decrease resistance tap t...

Страница 27: ...tance tap the arrows 6 To pause the programme tap pause 7 To resume the programme tap continue 8 To end the programm and return to the main menu tap home 3 4 3 Pre Set Programmes 1 To select the profile programmes tap Program in the main menu 2 Select one of the user profiles U0 U4 3 Select one of the 60 profile programmes 4 Set the desired training time 5 To start the programme tap start The prog...

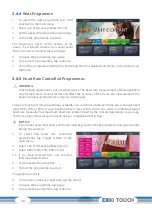
Страница 28: ...rement The heart rate measurement serves only as a training aid There are four heart rate programmes available You can choose between three pre set target heart rates 55 75 or 90 of your maximum heart rate or TAG where you enter an individual target heart rate manually Your maximum heart rate is determined by the console depending on your age For these programmes we recommend using a compatible ch...

Страница 29: ... recovery function to test your recovery heart rate and thus your fitness level 1 To test your recovery heart rate tap recovery after training 2 Grasp the hand pulse sensors with both hands After 60 seconds your result will be displayed as a score F1 F6 where F1 is the best and F6 is the worst result Exercise regularly to improve your fitness and recovery heart rate ...

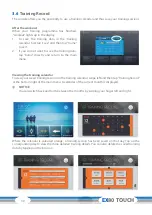
Страница 30: ...ome directly and return to the main menu Viewing the training calendar To view your saved training sessions in the training calendar swipe left and then tap Training Record at the bottom right of the main menu A calendar of the current month is displayed L NOTICE You can switch back and forth between the months by swiping your finger left and right Where the calendar is coloured orange a training ...

Страница 31: ...pps as their proper functionality can not be guaranteed The installation of other apps might cause technical issues L NOTICE The pre installed apps are produced and provided by external manufacturers Changes and availability within these apps might occur Sport Tiedje does not take any responsibility and can not be held liable for the availability functionality or contents of these apps When the co...

Страница 32: ...cess to apps during the training is only possible within the manual programme or one of the profile programmes 1 Start a desired programme 2 To use an app during your workout pause the programme for a moment and tap the desired app at the top of the screen 3 Tap Continue and the app will open L NOTICE It may take a moment for the app to open 4 To continue your workout tap the arrow on the left sid...

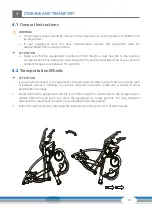
Страница 33: ...nd have a constant ambient temperature between 5 C and 45 C 4 2 Transportation Wheels ATTENTION If you want to transport your equipment over particularly sensitive and soft floor coverings such as parquet planks or laminate lay out the transport route with cardboard or similar to avoid possible floor damage 1 Stand behind the equipment and lift it until the weight is transferred to the transportat...

Страница 34: ... Please refer to the following overview for the most common errors and how to correct them If the equipment still does not function properly contact your contract partner Fault Cause Solution Drive disks wobble make noises Drive disk loose Tighten nut pay attention to left hand right hand thread Display is blank is not working Loose cable connections Check cable connections Equipment wobbles Equip...

Страница 35: ...rap defective or battery empty Pulse display defective Eliminate sources of interference e g mobile phone WLAN lawn mower and vacuum cleaner robot etc Use a suitable chest strap see RECOMMENDED ACCESSORIES Reposition chest strap and or moisten electrodes Changing batteries Check if pulse display by hand pulse possible ...

Страница 36: ...intenance of a crosstrainer opens on YouTube The video serves to illustrate the maintenance points described in this manual Please note that the video may not be available in your language or with appropriate subtitles If you cannot scan QR codes you can access all Sport Tiedje videos on YouTube by first opening YouTube and entering Sport Tiedje in the search field 6 DISPOSAL At the end of its ope...

Страница 37: ...d that you use a compatible chest strap as this ensures optimum transmission of the heart rate Our range of accessories offers the highest quality and makes training even better If you would like to find out more about compatible accessories please go to the detail page of the product in our webshop the easiest way is to enter the article number in the search field above and go to the recommended ...

Страница 38: ...list ready The corresponding contact options can be found in chapter 10 of this operating manual L NOTICE The serial number of your equipment is unique It s located on a white sticker The exact position of this sticker is shown in the following illustration Enter the serial number in the appropriate field Serial number Brand Category cardiostrong crosstrainer Model Name EX80 Touch Article Number C...

Страница 39: ...Nut 1 A29 Belt 1372J 1 A30 Crank 2 A31 Flat Key 2 A32 Screw 2 A33 Turing Plate 2 A34 Pressing Pipe 1 A35 Bearing 6003Zz 2 A36 C Clip 1 A37 Nut M12 3 A38 Washer M12 4 A39 Axle 1 A40 Bearing 6001Mrb 2 A41 Bush 1 A42 Flywheel 1 A43 Flywheel Cover 2 A44 Screw M4 X 16 6 A45 Magnetic Housing 1 A47 Washer M8 1 A48 Nut M8 1 A49 Screw M5 X 10 4 A50 Front Pedal Supporting Tube 2 A51 Magnetic 4 A52 ScrewM5X8...

Страница 40: ... A97 Small Chain Cover R 1 A98 Screw 5 32 3 4 12 A99 Screw 5 35 1 2 12 A100 C Clip R40 2 A101 End cap 1 A102 End cap 1 A103 Magnetic housing 2 A104 Magnetic housing 2 A105 Tension cable 1 B1 Pedal Supporting Tube L 1 B2 Pedal Supporting Tube R 1 B3 Pedal Housing L 2 B4 Pedal Housing R 2 B5 Lower Pedal Supporting Tube 2 B6 Screw M12 X 109 2 B7 Washer M12 4 B8 Nut M12 4 B9 Pedal Bracket L 1 B10 Peda...

Страница 41: ...ng 2 D9 Foam Spacer Ring 2 D10 Spong Hdr 2 D11 Spong Hdr 2 D12 ScrewM3X8 4 D13 EndCap 2 E1 Handle Bar L 1 E2 Handle Bar R 1 F1 Central Supporting Tube 1 F2 Iron Bracket 1 F3 CentralSupportingTubeCover L 1 F4 CentralSupportingTubeCover R 1 F5 Screw 4 F6 Screw 2 G Console 1 G1 Screw 4 H Water Bottle Holder 1 J1 Screw M8 X 16 4 J2 Screw M8 X 60 4 J3 Bolt M12 X 73 2 J4 Nut M12 4 J5 Bolt M12 X 109 2 J6...

Страница 42: ...42 EX80 TOUCH 8 3 Exploded Drawing ...

Страница 43: ...43 ...

Страница 44: ...our web shop begin on delivery of the fitness equipment The respective warranty periods for your equipment can be found on its product website Repair Costs According to our choice there will either be a repair a replacement of individual damaged parts or a complete replacement Spare parts that have to be mounted while assembling the equipment have to be replaced by the warrantee personally and are...

Страница 45: ... control you will need to give the serial number of your equipment when contacting the service team Where possible please have your serial number and your customer number ready when you call our service hotline It will help us to deal with your request swiftly If you cannot find the serial number on your fitness equipment our service team is at your disposal to offer further information Service ou...

Страница 46: ...s trouverez les heures d ouverture sur notre site Internet UK NL INT CUSTOMER CARE TECHNISCHE DIENST SERVICE TECHNICAL SUPPORT SERVICE 44 141 737 2249 customercare powerhouse fitness co uk You can find the opening hours on our homepage 31 172 619961 info fitshop nl De openingstijden vindt u op onze homepage 49 4621 4210 944 service int sport tiedje de You can find the opening hours on our homepage...

Страница 47: ...ompanies and physio practices with professional equipment for endurance and strength training Sport Tiedje offers a wide range of fitness equipment from renowned manufacturers high quality in house developments and comprehensive services such as a build up service and sports scientific advice before and after the purchase The company employs numerous sports scientists fitness trainers and competit...

Страница 48: ...48 EX80 TOUCH Notes ...

Страница 49: ...49 Notes ...

Страница 50: ...50 EX80 TOUCH Notes ...

Страница 51: ...51 ...

Страница 52: ...Crosstrainer EX80 TOUCH ...

Отзывы: